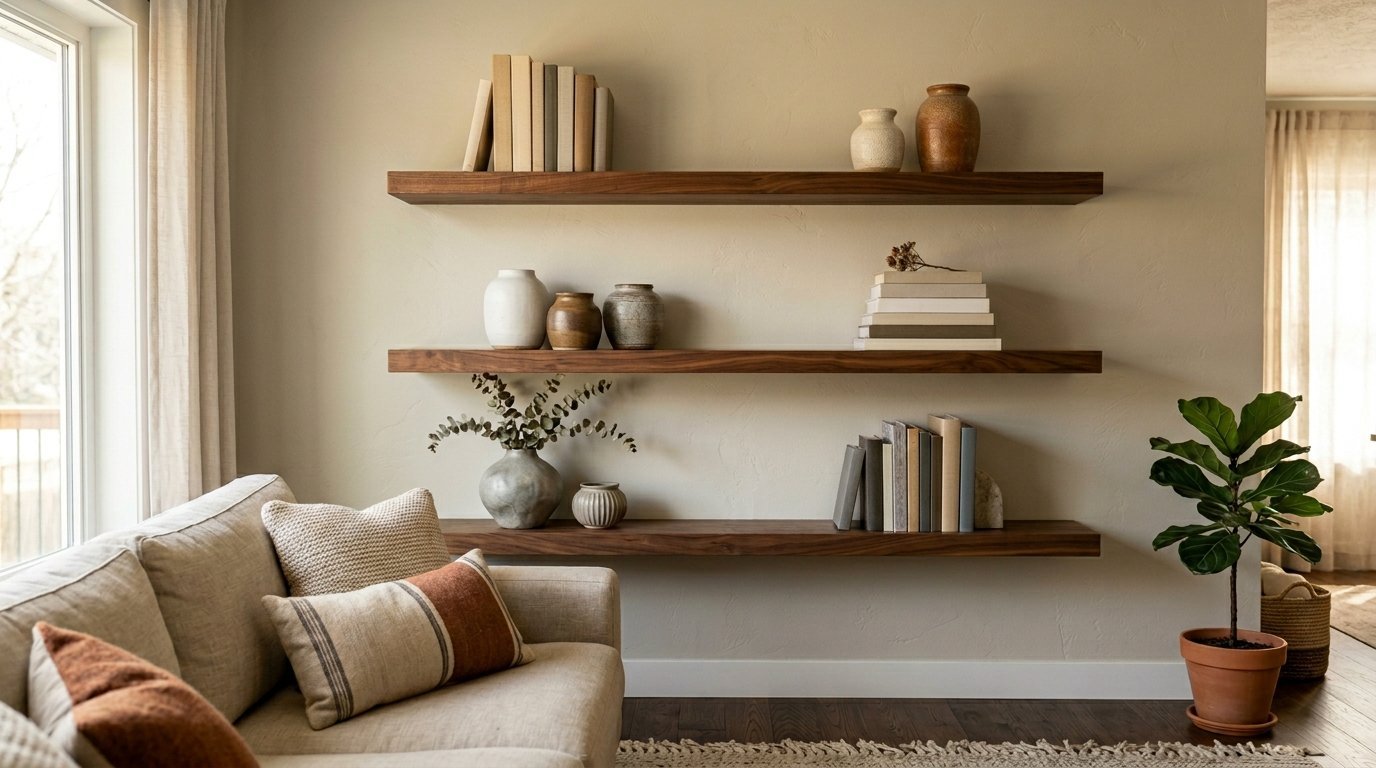
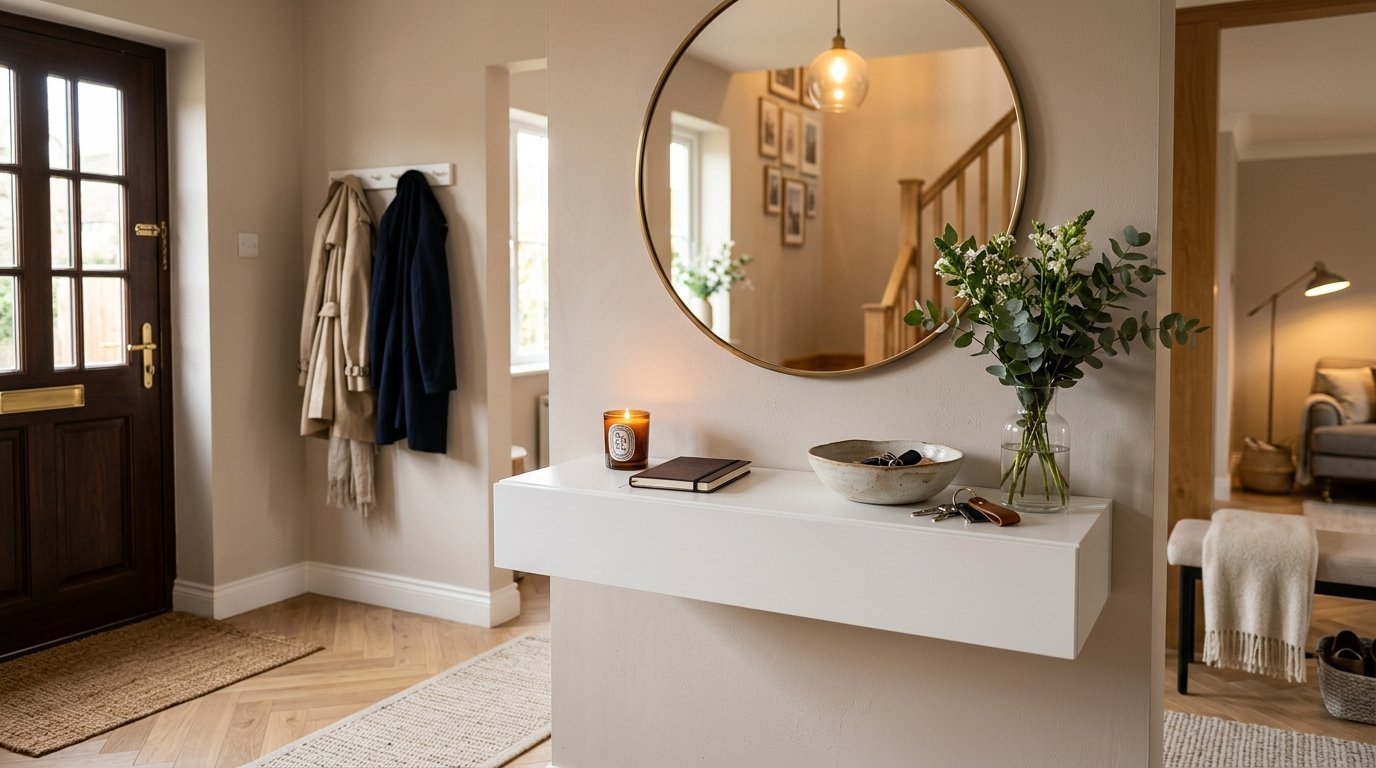
You stand back to admire your new shelf. You place a stack of books on the fresh pine wood. Suddenly the front edge tilts forward. The hardware pulls away from the drywall. Dust falls on the floor. I have been there. I once watched an expensive piece of oak rip right out of my living room wall. My tools were everywhere. The hardware failed completely. You feel terrible when a weekend project ruins your paint and plaster. Getting a piece of wood to sit perfectly flat against the wall takes exact steps. Most people skip the hidden details. We will fix that right now.
You will get exact steps for attaching heavy wood to any wall material. I will walk you through bracket selection and hardware weight limits. You will see exact costs and timelines. We cover everything from a sleek Tv Unit Design to simple Bathroom Organization. You will save money by avoiding costly drywall repairs. A complete floating shelf installation usually takes about forty five minutes. Proper hardware costs under twenty dollars. My preferred toggle anchors cost around twelve dollars per pack. I will show you exact mistakes to avoid. I will share my personal failures so you skip them entirely.
1. Trusting Basic Plastic Wall Anchors
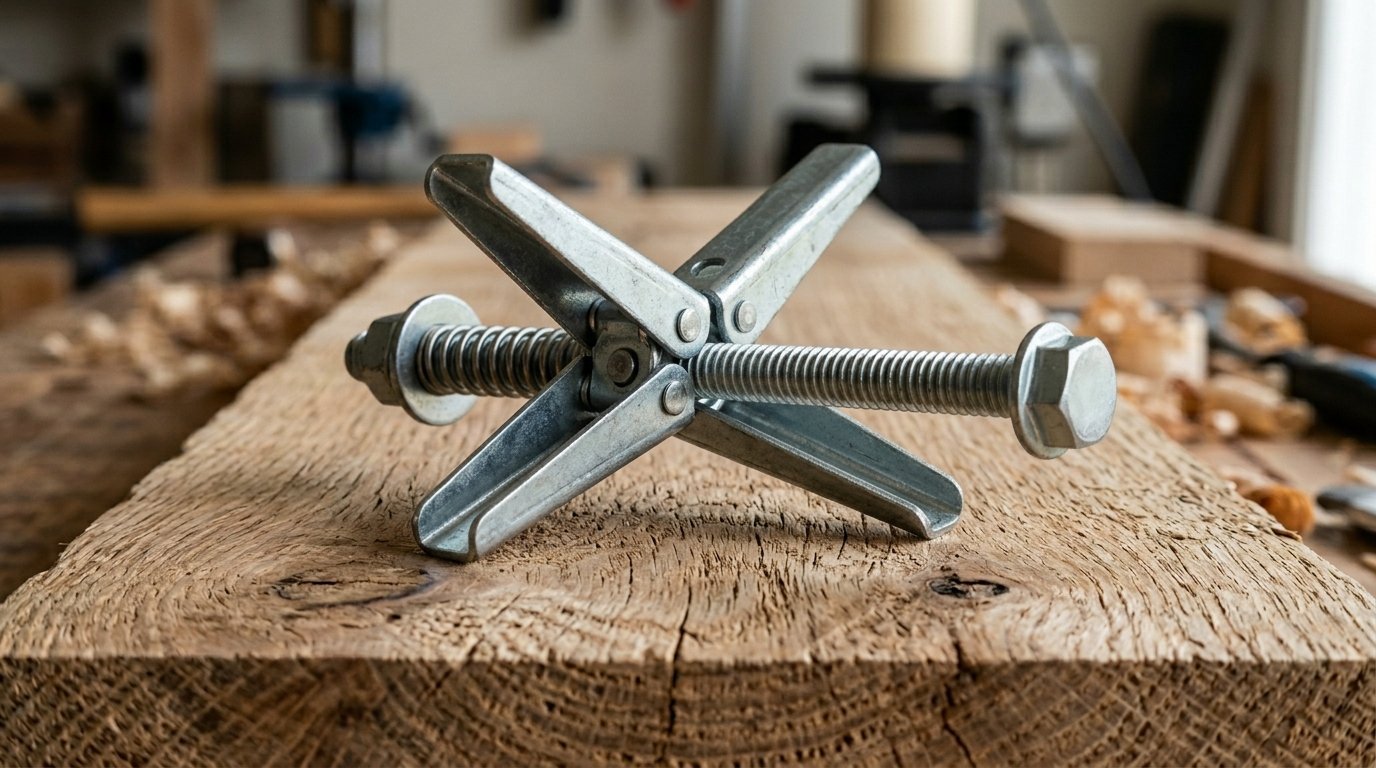
Most people grab the cheap plastic plugs that come in the box. Those plugs pull right out under stress. A thick slab of walnut weighs ten pounds before you put anything on it. Plastic friction anchors just slip. I tested this last November. I hung a heavy floating pine board using standard plastic plugs. The whole thing fell in two days.
The fix requires heavy duty hardware. I strictly use TOGGLER SnapSkru anchors for medium loads. They cost about fourteen dollars for a box of fifty. They grab the drywall from behind. The hold is incredible. For serious weight I switch to toggle bolts. A standard toggle bolt holds fifty pounds in half inch drywall.
Woodworking requires solid foundations. Never trust friction alone. You must create a mechanical lock behind the drywall. Drill a clean hole first. Push the metal toggle through the gap. Pull it tight against the back side. The metal grips the plaster like a vise. Your heavy books are safe now.
Let me share a quick case study. A client in Chicago wanted thick oak shelves for her kitchen. We avoided all plastic hardware. We used quarter inch toggle bolts every sixteen inches. The total hardware bill was eighteen dollars. Those boards now hold stacks of ceramic plates perfectly level.
Heavy items require metal fasteners. Stop using the free hardware. Buy professional grade anchors at the hardware store. The extra ten dollars buys total peace of mind. Your walls will stay intact. Your dishes will stay safe. Your room styling will last for decades.
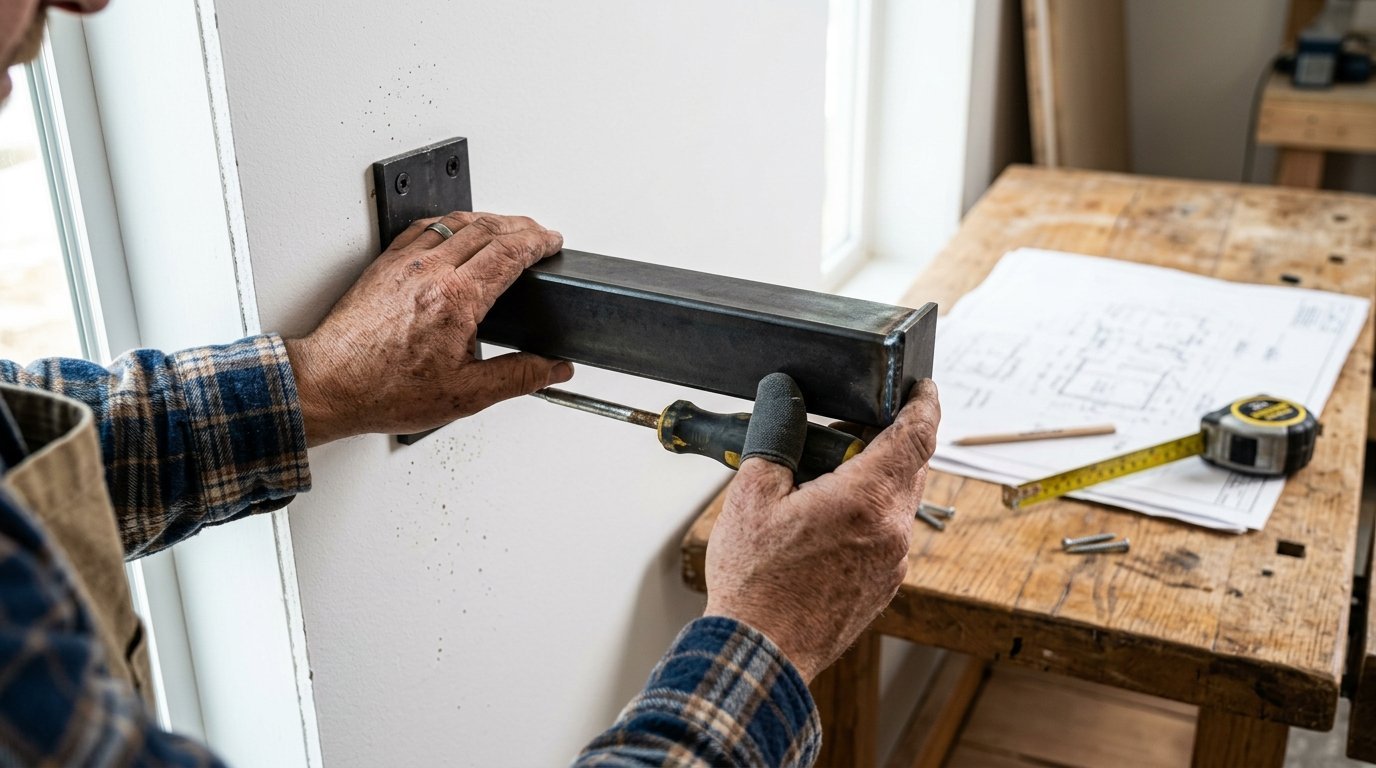
2. Missing the Hidden Wall Studs
Drywall anchors are great for light items. Heavy Wood Projects demand solid framing. You must hit the studs. People often guess where the wood framing hides. They tap on the wall and hope for the best. I have drilled empty holes based on a hollow sound. It wastes time. It ruins your paint job.
You need a reliable stud finder. I rely entirely on the Franklin Sensors ProSensor 710. It costs roughly fifty dollars. It shows the exact edges of the stud instantly. Cheap magnetic finders trick you. They find random screws instead of the solid center.
A typical stud is only one and a half inches wide. You must hit the dead center for maximum grip. If you catch the edge the screw will tear out. Mark your center line carefully. Use a sharp pencil. Drill a pilot hole first. I use a Bosch titanium drill bit for this step. It tracks straight without wandering.
A local bakery hired me to hang maple display racks. They held twenty pounds of flour each. We skipped drywall entirely. We mapped every stud across ten feet of wall space. We sank three inch lag screws directly into the framing. The installation took two hours. The racks never moved a millimeter.
Hitting the framing takes extra planning. You might need to adjust your shelf placement slightly. Moving the shelf one inch left or right makes a massive difference. The wood framing handles hundreds of pounds easily. Drywall crumbles under a fraction of that load. Take the time to find the solid wood.
3. Selecting Flimsy Hardware Brackets
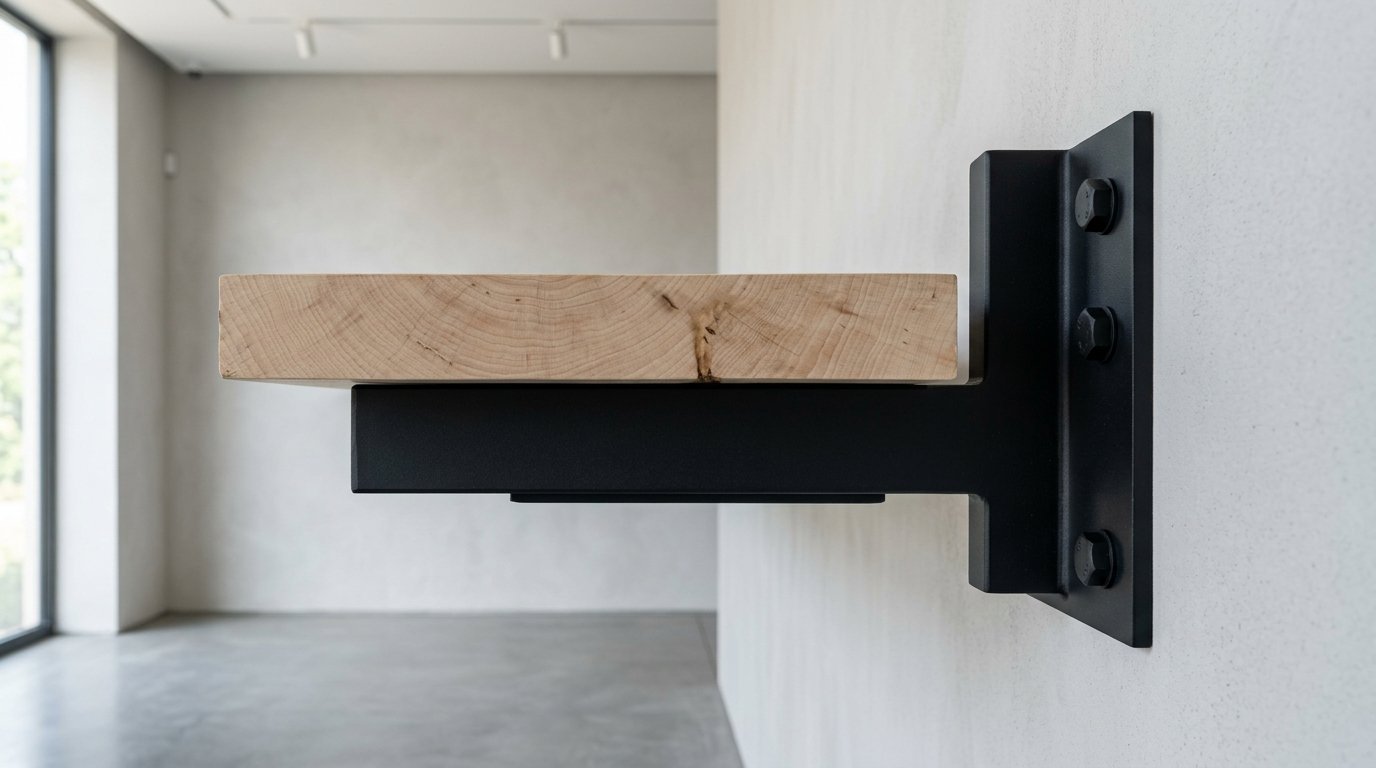
People buy beautiful slabs of hardwood. Then they buy cheap metal brackets from big box stores. The metal flexes under tension. The shelf tilts forward immediately. A deep board acts like a lever. It multiplies the pulling force against the wall.
I see this happen in Tv Unit Design planning all the time. Someone mounts a shallow bracket for a twelve inch deep console. The television weight pulls the hardware down. The geometry is completely wrong. You must match the bracket length to the wood depth.
The metal rod should reach at least two thirds into the wood. I always buy heavy duty hidden brackets from Rockler. They run about thirty dollars each. The steel is a quarter inch thick. It never bends. Knape and Vogt also makes incredible heavy duty hardware.
My brother tried to save twenty dollars on hardware last year. He bought thin rods from a discount site for his home office. The metal bowed downward instantly. We had to take everything down. We patched the holes. We bought the thick Rockler rods. The second attempt worked perfectly. Never cut your budget on structural steel.
Good hardware features welded joints. Check the back plate before buying. A welded back plate resists bending. A cheap stamped metal plate will warp. Spend the extra money on professional grade steel. Your heavy displays will sit perfectly flat forever.
4. Rushing the Critical Leveling Step
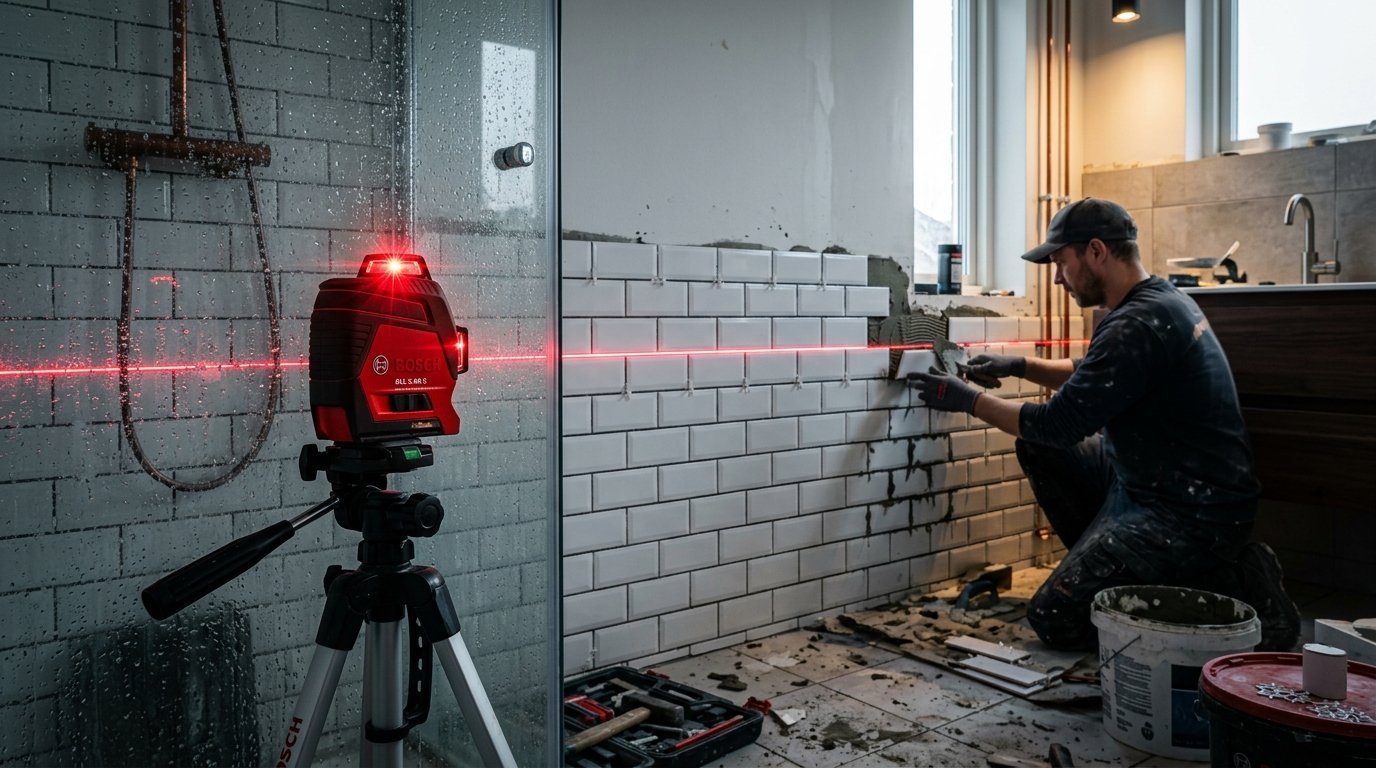
Gravity exposes every tiny error. A shelf that looks straight to your eye will slope wildly once loaded. Round objects will literally roll off the edge. This ruins any Diy Wall Decor setup. People hold the wood against the wall and draw a quick line.
This habit guarantees failure. You must level the mounting plate independently. I use a Johnson two foot aluminum level. A standard bubble level costs twenty dollars. Place it directly on the steel bracket before marking your holes.
Do not drill all holes at once. Drill one side first. Tighten that single screw snugly but not tight. Now place your level across the bracket again. Pivot the hardware until the bubble hits dead center. Mark your remaining holes now. This sequence guarantees perfection.
A recent bathroom remodel taught me this lesson deeply. Bathroom Organization demands precision. The grout lines in tile trick your eyes. I aligned a glass shelf visually with the wall tile. The tile itself was crooked. The shelf sloped terribly. I bought a DeWalt laser level for ninety dollars the next day. A laser line never lies.
Houses settle over time. Floors slope gently. Ceilings sag slightly. Never measure down from the ceiling to set your height. The ceiling is almost certainly crooked. Always rely on a dedicated bubble or laser level. Gravity is the only true reference line.
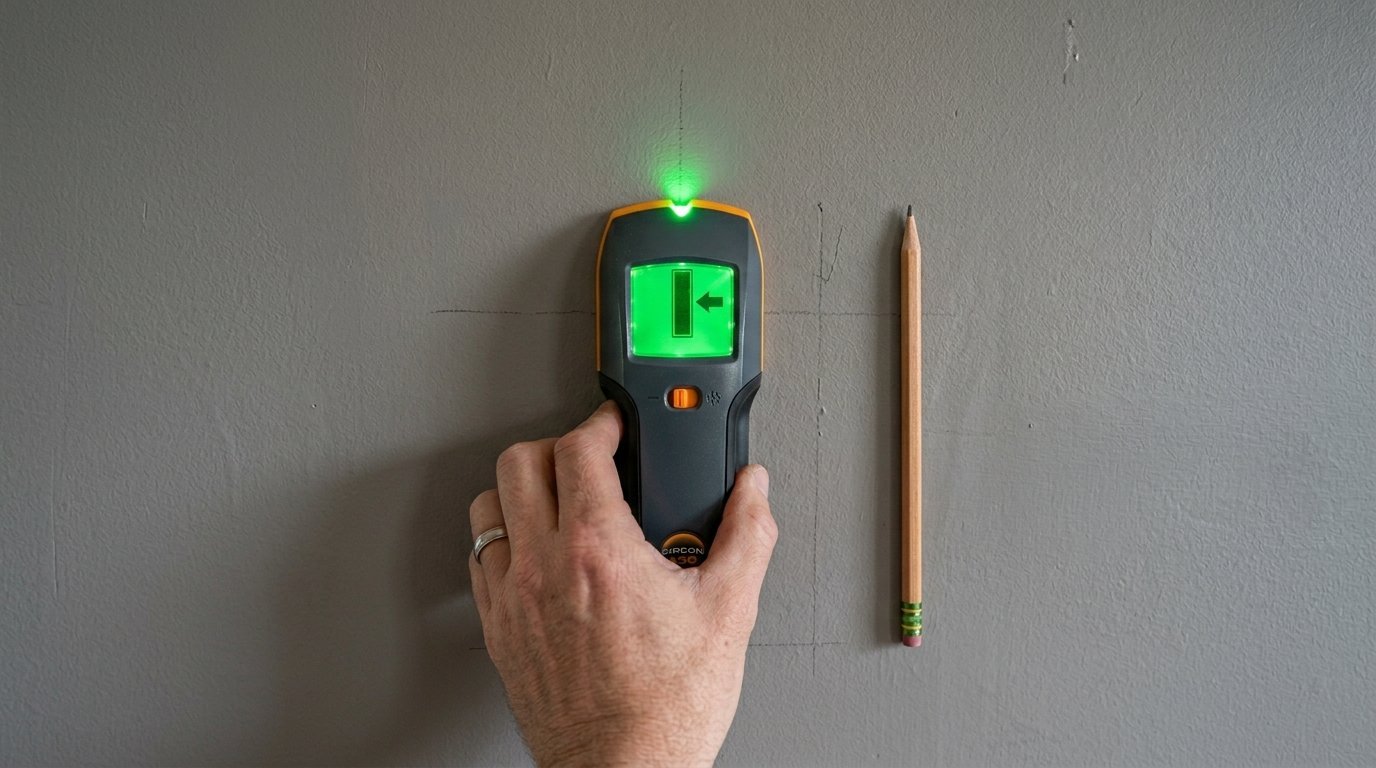
5. Drilling Sloppy Holes
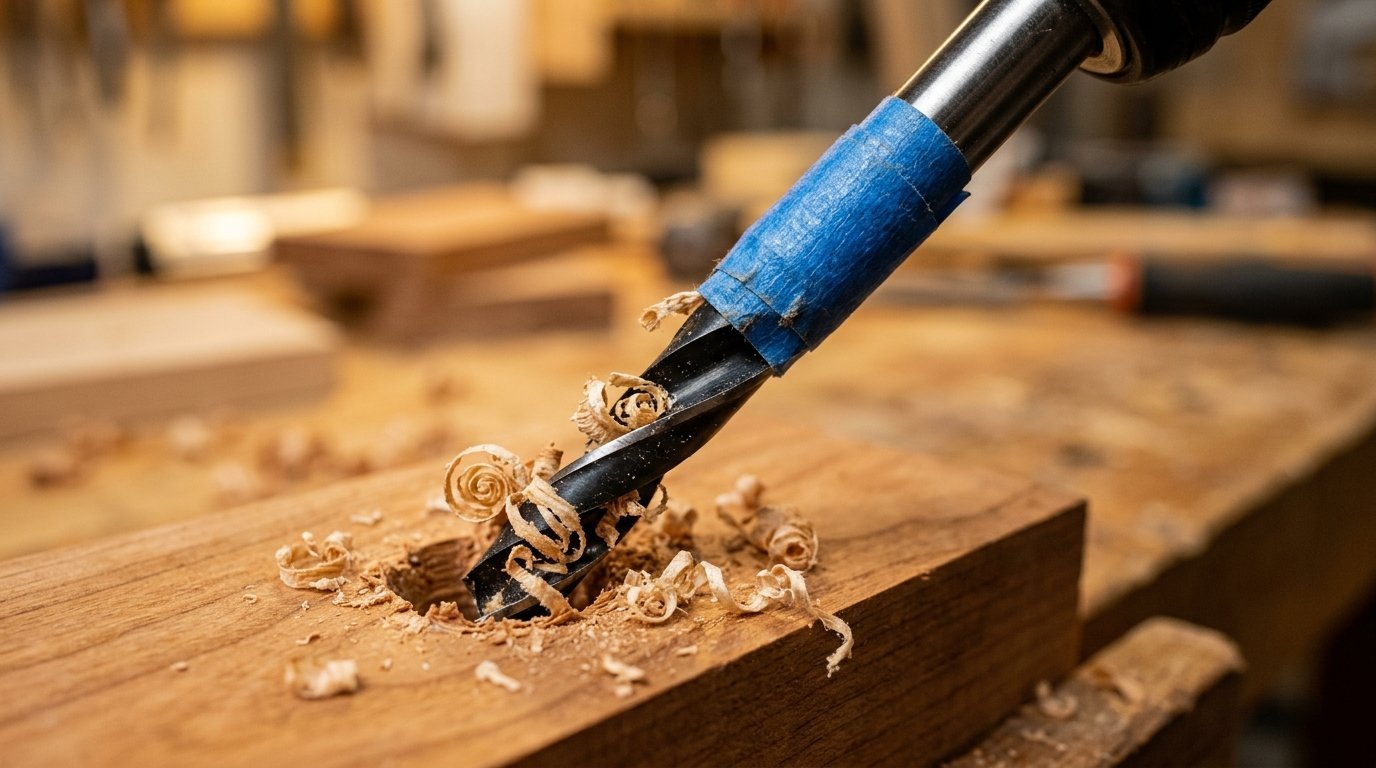
A tight hole keeps the hardware locked. A sloppy hole ruins the grip completely. Most people push the drill hard into the plaster. The bit wobbles. The hole becomes oval shaped. The anchor spins freely without catching.
You must control the drill speed perfectly. I set my Ryobi drill to the lowest speed setting. Start spinning the bit before touching the wall. Let the sharp tip cut the paper cleanly. Push gently and let the tool do the work.
Woodworking requires precise hole depths too. When drilling into the back of your shelf use a stop collar. A drill stop prevents you from poking through the front edge. I buy brass stop collars from Woodpeckers. They lock onto the bit tightly.
Keep your drill perfectly horizontal. Follow these exact steps for the best hole:
- Mark the wall with a pencil.
- Set your drill to low speed.
- Hold the drill completely straight.
- Let the bit cut the paper slowly.
I ruined a beautiful piece of cherry wood three years ago. I pushed a paddle bit too hard. It punched right through the decorative face. I lost sixty dollars in lumber in one second. Now I wrap blue painter tape around my drill bit. The tape shows me exactly when to stop pushing. Precision requires patience.
A slanted hole pushes the anchor sideways. The bracket will not sit flat against the paint. I sometimes place a small block of wood next to my drill bit. The block acts as a ninety degree visual guide. It keeps my hands steady during the whole job.
6. Leaving the Wood Unsecured
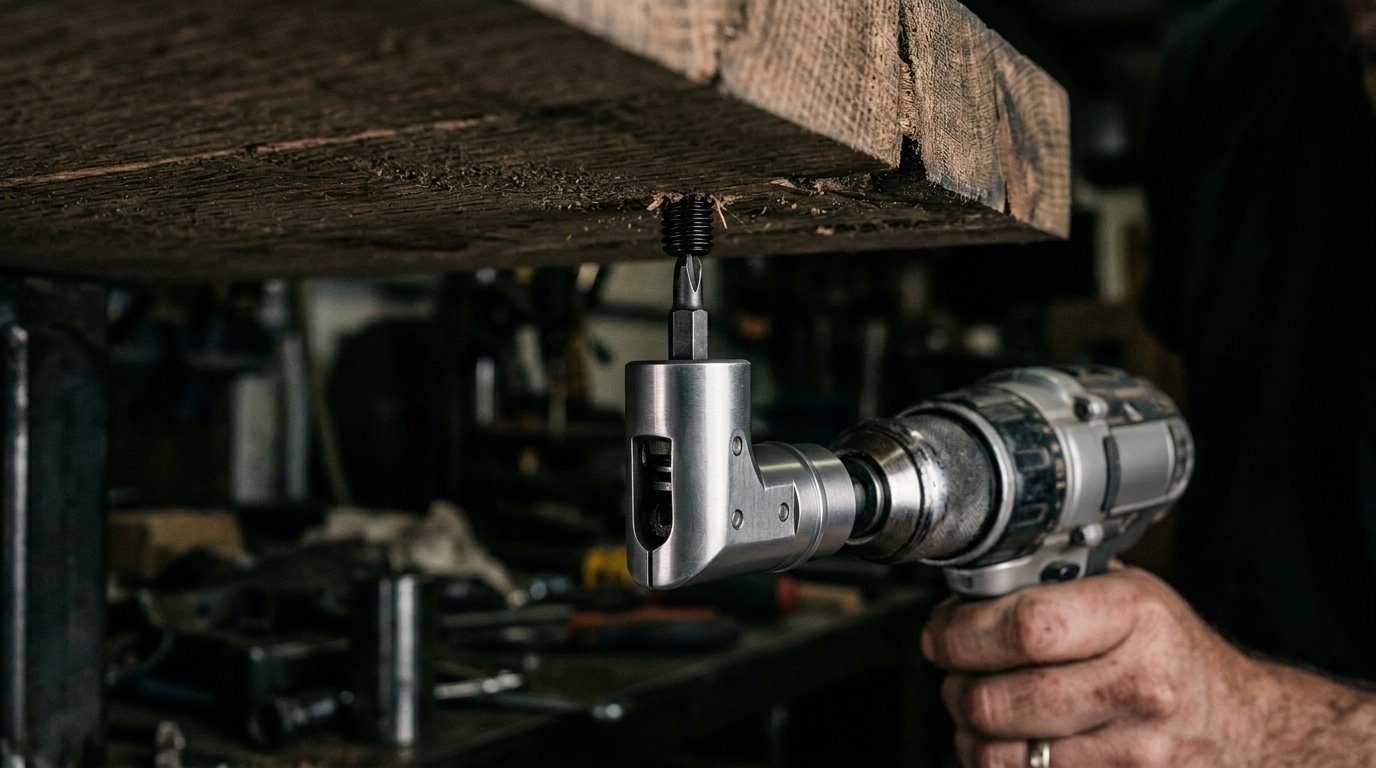
You mounted the bracket perfectly. You slid the wood onto the steel rods. You step back and call the job finished. This is a massive safety hazard. The shelf will slowly slide forward over time. Vibrations from doors closing push the wood off the hardware.
You must lock the wood to the steel. Most quality brackets include a set screw. This small screw threads up from the bottom. It bites into the steel rod. It prevents any forward movement entirely.
People skip this because they lack the right tools. The gap is often too tight for a standard screwdriver. I keep a Makita right angle adapter in my toolbox. It fits into two inch spaces easily. It costs roughly thirty dollars.
A client called me panicking last spring. Her cat jumped onto a floating ledge. The entire wooden slab slid off the metal posts. The cat was fine but the floor took a dent. I went over and drilled locking screws through the bottom face. We locked the wood mechanically. Always complete this final step.
Silicone adhesive offers another option. Put a small dab of construction adhesive inside the wooden holes. Slide the wood onto the steel rods. The glue cures overnight. The wood will never move again. The downside is permanent attachment. I prefer set screws for easy removal later.
Frequently Asked Questions

How much weight can a floating shelf actually hold?
A properly mounted bracket holds fifty pounds easily. You must attach it directly to the wall studs. Heavy duty brackets from professional brands handle up to one hundred pounds. Drywall anchors max out around thirty pounds. The depth of the wood also changes the weight capacity dramatically. A deeper board holds less weight due to leverage.
What is the best wood for open shelving?
White oak provides the best strength and beauty. It stays perfectly straight over time. Walnut looks gorgeous but costs more money. Pine is very cheap and lightweight. Pine tends to warp if the room gets humid. Maple offers a smooth finish for painting. Hardwoods hold the mounting hardware much better than softwoods.
Can you mount heavy shelves on metal studs?
Yes. You must use specialized hardware for this job. Standard wood screws strip out the thin metal instantly. I use toggle bolts exclusively for metal studs. The metal wings pop open behind the steel stud. This creates a massive anchor point. The job takes longer but provides incredible strength.
How deep should the hardware go into the wood?
The metal rod needs to reach two thirds of the total depth. If your board is twelve inches deep the rod must be eight inches long. Shorter rods allow the wood to flex. The front edge will droop under a heavy load. Always buy hardware that matches your specific dimensions perfectly.
Do French cleats work for floating designs?
French cleats offer massive strength. They are great for heavy cabinets. They do not work well for thin boards. The cleat mechanism requires a thick back profile. The wood must hide the angled cuts. Steel post brackets work much better for a minimalist look. Save the cleats for bulky wooden boxes.
How do you fix a stripped drywall anchor hole?
Remove the loose plastic anchor completely. Do not try to stuff a bigger screw into it. Buy a toggle bolt instead. The toggle bolt requires a half inch hole anyway. You can use the stripped hole as a starting point. Drill it out cleanly and insert the toggle wings. The problem disappears instantly.
What drill bit size do you need for toggle bolts?
A standard quarter inch toggle bolt requires a half inch drill bit. You need a large hole to push the folded metal wings through. This scares many beginners. The large hole is completely normal. The wide metal washer on the bracket covers the hole completely. You will never see the gap once finished.
Is pine wood too soft for heavy displays?
Pine holds up fine for basic display items. It will dent if you drop heavy metal objects on it. The mounting holes can compress over time. This makes the shelf feel slightly loose. I prefer hardwoods for serious loads. If you use pine make sure the steel rods fit extremely tight.
How far apart should shelf brackets be placed?
Place a bracket every sixteen inches. This spacing perfectly matches standard wall studs in American homes. You can span up to twenty four inches with very thick wood. Do not exceed two feet between supports. The wood will begin to sag in the middle. The sag becomes permanent after a few months.
Can you install floating shelves on tile walls?
Yes you absolutely can. You need a diamond tipped drill bit to cut the tile. Regular bits will crack the ceramic immediately. Keep the bit wet with a spray bottle while drilling. Once you pass through the tile you drill the wall normally. Fasten the hardware tightly against the flat tile surface.
How do you hide the set screw underneath?
Use a countersink bit before driving the screw. This creates a small divot in the wood. The screw head sits below the surface of the wood. You can cover the hole with a matching wood plug. A tiny dab of wood filler also works perfectly. Sand it flush and touch up the finish.
Are magnetic stud finders better than electronic ones?
I strongly prefer electronic sensors. Magnetic finders only locate the metal drywall screws. The screw might be off center. The screw tells you nothing about stud width. Electronic sensors read the actual density of the wall. They show you the left and right edges perfectly. The extra money buys true accuracy.
How much does custom shelving hardware cost?
A high quality heavy duty bracket costs thirty to fifty dollars. Cheap thin metal versions cost fifteen dollars. Do not buy the cheap versions. You will replace them in six months. A ruined wall costs hundreds of dollars to fix. Buy the expensive hardware once and enjoy a perfect floating shelf installation forever.
Can you glue the shelf to the bracket?
Yes. Construction adhesive works incredibly well. Squirt a small amount into the drilled holes in the wood. Slide the wood onto the metal posts. The glue hardens into a permanent bond. The wood will never rattle or slide. You will have to destroy the wood to remove it later.
What happens if the wall is not perfectly flat?
Most walls have gentle waves in the plaster. A long flat bracket will rock back and forth. You must fill the gaps behind the steel. I use small metal washers as spacers. Slip a washer over the screw behind the bracket. This creates a solid resting point without bending the hardware.
Wrapping Up
You now have the exact blueprint for a flawless floating shelf installation. A sagging board ruins the entire aesthetic of a room. Solid mounts give you total confidence in your home styling. Gather your tools and pick up those heavy duty brackets today. Your walls are ready for an upgrade. What room are you planning to tackle first?

Anya Castellan is the Founder and Editor-in-Chief of Home Wall Trends. An art history graduate of the Rhode Island School of Design with twelve years of experience writing for leading American design publications, she specializes in composition, gallery wall theory, and the quiet architecture of domestic space. A former contributing editor at Architectural Digest and guest lecturer at Parsons School of Design, Anya personally reads and signs off on every piece before it is published.