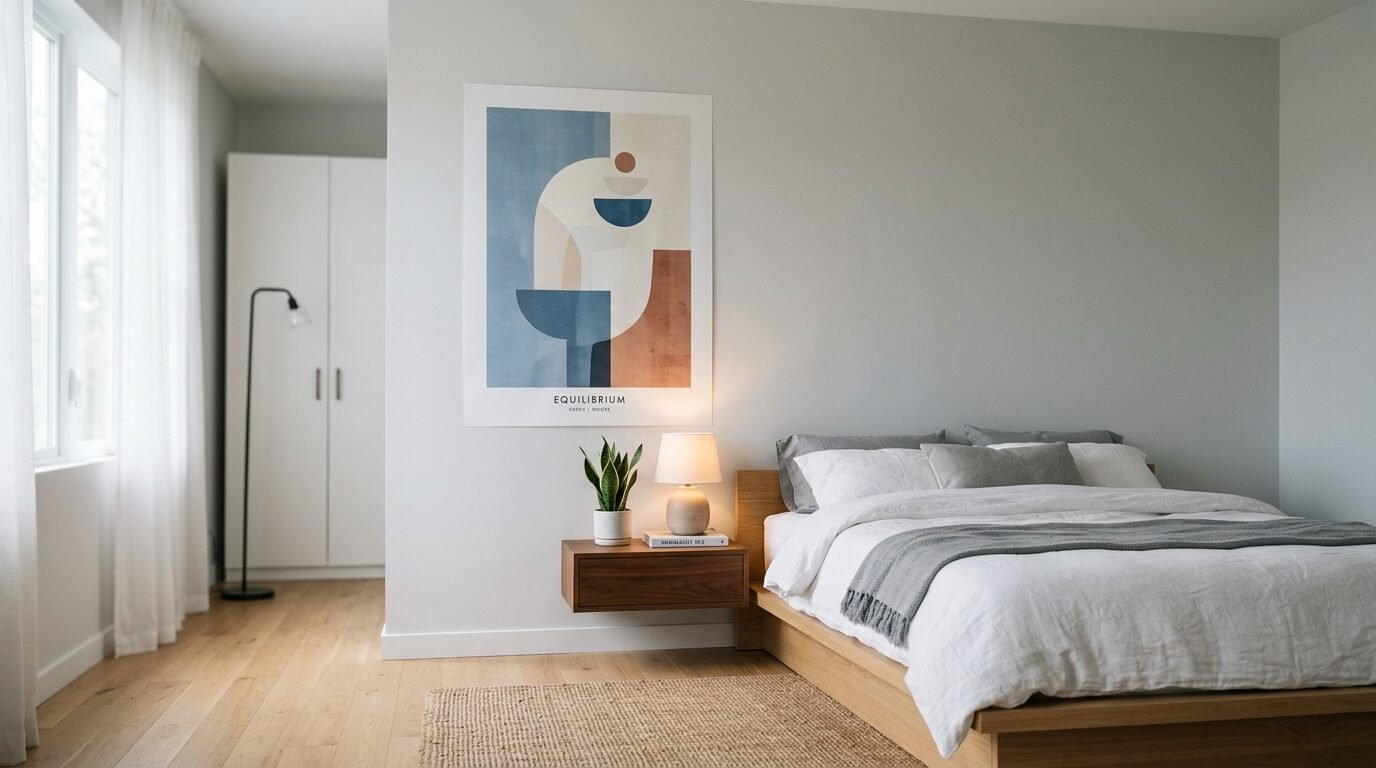
Expensive frames often stop people from decorating. You find a beautiful Professional Poster online. You print it out. Then you realize the frame costs three times more than the art. I have been there many times. In my first tiny apartment, I had zero budget for custom framing. I had to get creative with my Poster Display. I started experimenting with everyday items. I found that frameless art often looks more modern and relaxed. It feels personal and approachable. This guide shows you exactly how to hang art using simple tools. These methods work for renters, students, or anyone who loves a DIY look. You will learn how to turn a Large Poster into a focal point without spending a fortune.
Quick Executive Summary
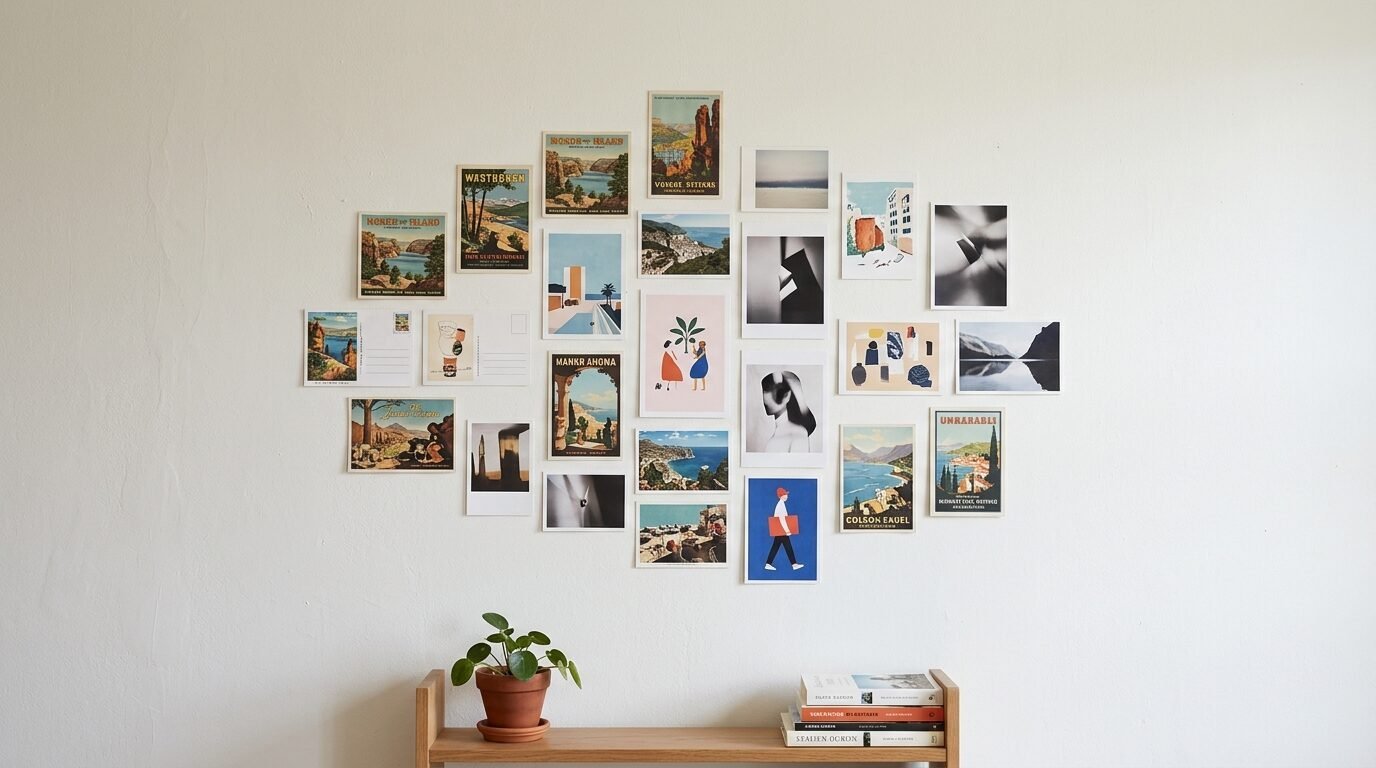
Displaying art without frames is a smart way to save money. It allows you to change your decor whenever you feel like it. You can use items like magnetic hangers, colorful washi tape, or even simple clipboards. These methods are perfect for filling wall space quickly. In my experience, these ideas work best for a Unique Poster that has a handmade or vintage feel. You will see how to use Command Strips for a clean look or binder clips for an industrial vibe. Most of these projects take less than ten minutes. They require very few tools. You can create a high-end look on a thrift store budget. This post covers fifteen distinct methods. Each one includes pros and cons and specific steps to follow.
1. Use Magnetic Wood Hanger Bars
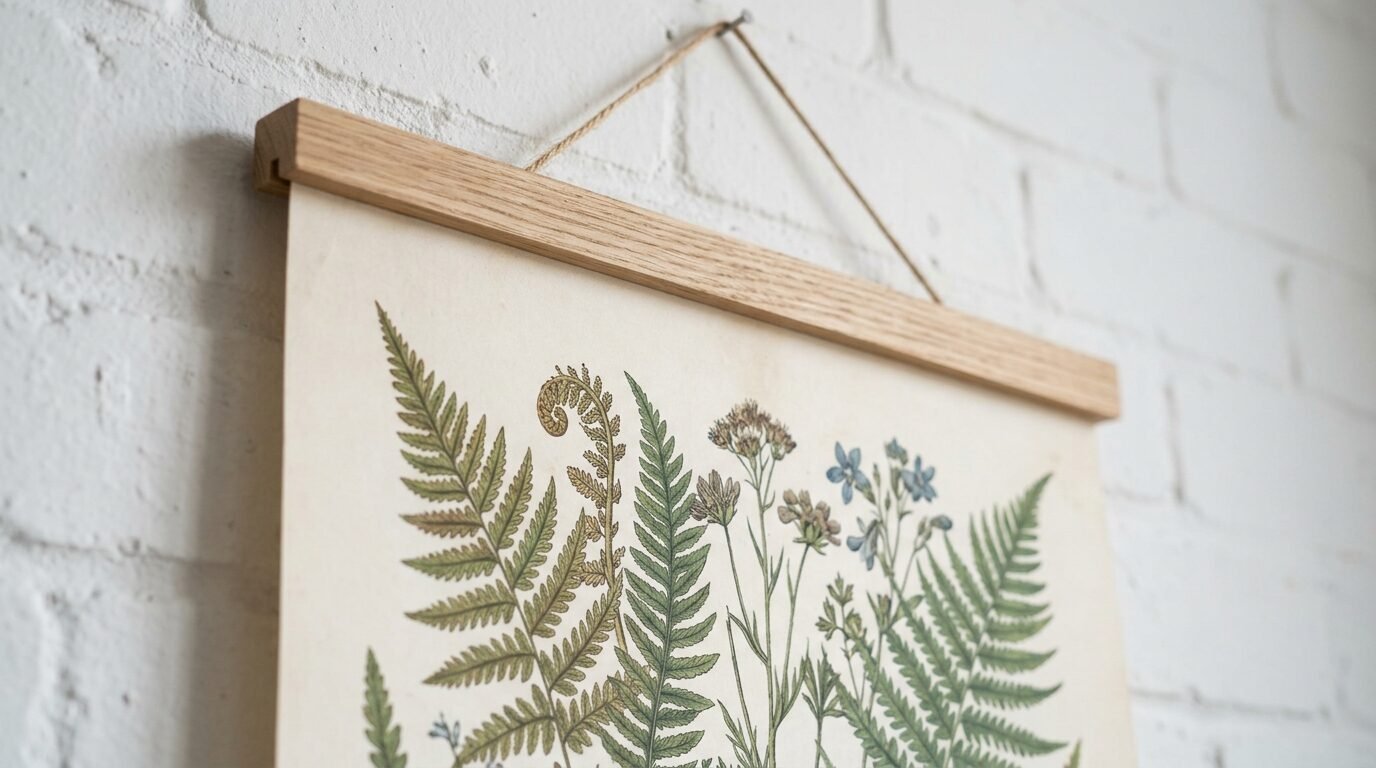
Magnetic wood hangers are my favorite way to display art. They consist of four wooden strips with strong magnets inside. You sandwich the top and bottom of your print between the wood pieces. I love this because it does not damage the paper. I’ve seen this work beautifully for a Large Poster that is too big for standard frames. It gives the art a scroll-like appearance.
In my experience, teak or oak bars look best against white walls. I once used a 24-inch set for a vintage map. The magnets held the heavy paper without any slipping. These hangers are very light. You only need one small nail or a clear hook to hang them. They are perfect for people who move often. You can roll up the art and the hangers together. This makes packing very easy.
I’ve noticed that some cheap magnetic hangers have weak magnets. Always check the weight capacity before buying. If your poster is very thick, look for extra strength magnets. This ensures the bottom bar stays in place to keep the paper flat.
2. Try Colorful Washi Tape Borders
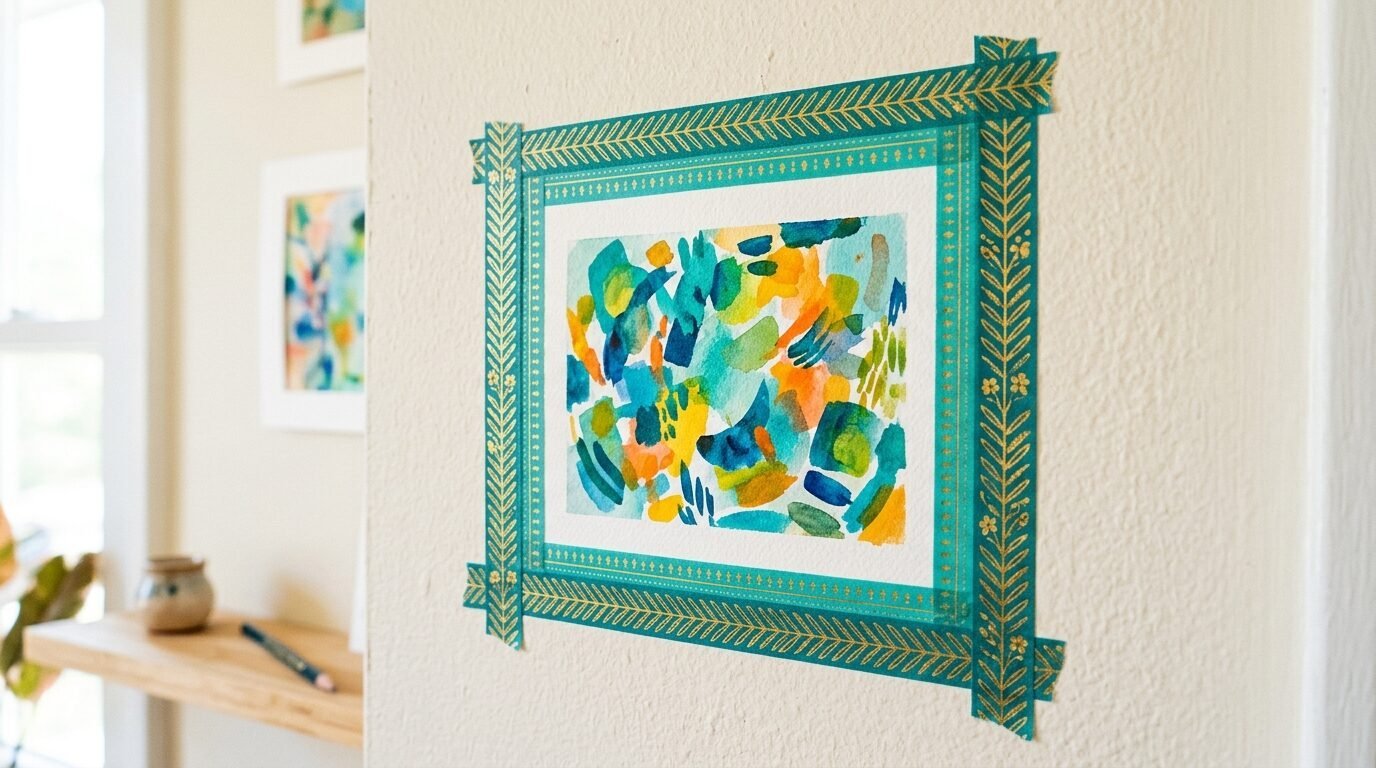
Washi tape is a staple for a Unique Display. It is a paper tape from Japan that comes in thousands of colors. It is famous for being low-tack. This means it stays on the wall but peels off without taking the paint with it. I have used washi tape to create “faux frames” around small prints. It adds a pop of color and personality.
I’ve seen people get very intricate with this. You can create double borders or even geometric shapes. When I lived in a dorm, I used neon yellow tape to hang black and white photos. It turned a boring wall into a gallery.
For a Professional Poster, try a clean black tape. It mimics the look of a thin metal frame. Always wipe the wall with a dry cloth before applying the tape. Dust prevents the adhesive from sticking well. If you make a mistake, just peel it off and start over. It is the most forgiving method on this list.
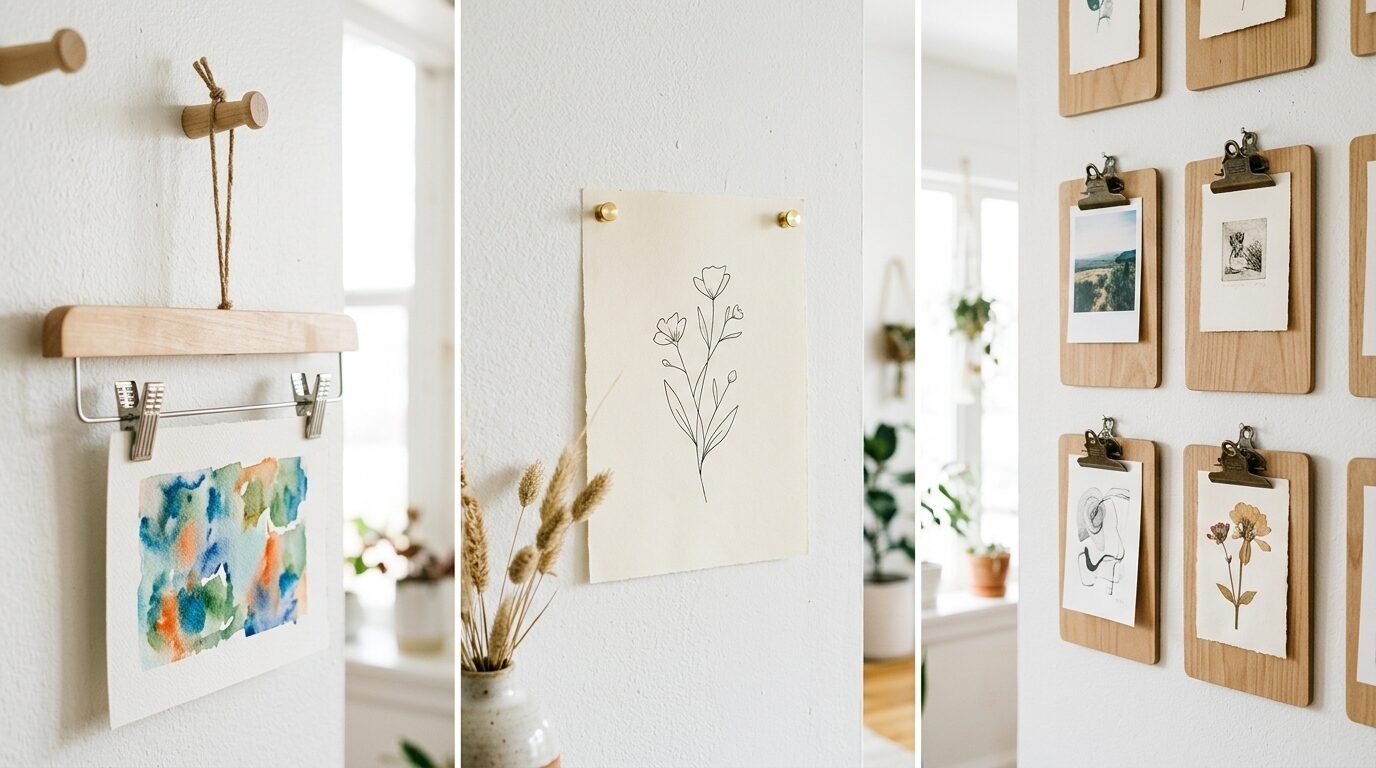
3. Hang Art with Vintage Wooden Pants Hangers
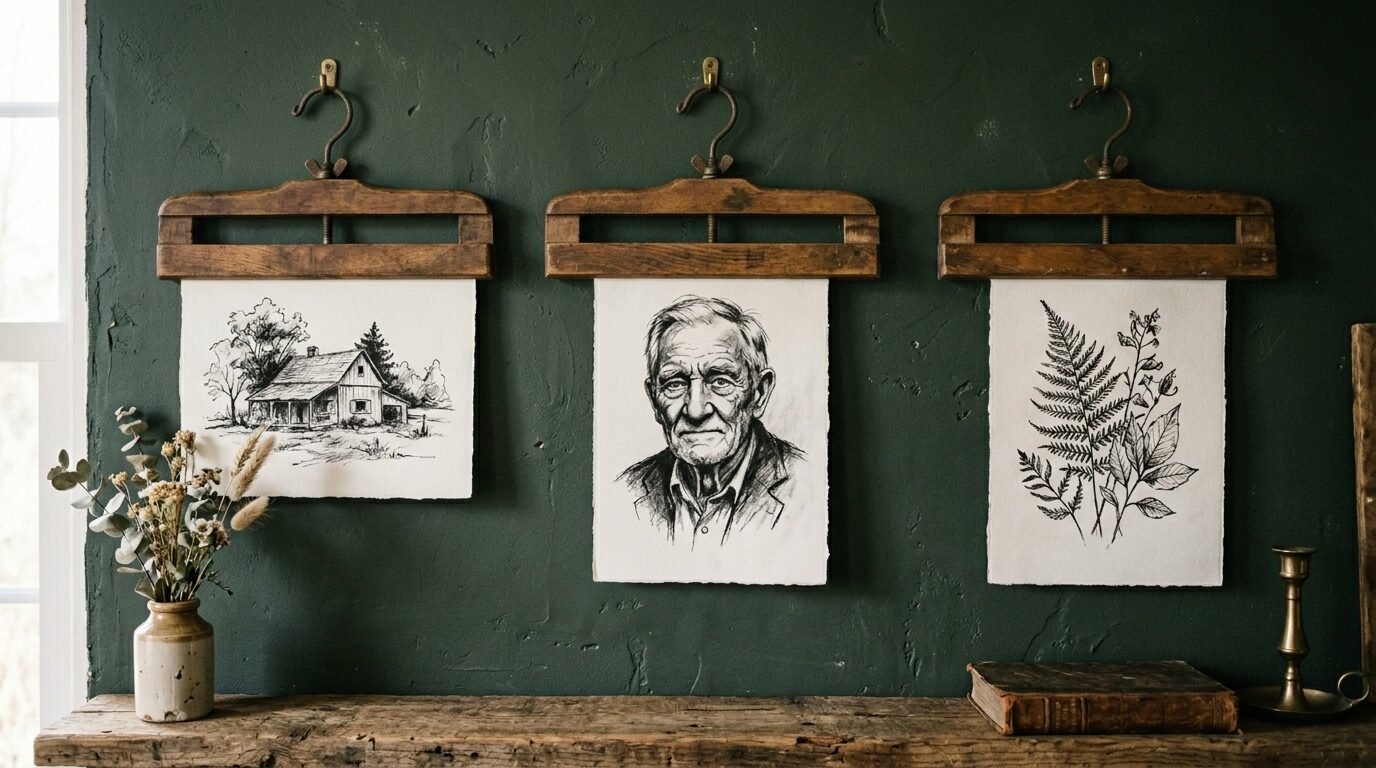
This is a classic Pinterest hack that actually works. Go to a local thrift store and look for old wooden pants hangers. They have a felt-lined clamp that is perfect for holding paper. I started using these for botanical prints last year. The vintage wood adds a layer of history to the room.
I’ve noticed that these hangers work best for medium-sized prints. If the paper is too wide, it might curl at the edges. I once hung three hangers in a row in my hallway. I put a different herb print in each one. It looked like a professional gallery installation.
One tip I wish I knew earlier is to check the metal hook. Some old hangers have hooks that don’t swivel. This makes it hard to hang them flat against the wall. Look for the ones with a rotating top. If the wood looks dull, rub a little olive oil on it. It brings back the shine instantly.
4. Create a Grid with Metal Binder Clips
Binder clips are not just for the office. They are excellent for an industrial or minimalist Poster Display. You can find them in gold, rose gold, or matte black. I like to clip the top corners of a print and hang the clips on small nails. This creates a very clean and modern look.
I saw this work well in a home office setup. The owner used a large wire grid on the wall. They used tiny silver binder clips to attach various prints and notes. It felt organized and creative at the same time.
In my experience, using two clips per print is better than one. One clip in the center can cause the paper to bow over time. Two clips at the corners keep the top edge straight. If you are worried about the metal scratching the ink, put a tiny piece of cardstock behind the clip. This acts as a buffer.
5. Mount Art on Simple Clipboards
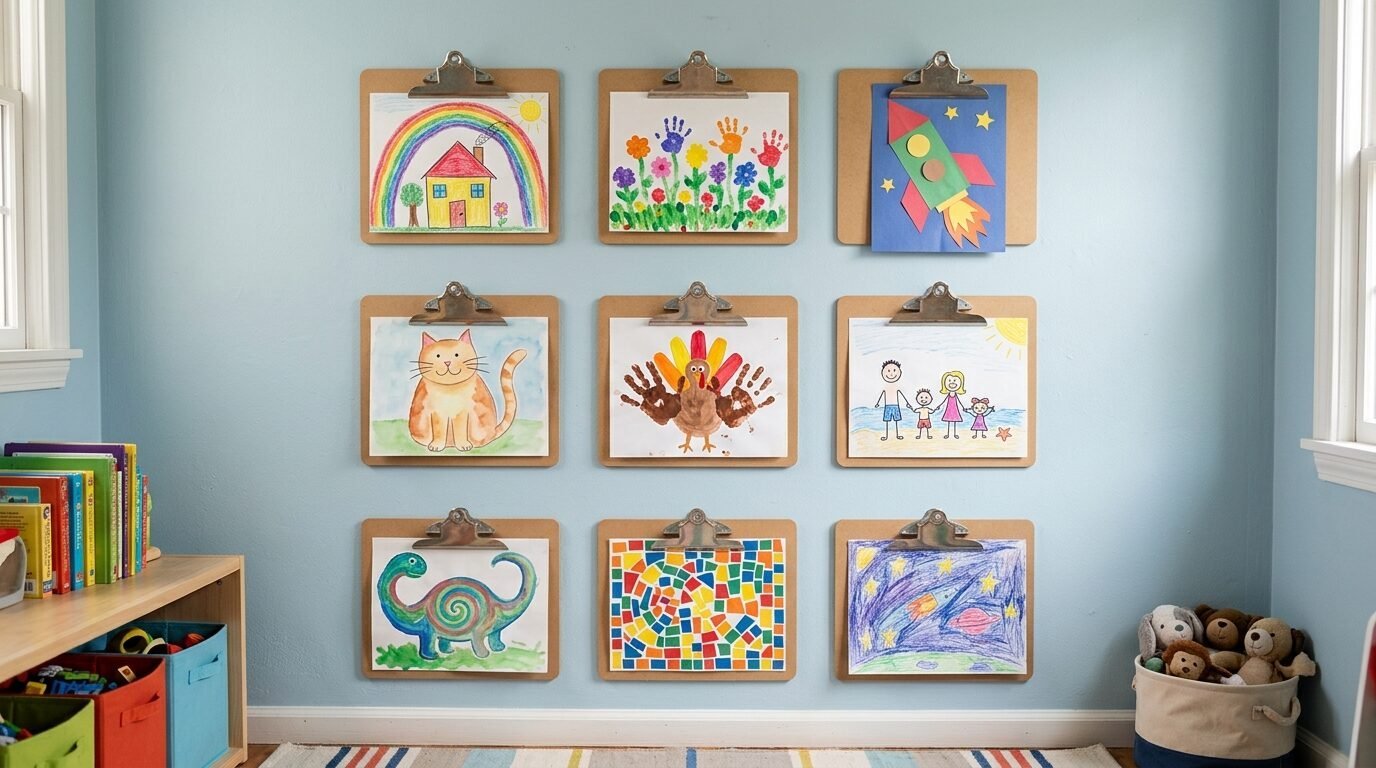
Clipboards are great for filling wall space in a kitchen or kids’ room. They turn your wall into an ever-changing art gallery. I have used a 3×3 grid of clipboards to display my children’s drawings. It makes them feel like real artists.
I’ve seen this work with standard brown masonite clipboards for a rustic feel. You can also spray paint them to match your room. I once painted six clipboards a matte navy blue for a nursery. It looked incredible against a light grey wall.
To get the grid perfectly straight, use a level. I’ve noticed that even a slight tilt is very obvious with clipboards. Space them about three inches apart. This gives the eyes enough room to rest between each piece of art. It makes a Professional Poster look intentional rather than cluttered.
6. Use Decorative Thumbtacks or Pushpins
Pushpins are the simplest way to hang art. However, they don’t have to look messy. I recommend finding decorative pins. Look for brass heads, wooden spheres, or even flat marble designs. These feel like a part of the art rather than a tool.
I used gold map pins for a series of travel photos in my guest room. It felt cohesive and high-end. I’ve noticed that many people hesitate to poke holes in their art. If you feel this way, don’t pin through the paper. Instead, place the pins just outside the edges so the heads hold the paper against the wall.
This method works best for smaller items. For a Large Poster, you would need many pins to keep it flat. I’ve seen gravity take a toll on heavy prints when only two pins are used. Use four pins, one in each corner, for the best results.
7. Apply Heavy Duty Command Strips
Command Strips are the gold standard for renter-friendly decor. They allow for a totally flat mount. There are no clips, no tape, and no visible hardware. This creates a very sleek, modern appearance. I use these when I want the art to look like it is part of the wall itself.
In my experience, the “poster” version of these strips is best. They are thin and don’t create a gap behind the paper. I once used them to hang a massive panoramic print. It stayed up for three years without moving a millimeter.
When you remove them, pull the tab slowly. I have seen people rip their wallpaper by being too fast. If you follow the instructions, the wall remains perfect. This is a great choice for a Professional Poster where you want zero distractions from the image.
8. Lean Art on Floating Shelves or Ledges
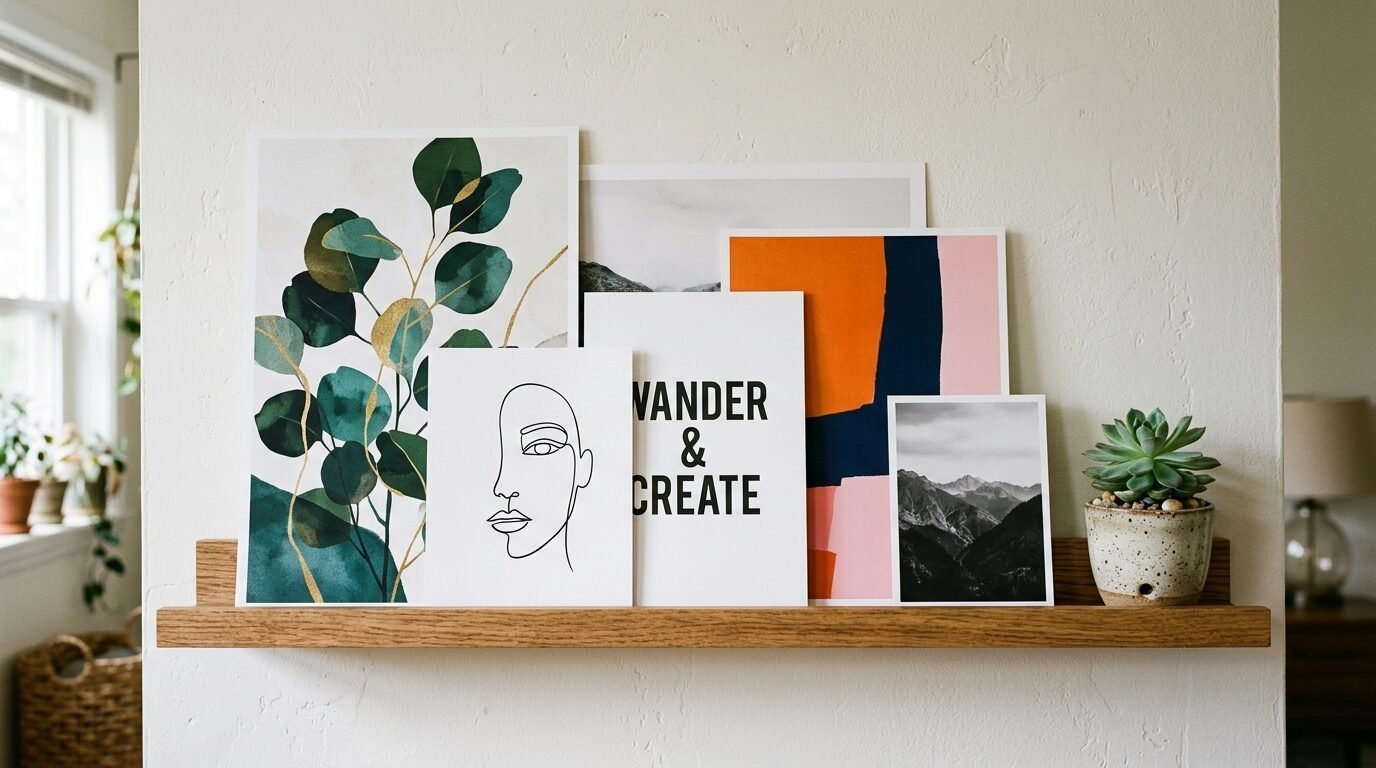
You don’t always have to hang things on the wall. A picture ledge is a narrow shelf designed to hold art. You can lean your prints against the wall. I love this because you can overlap different sizes. It creates a layered, lived-in look.
I’ve seen this used in living rooms above the sofa. You can mix framed pieces with frameless prints. Use a piece of foam core or heavy cardboard behind your print to give it stability. Without a frame, thin paper will just flop over.
I’ve noticed that leaning art feels very relaxed. It is perfect for a Unique Poster that you might want to move around. You can swap the art in seconds. There are no new holes to drill. It is the ultimate low-commitment decorating strategy.
9. Suspend Art from Copper Pipes or Dowels
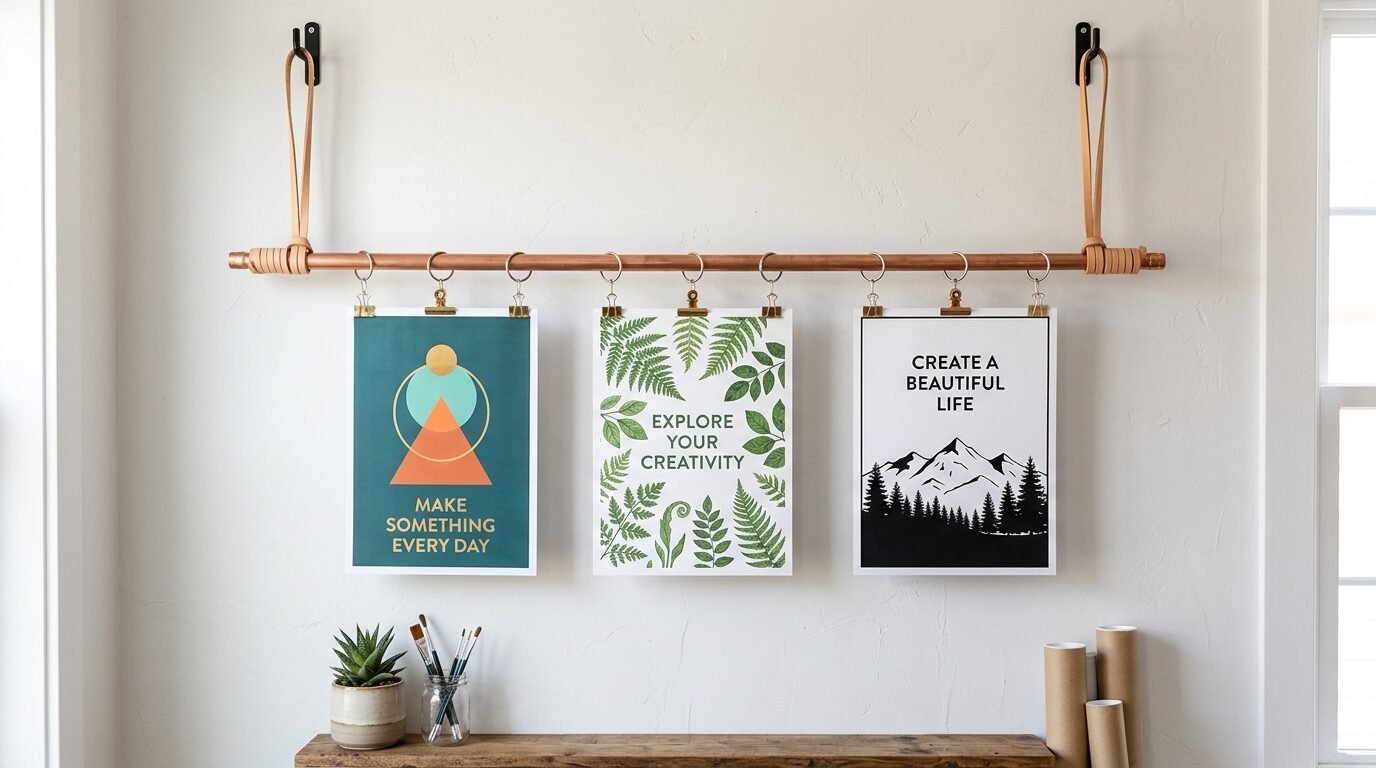
This is a more involved DIY project but the results are stunning. You can use a thin copper pipe or a wooden dowel. Tie a string to each end to create a hanger. Then, use clips to attach your art to the pipe. It creates a beautiful hanging installation.
I tried this in my bedroom with three different prints of varying lengths. It added height to the room and filled a large empty wall. The copper added a warm, metallic glow that felt very sophisticated.
I’ve noticed that cotton twine or leather cord works best for the hanging string. It adds a natural texture. Make sure the pipe is slightly wider than your poster. This keeps the proportions looking correct. It turns a simple print into a focal point.
10. Use Clear Glue Dots or Wall Putty
Glue dots and wall putty are invisible. They are perfect for a clean, minimalist look. I used blue wall putty for years in my college dorm. It is great for lightweight prints and photos.
I’ve seen people use glue dots for a Unique Display of postcards. You can create a cloud shape or a heart shape on the wall. Because the adhesive is hidden, the art seems to float.
In my experience, putty can sometimes leave a greasy mark on thin paper. I suggest using it only on the corners. If you are worried about your wall, test a small piece of putty in a hidden spot first. Glue dots are usually safer for the paper but can be harder to remove from the wall.
11. Clip Art to a Wire Wall Grid
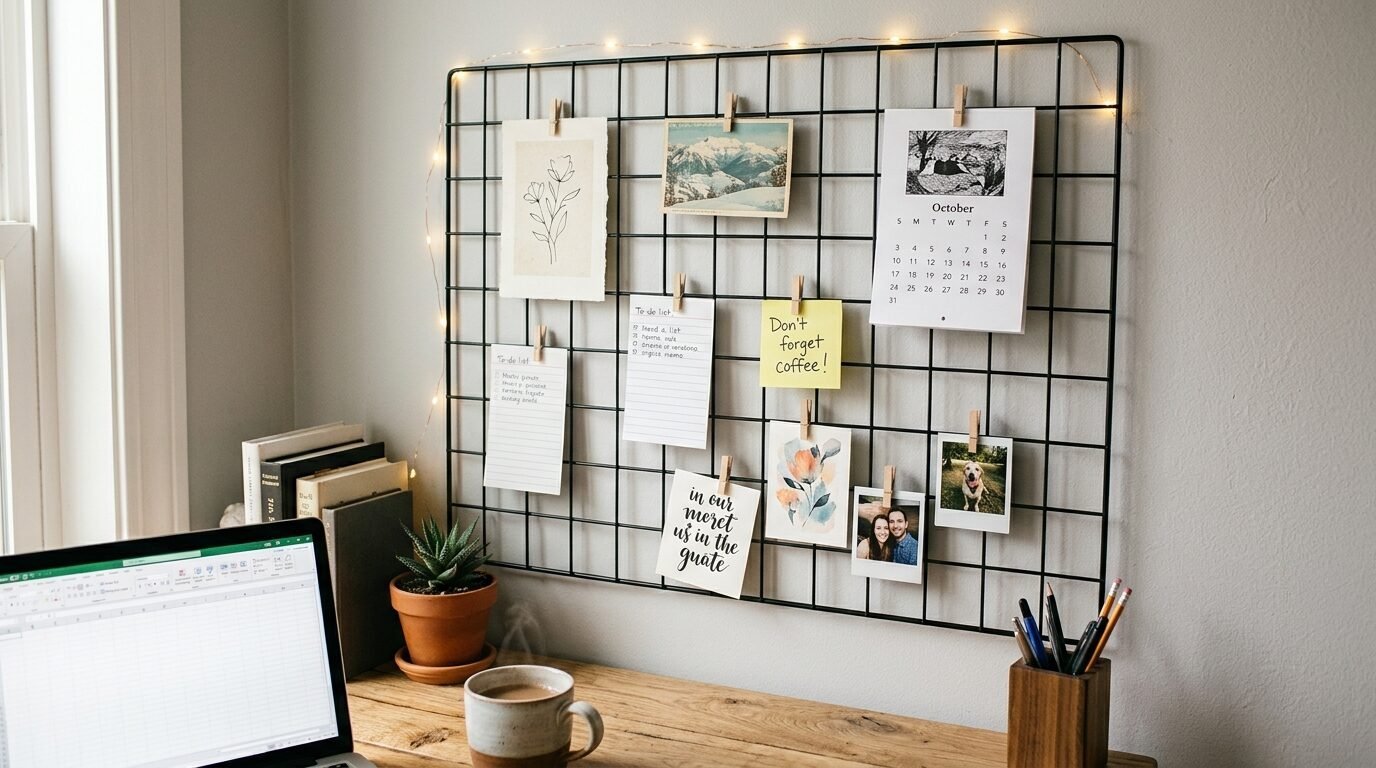
Wire wall grids are very popular in home offices and craft rooms. They are usually black or white metal. You can clip anything to them. I use mine for a mix of printable calendars, art, and to-do lists.
I’ve noticed that this method is excellent for Filling Wall Space. A single grid can hold ten or twelve small pieces of art. It creates a cohesive look even if the art styles are different.
Use small clothespins or bulldog clips for a varied look. I once used tiny wooden clothespins to hang a series of black and white sketches. It felt very artistic and raw. The grid itself acts as a frame for the entire collection.
12. Repurpose an Old Shutter or Window Frame
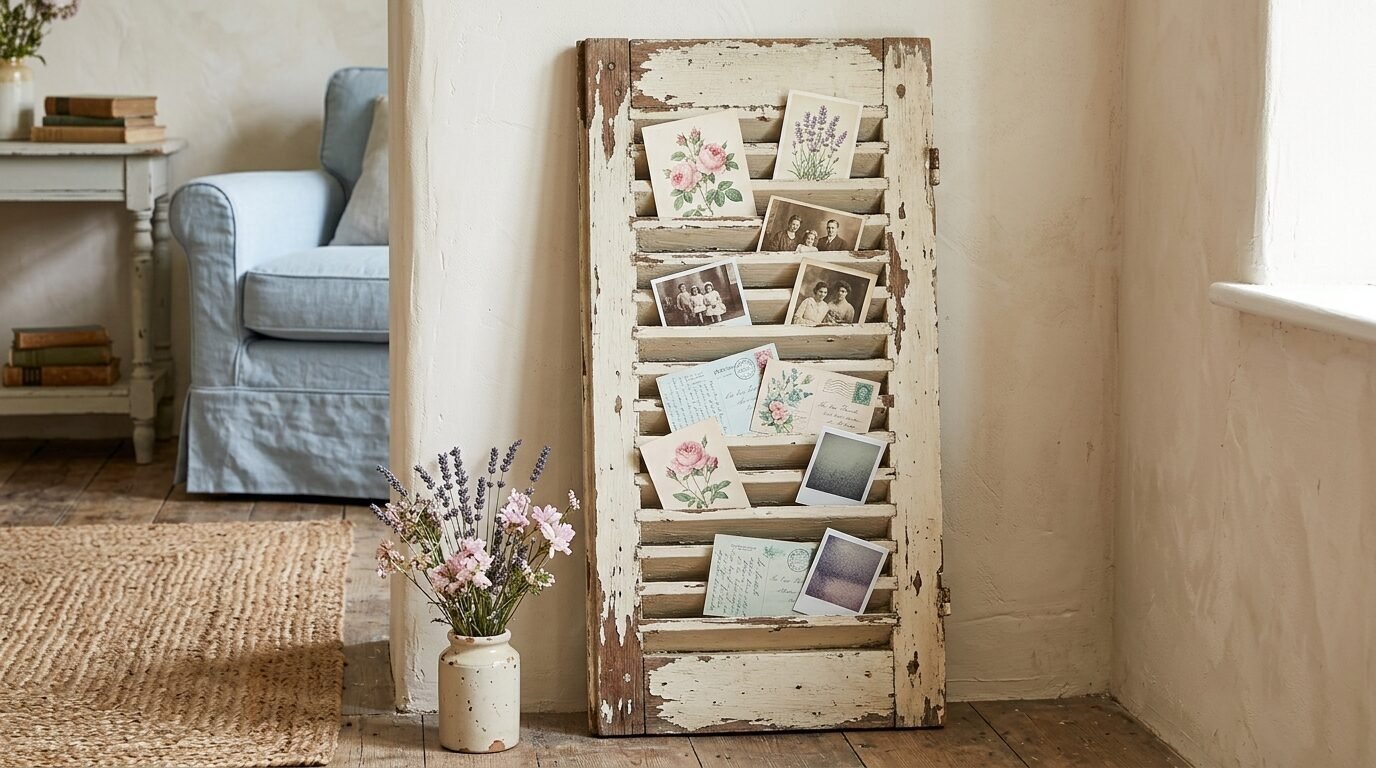
This is a great way to use architectural salvage. You can find old shutters or window frames at yard sales. Lean them against the wall or hang them. Then, use clips or tape to attach your art to the slats or the glass.
I saw a beautiful display where a tall wooden shutter was used to hold vertical prints. The owner tucked the corners of the prints into the slats. It looked like a piece of custom furniture.
In my experience, this adds a lot of texture to a room. It is perfect for a rustic or farmhouse style. If the wood is old, make sure to seal it first. You don’t want old paint or splinters touching your Professional Poster.
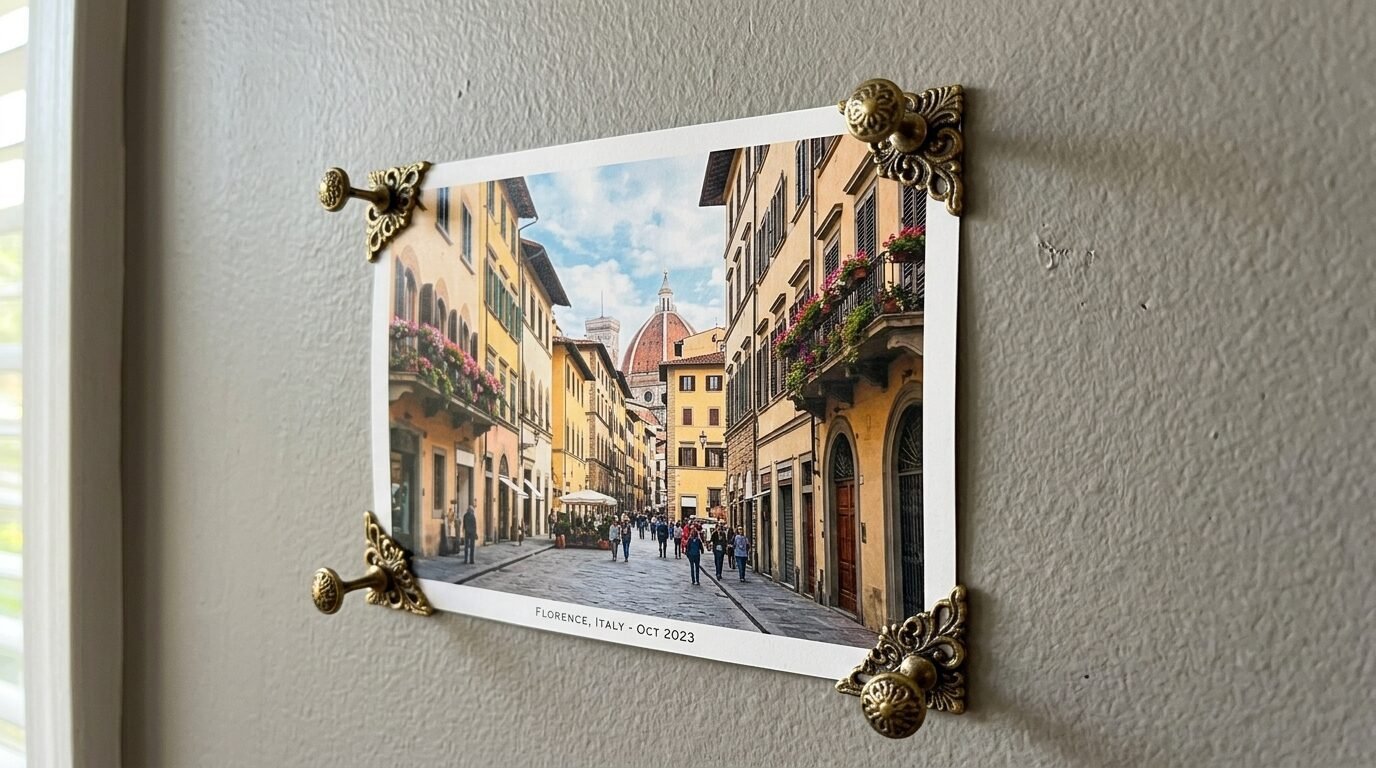
13. Use Corner Photo Mounts Directly on the Wall
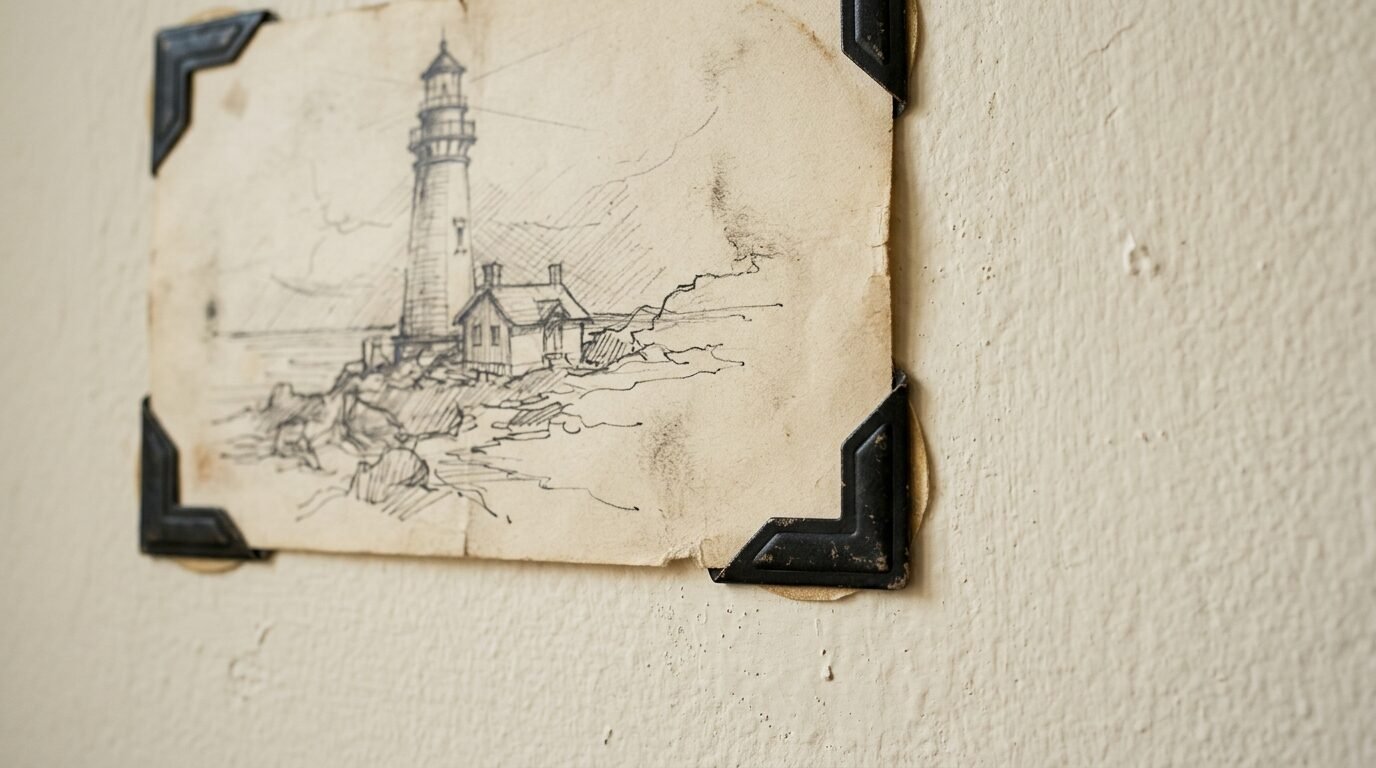
Photo corners are usually for scrapbooks. However, you can use them on the wall. Stick the corners to the wall and slide your art into them. This gives a very vintage, scholarly look.
I’ve seen this work for a Unique Poster that has a classic feel. It looks very intentional. I used black photo corners for a set of architectural drawings. It felt like they were pulled straight from an old portfolio.
I’ve noticed that this works best on very smooth walls. If your walls have a heavy texture, the corners might not stick well. Use a ruler to make sure the corners are perfectly spaced. This ensures your art sits level.
14. Support Art with a Cork Board Backdrop
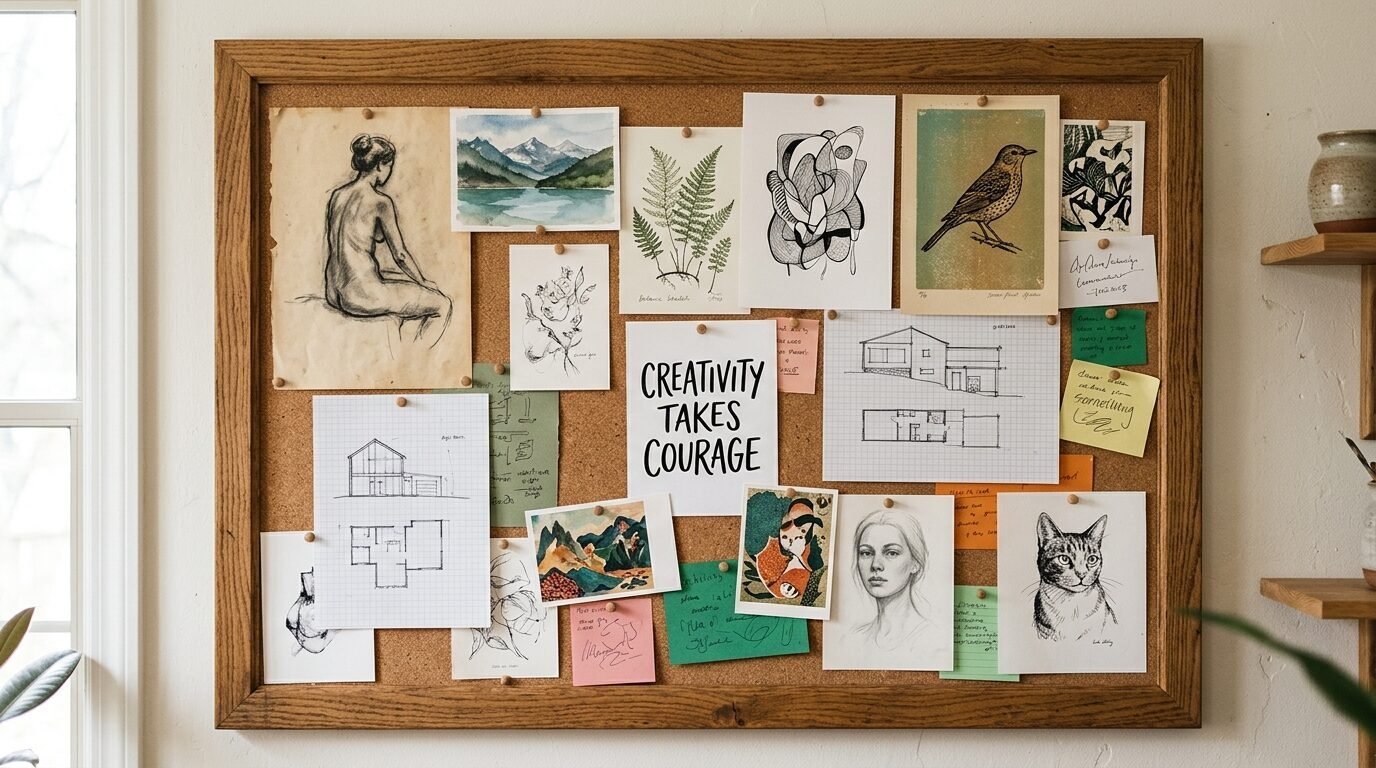
A large cork board can be a beautiful background for art. You can cover the cork with fabric or paper first. Then, use pins to arrange your prints. It gives you a dedicated space for creativity.
I once used a massive floor-to-ceiling cork wall in a home studio. I pinned a Large Poster in the center and surrounded it with smaller sketches. It felt like a giant mood board.
I’ve noticed that this is very practical for people who change their minds often. You can pin and unpin without ever touching the wall itself. It protects your drywall while giving you a huge canvas to work with.
15. Create a String and Clothespin Line
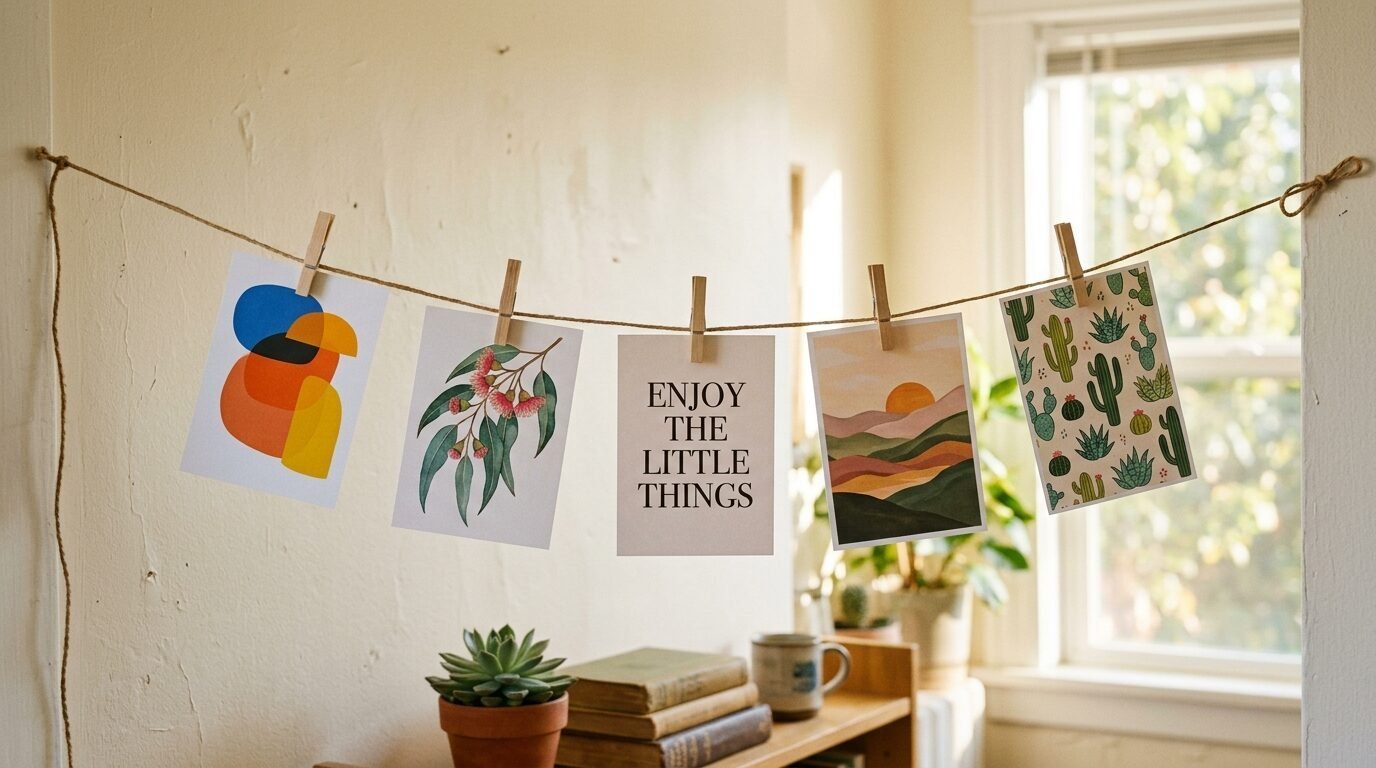
This is a very whimsical way to display art. Run a piece of twine or wire across a wall. Use clothespins to hang your prints along the line. It reminds me of a clothesline drying in the sun.
I’ve seen this work across a large window or above a bed. It feels light and airy. I used this for a series of watercolor prints in a bathroom. It made the small space feel much more interesting.
In my experience, you should use a sturdy string. Thin thread will sag under the weight of a Large Poster. Use a small tension rod if you want to hang art inside a window frame. It looks very professional and requires no tools at all.
Comparison of Frameless Display Methods
| Method | Best For | Damage Risk | Style |
| Magnetic Hangers | Large Poster | Very Low | Minimalist |
| Washi Tape | Small Prints | Low | Playful |
| Pants Hangers | Vintage Art | Low | Rustic |
| Binder Clips | Modern Decor | Medium | Industrial |
| Command Strips | Professional Poster | Very Low | Sleek |
| Clipboards | Kids’ Art | Medium | Organized |
| Wire Grids | Gallery Walls | Medium | Creative |
Tools You Need for Frameless Displays
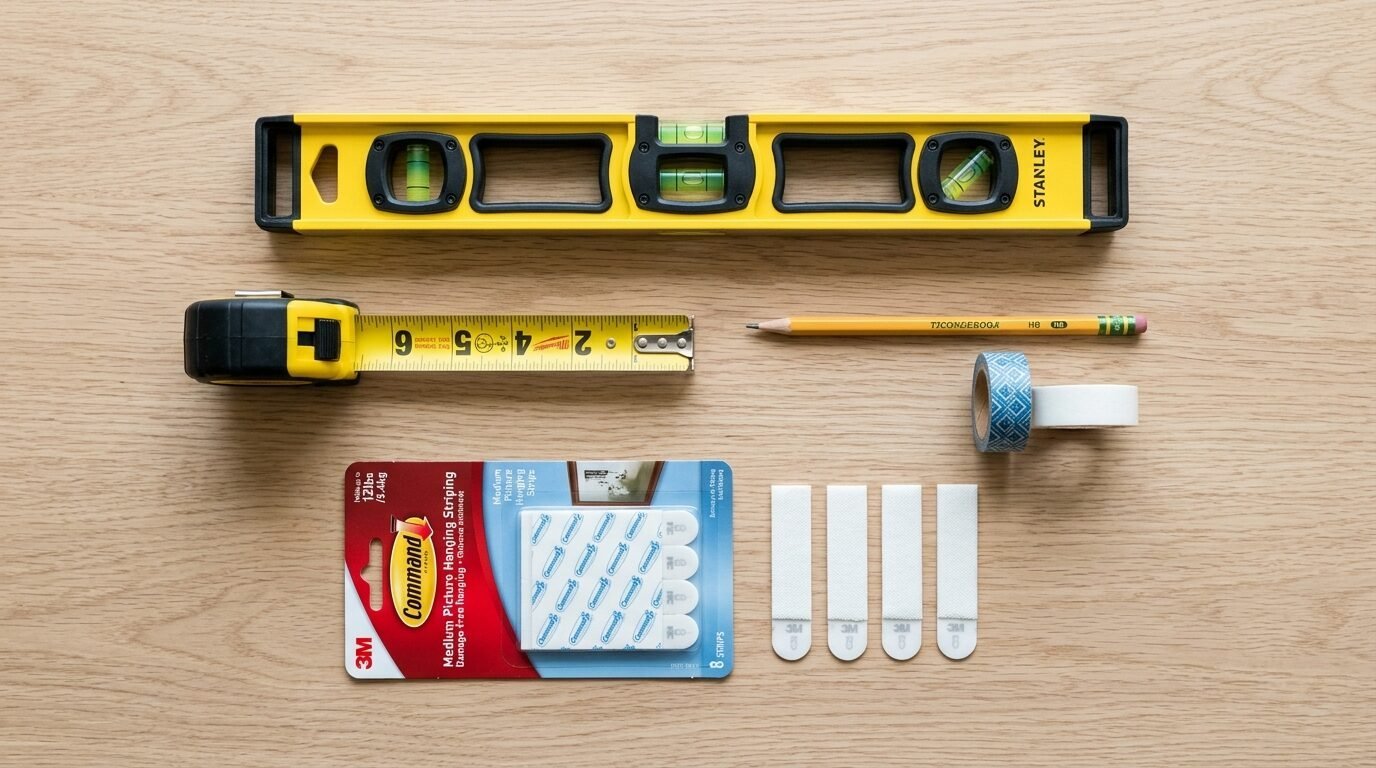
To get the best results, you need a few basic tools. Having these on hand makes the process much faster. I always keep a small kit in my junk drawer.
- A Small Level: This is the most important tool. Nothing ruins a Poster Display faster than a crooked print. I’ve noticed that even a one-degree tilt is visible from across the room.
- Measuring Tape: Use this to space your art evenly. I usually aim for two to three inches between pieces.
- Pencil: Lightly mark where the corners of your art will go. This helps when applying tape or Command Strips.
- Microfiber Cloth: Use this to clean the wall before using any adhesive. Dust is the enemy of sticky things.
- Blue Painter’s Tape: I use this to mock up my layout. I tape the art loosely to see how it looks before committing to a permanent spot.
- Heavy Cardstock: If you are using clips, a small piece of cardstock protects the print from metal teeth.
- Scissors: You will need these for washi tape or twine.
In my experience, taking ten minutes to prep makes the final result look much better. I’ve seen many people rush and end up with a messy wall. Take your time and measure twice.
Frequently Asked Questions (FAQ)
How do I stop my posters from curling?
Most posters come rolled in a tube. They will try to curl back up when you hang them. To fix this, lay the poster flat on a clean table. Place heavy books on the corners for 24 hours. I have seen this work for even the thickest paper. If it still curls, use Command Strips or tape on all four corners to hold it flat against the wall.
Will washi tape fall off after a few days?
Washi tape is designed to be temporary. Its staying power depends on your wall texture. I’ve noticed that it sticks best to smooth, eggshell, or satin paint. If your walls are very matte or textured, the tape might peel. Try rubbing the tape firmly with your finger to create heat. This helps the adhesive bond.
Can I hang a Large Poster without damaging it?
Yes. Magnetic hangers and Command Strips are the best options for this. They do not involve poking holes or using harsh glues. I’ve seen people use these for very expensive limited edition prints with great success. Always check the weight of your poster. Large prints on heavy paper need stronger magnets or more strips.
What is the best way to fill a huge empty wall?
A wire grid or a large collection of clipboards is excellent for Filling Wall Space. These methods allow you to create a massive installation without needing massive art. You can use many small pieces to create one large visual statement. It is often cheaper than buying one giant frame.
Is wall putty safe for all paint types?
Most wall putty is safe. However, I have noticed that it can leave an oily stain on some flat paints over time. I’ve seen this happen mostly in older homes. To be safe, use a tiny amount. You can also place a small piece of clear tape on the wall first, then put the putty on the tape. This creates a barrier.
Final Thoughts on Frameless Art
Hanging a Unique Poster without a frame is a great way to show your personality. It removes the barrier of cost and allows for total creativity. I have tried every method on this list. Each one brings a different energy to a room. Magnetic hangers feel high-end. Washi tape feels fun. Clipboards feel organized.
I’ve noticed that people are often more drawn to frameless art. It feels less formal and more inviting. Don’t be afraid to mix and match these ideas. You could use a wire grid in your office and magnetic hangers in your bedroom. The goal is to make your space feel like home.
In my experience, the best displays are the ones that tell a story. Choose the art you love first. Then, pick the hanging method that fits the vibe. You don’t need a huge budget to have a beautiful home. You just need a little bit of imagination and a few simple tools. Start with one print today and see how much it changes your room.

Anya Castellan is the Founder and Editor-in-Chief of Home Wall Trends. An art history graduate of the Rhode Island School of Design with twelve years of experience writing for leading American design publications, she specializes in composition, gallery wall theory, and the quiet architecture of domestic space. A former contributing editor at Architectural Digest and guest lecturer at Parsons School of Design, Anya personally reads and signs off on every piece before it is published.