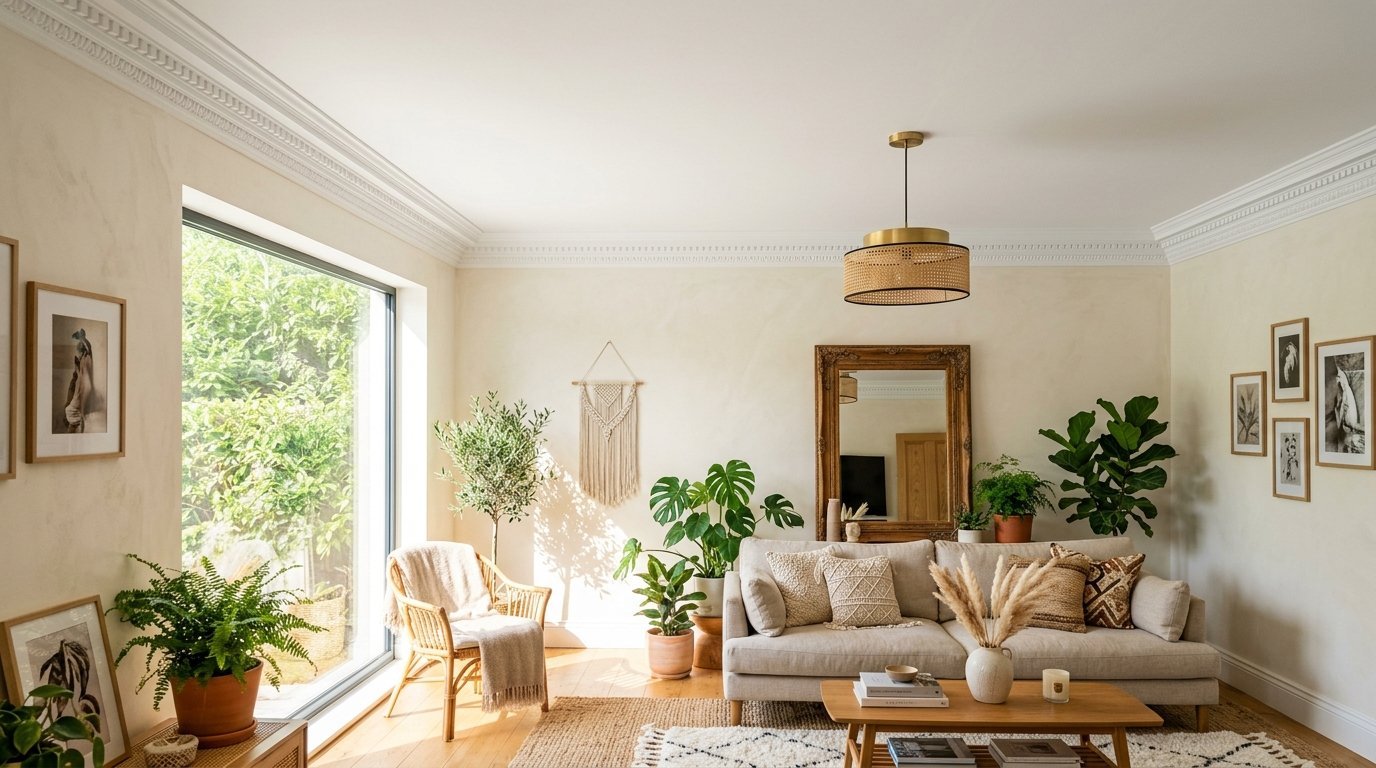
Blank walls make an apartment feel cold. You stare at the empty space near your ceiling every single day. You want architectural character. You live in a rental property. Your lease strictly forbids nails. Traditional woodworking requires power saws. You do not own a miter saw. I found a better way. You can put up beautiful architectural details using only heavy duty tape. You can transform your space completely damage free. Your security deposit remains perfectly safe.
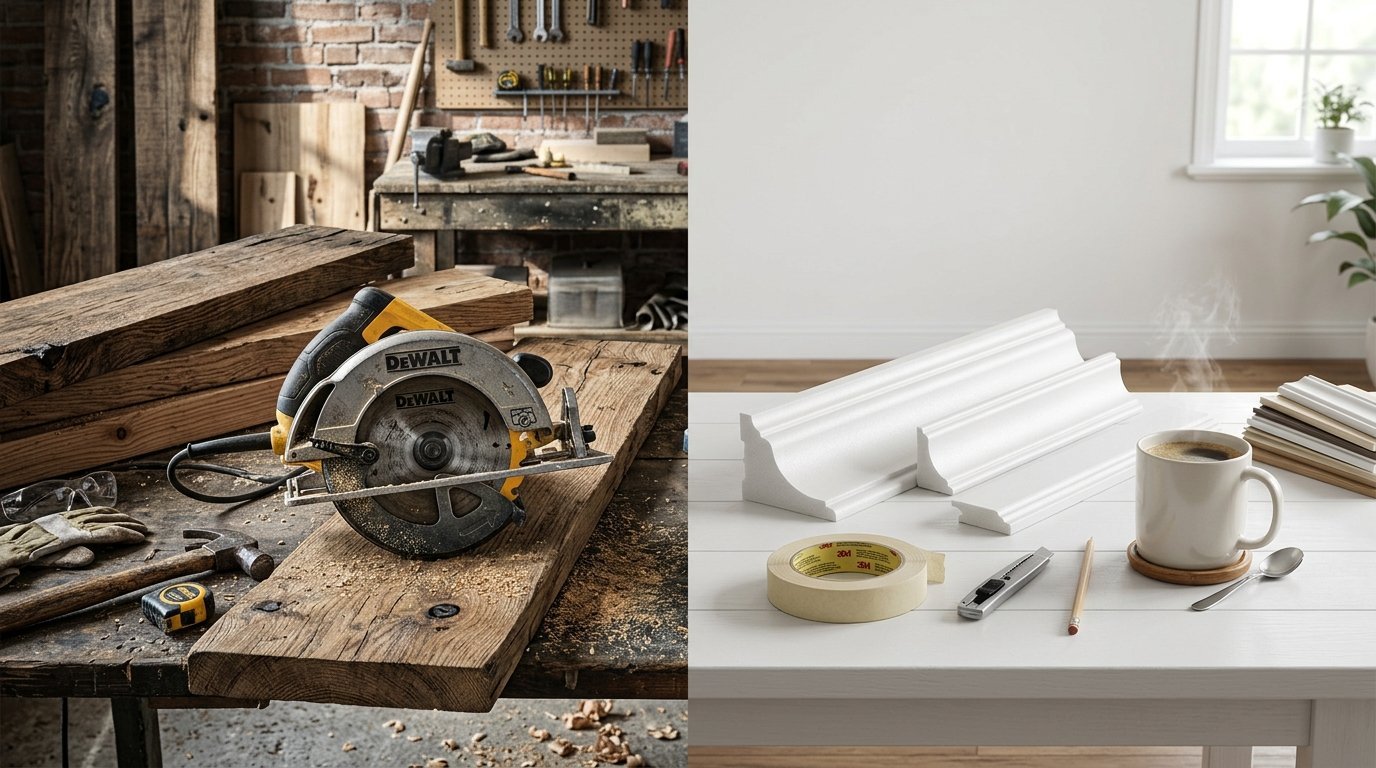
This guide shows you exactly how to install lightweight polyurethane molding using renter safe adhesives. I cover exact tools and exact costs. I outline step by step actions for perfect corners. You will spend under 100 dollars for an entire room. You will finish this project this weekend. You will get the look of expensive millwork without touching a single hammer.
Why Renters Love Peel And Stick Molding
Renters face massive restrictions regarding wall modifications. Landlords hate holes in drywall. Property managers keep security deposits for tiny scratches. Peel And Stick Molding solves these specific problems.
You get the exact look of custom carpentry. Nobody can tell the difference from the ground. The pieces weigh almost nothing. The materials cost a fraction of real wood. You skip the dust and noise of power tools.
The Cost Difference You Will Actually Notice
Real wood baseboards and top trims cost hundreds of dollars. You must pay for delivery. You must rent power tools. Lightweight polyurethane options cost less than two dollars per foot. You buy them online. They ship in regular boxes straight to your door.
Protecting Your Security Deposit
You need Rental Friendly Upgrades that leave zero trace behind. Heavy duty double sided tapes hold the lightweight foam pieces perfectly. They release cleanly when you move out. You keep your full deposit. You leave the apartment looking exactly like move in day.
The Exact Materials You Need For DIY Wall Molding
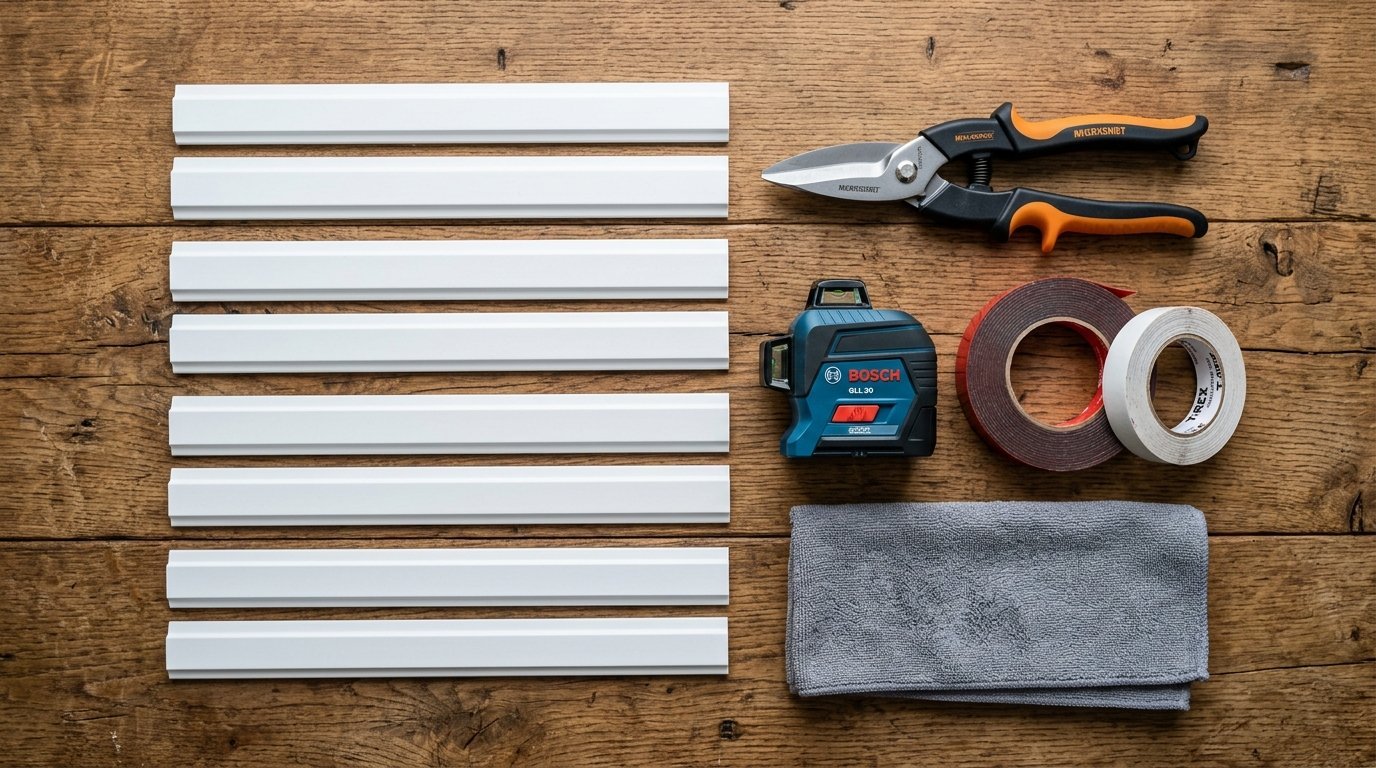
You only need a few specific items for this job. You skip the heavy machinery entirely. You can buy all these supplies at your local hardware store or online.
- Polyurethane or high density foam trim pieces
- Miter shears for cutting angles
- Heavy duty double sided mounting tape
- 3M Command strips for extra hold
- A standard tape measure
- A basic pencil
- A laser level or standard bubble level
- Norwex microfiber cleaning cloths
- Distilled water
- High purity isopropyl alcohol
- Painters tape
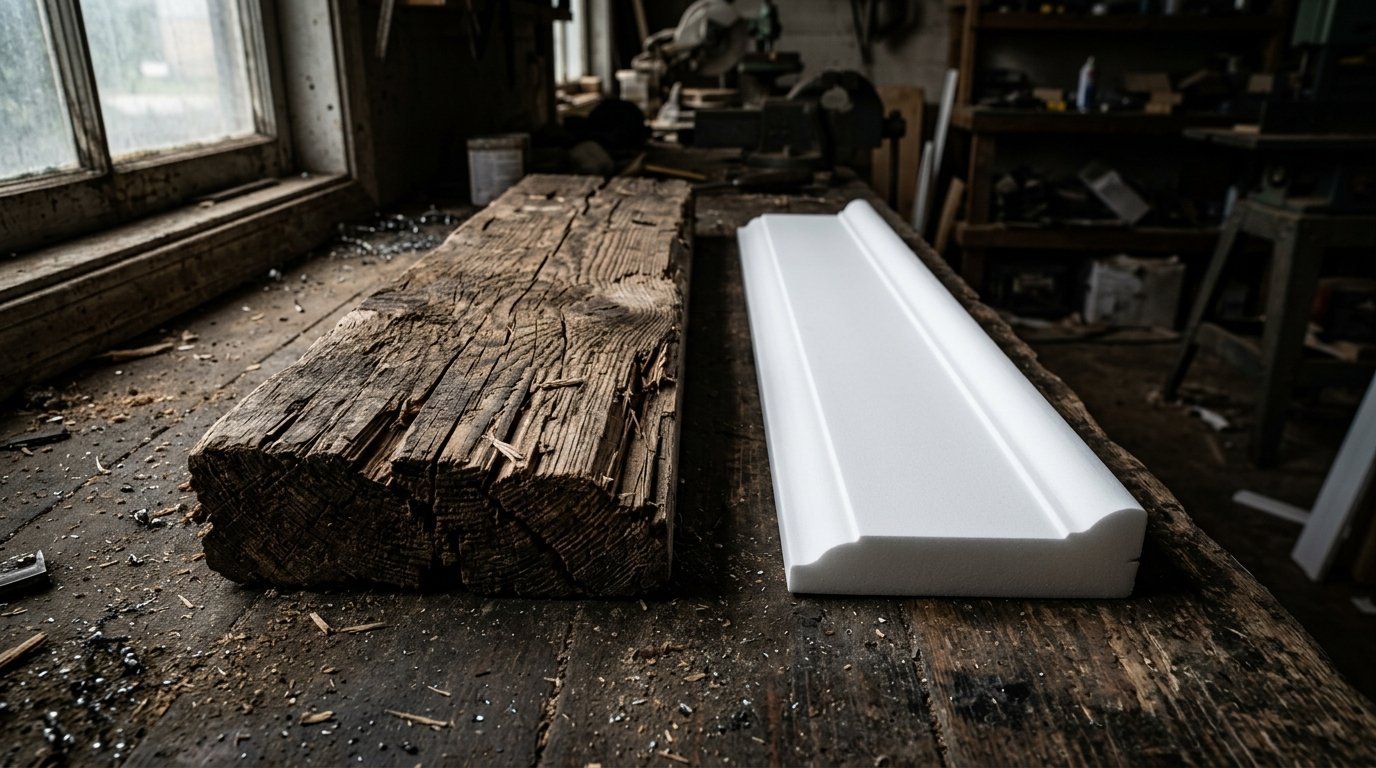
The Best Trim Profiles For Small Space Hacks
You should choose lightweight materials. Do not buy heavy MDF board. Do not buy solid oak. Polyurethane offers the best look. High density foam works perfectly for ceilings. These materials cut easily with hand tools.
Adhesive Tapes That Actually Hold Up
Your tape choice determines your success. Gorilla Mounting Tape holds extremely well. 3M Command Strips offer the cleanest removal. You will use a combination of both for the strongest hold.
Learning From Past Decorating Mistakes
I love DIY projects. Sometimes they go perfectly. Sometimes they fail completely. Three months ago I threw a fresh piece of pine right into the trash. I tried to craft a farmhouse welcome sign. The wood was too heavy. My cuts were crooked. I realized heavy wood does not belong on renter walls.
I shifted my focus to lightweight alternatives. I started testing polyurethane trims. I found they look identical to painted wood. They weigh ounces instead of pounds. My failure with heavy pine led me to this specific tape based strategy.
Preparing Your Walls Before You Stick Anything
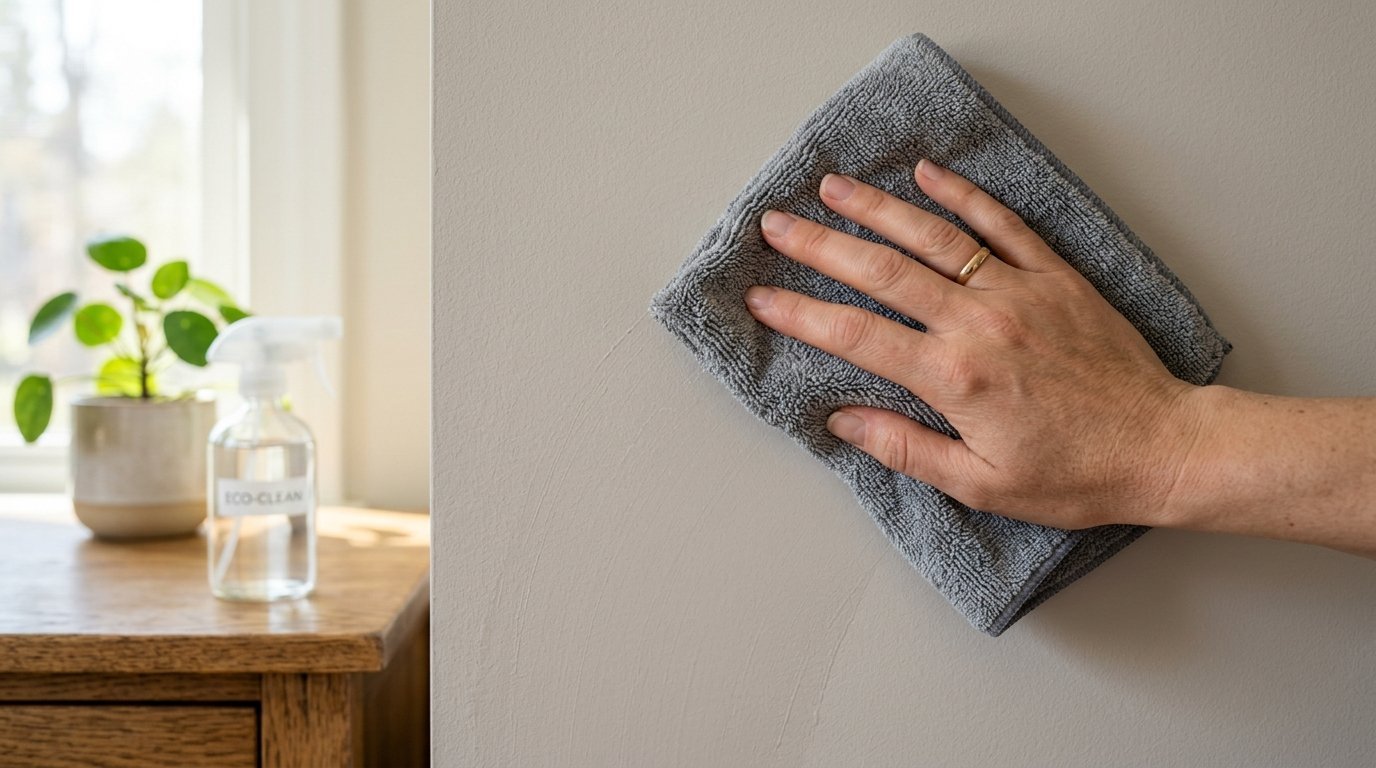
Adhesive tape fails on dirty walls. Dust prevents a strong bond. Grease ruins the stickiness. You must prep your drywall perfectly. Do not skip this step.
- Wipe the upper walls with a dry Norwex microfiber cloth
- Remove all loose dust and cobwebs
- Mix distilled water with high purity isopropyl alcohol
- Lightly dampen a clean microfiber cloth with the mixture
- Wipe the exact areas where the tape will stick
- Let the wall dry completely for one full hour
Cleaning Tricks I Learned The Hard Way
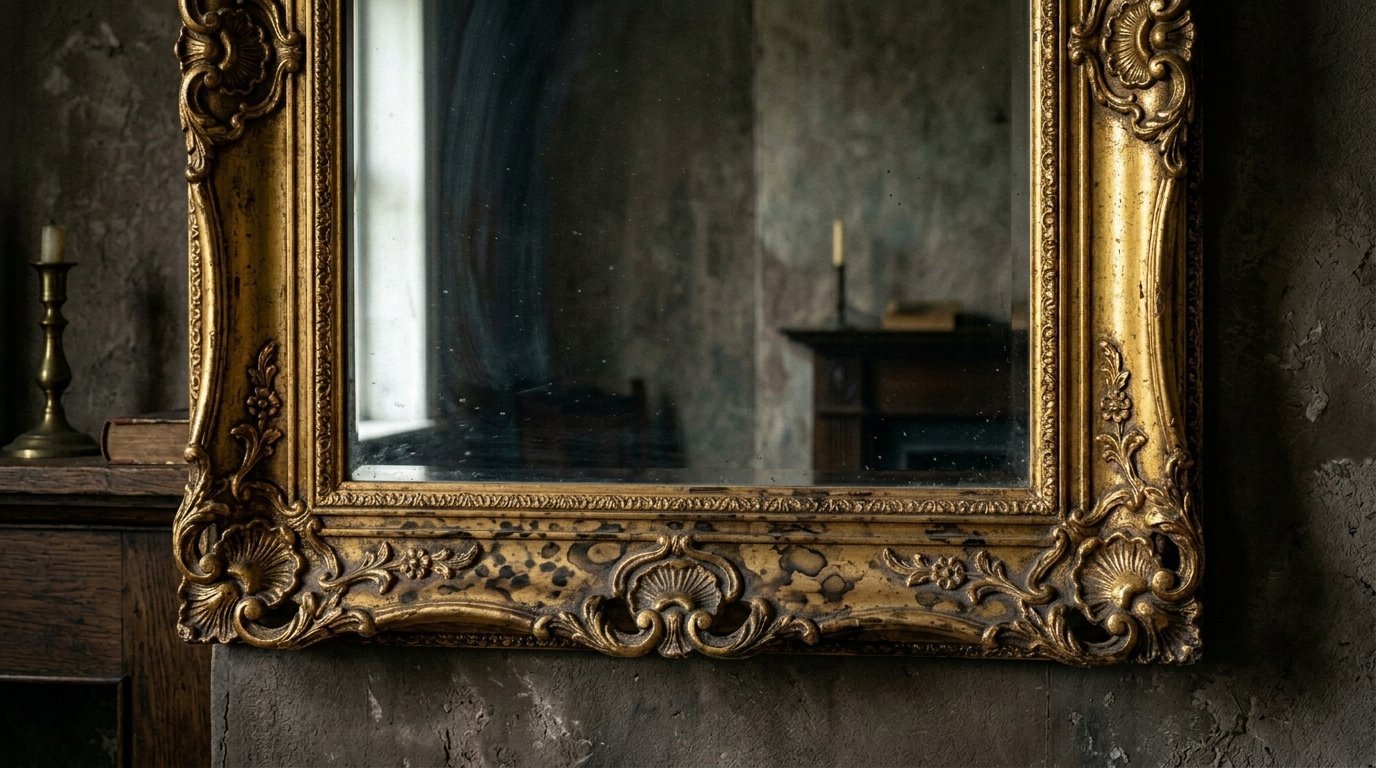
I noticed an issue with a gold frame in my bedroom last summer. Every time I wiped the glass water gathered at the absolute bottom curve. The moisture sat there and ruined the finish. You must avoid using too much liquid when cleaning your walls. A slightly damp cloth works best. Never spray liquid directly onto the drywall.
How Moisture Ruins Rental Friendly Upgrades
Moisture behind your trim will ruin the paint. I saw this destroy a beautiful piece in my hallway three years ago. The damp air got behind the frame and caused black spots. You must ensure your walls are bone dry before applying any adhesive. Press the tape firmly to seal out room humidity.
Cutting Trim Corners Without Power Saws
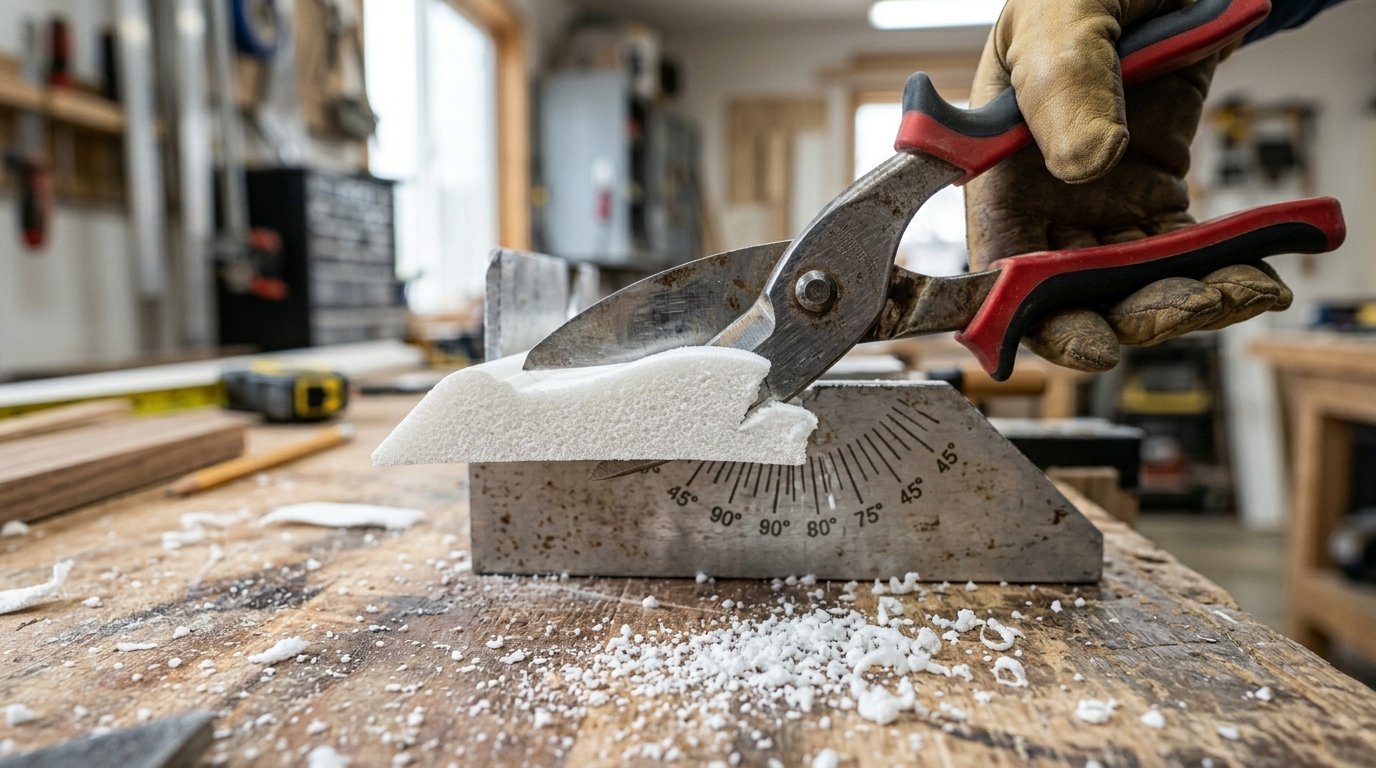
Corners intimidate beginner DIYers. You think you need a heavy electric miter saw. You do not. You will use a hand tool called miter shears. Miter shears look like heavy duty scissors. They have a built in angle guide.
Measuring Twice
You must measure your wall precisely. Stretch your tape measure from corner to corner. Write the number down immediately. Transfer that exact number to your foam piece. Mark it clearly with your pencil.
Making The Corner Cuts With Miter Shears
- Set your miter shears to a 45 degree angle
- Place the foam trim flat on the shear anvil
- Line up your pencil mark with the blade
- Squeeze the handles firmly and evenly
- The blade slices cleanly through the foam
- Keep the offcut piece for testing your fit
You now have a perfect corner angle. You did this silently. You created zero sawdust.
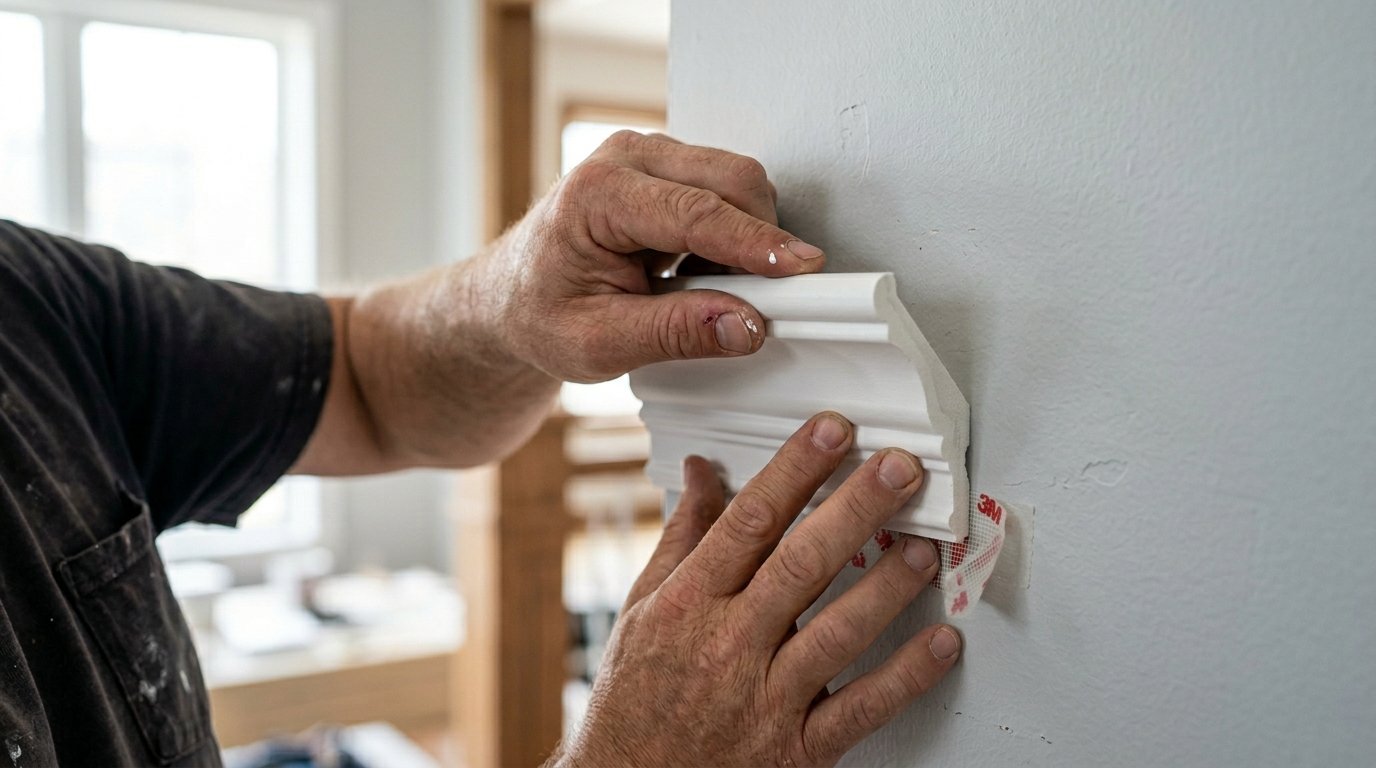
Applying The Adhesive Tape Correctly
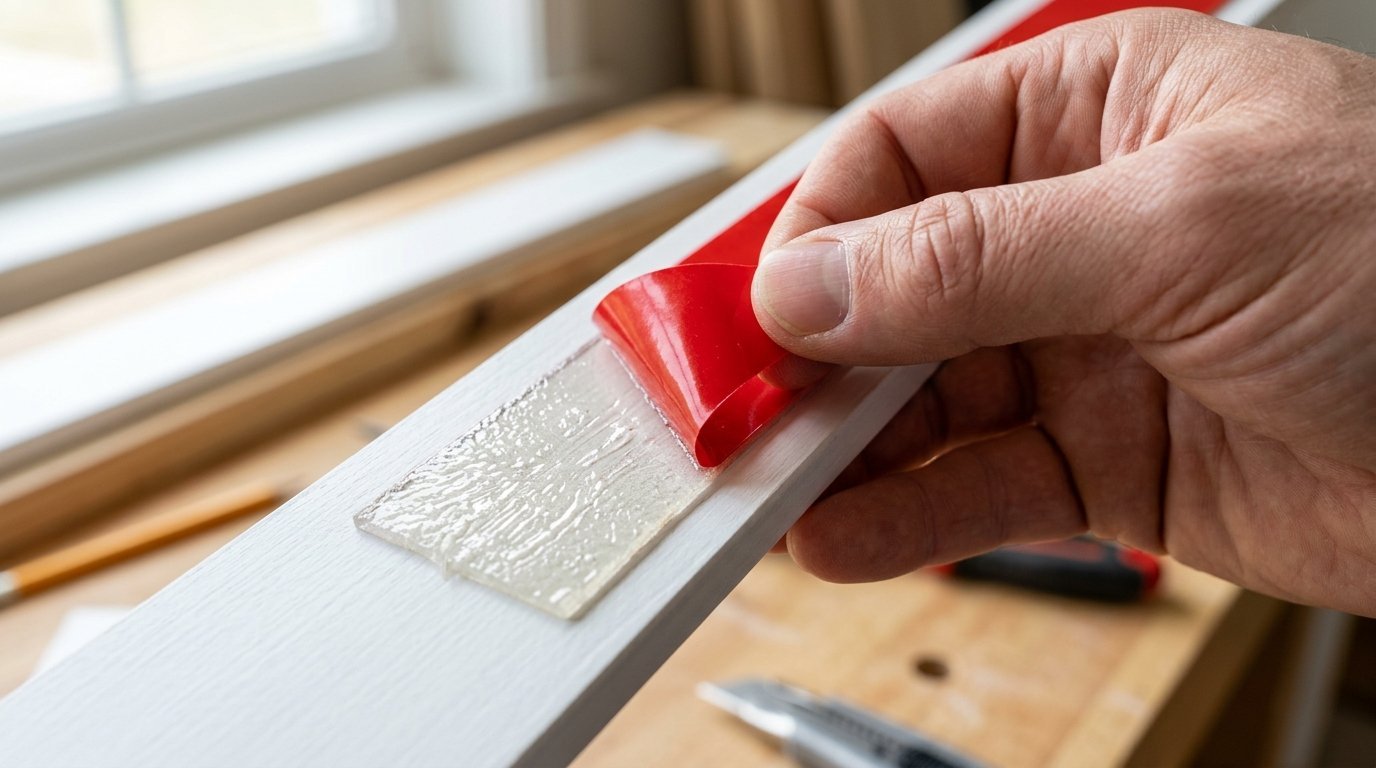
The tape does all the heavy lifting. You must apply it properly for a long lasting hold.
- Flip your cut piece of molding upside down
- Cut two inch strips of your heavy duty mounting tape
- Place one strip every six inches along the back
- Press each strip down hard with your thumb
- Leave the protective backing on the outer side for now
- Put 3M Command strips exactly on the corners
Creating A Strong Bond
Tape requires pressure to bond. Rub your thumb over every single piece of tape on the back of the trim. The warmth from your hand helps the glue activate.
Leveling And Placing The Molding On The Wall
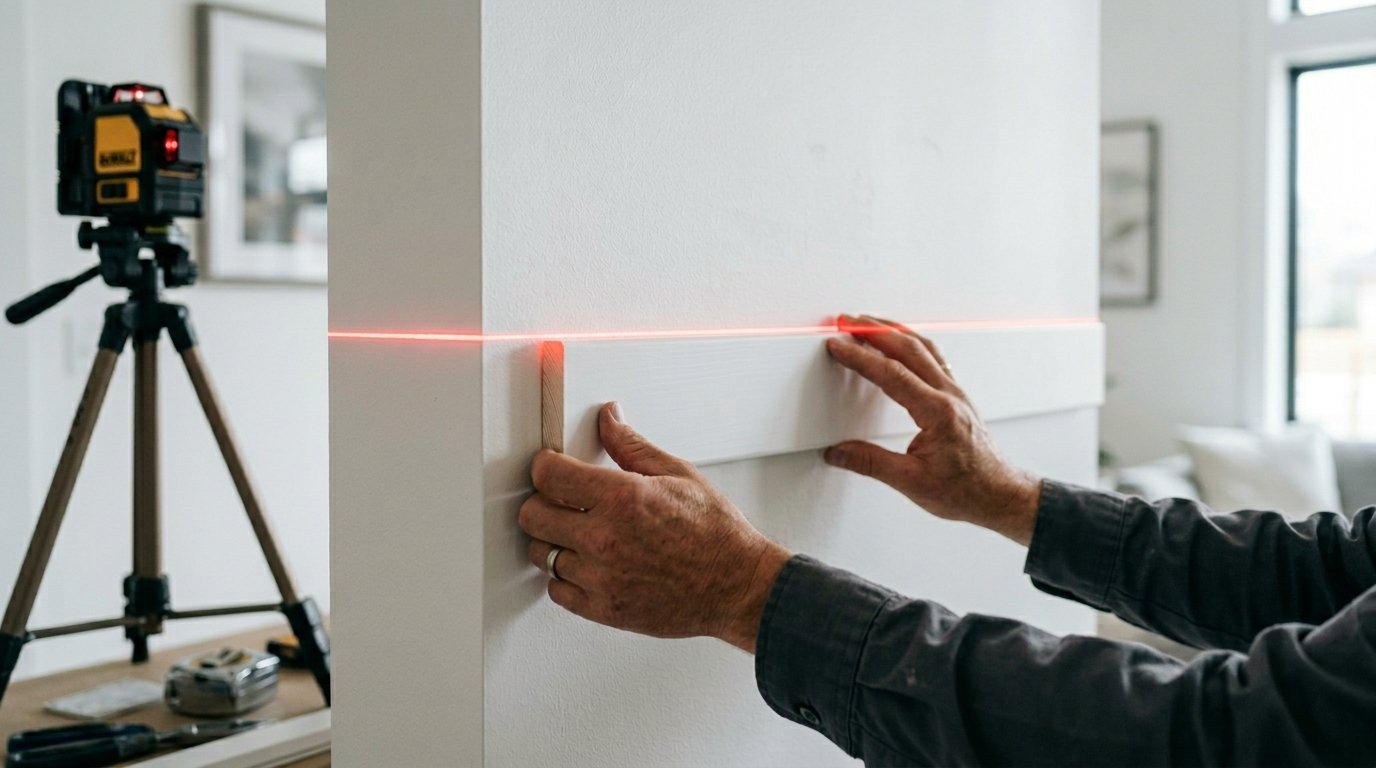
Your ceilings are probably not perfectly straight. Most rental apartments have crooked lines. You must use a level. Do not trust your eyes alone.
- Place your laser level on a tall tripod
- Shine the red line exactly where you want the bottom edge
- Peel the backing off just the middle pieces of tape
- Line up the center of your trim with the red laser line
- Press the center against the wall
- Peel the remaining tape backing off the sides
- Press the sides firmly into place
Pressing And Securing The Strips
Walk along the length of the installed piece. Push hard against the foam with the heel of your hand. Hold your pressure for ten seconds on every spot with tape. This forces the adhesive into the drywall texture.
Hiding The Seams For A Professional Look
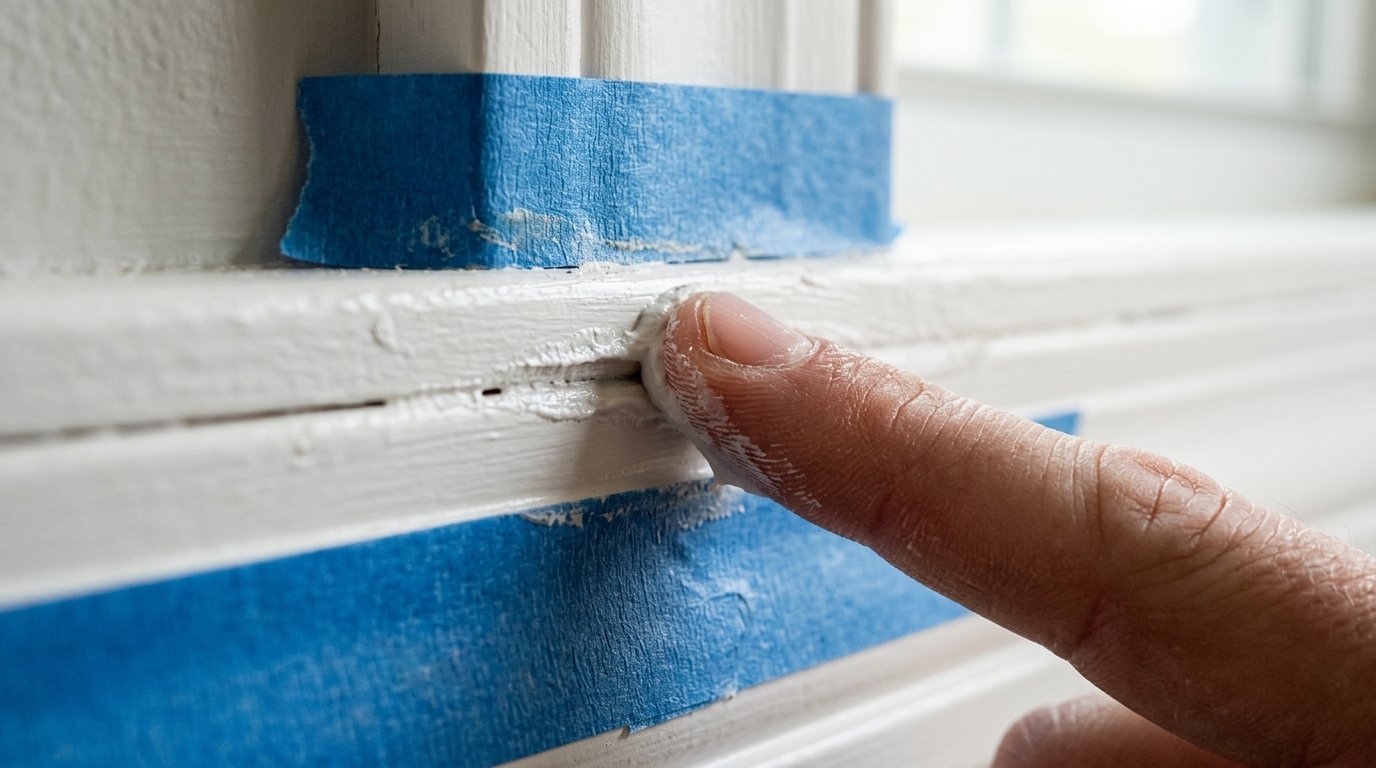
Foam pieces meet at the corners. Straight pieces meet in the middle of long walls. You will see a tiny gap between them. You must hide these seams.
The Painter Tape Trick
- Place strips of painters tape above and below the seam
- Buy a small tube of renter safe lightweight spackle
- Put a tiny drop of spackle on your fingertip
- Rub the spackle directly into the gap
- Wipe away the excess with a baby wipe
- Pull the painters tape off immediately
- Let the spackle dry completely
Renter Safe Caulk Alternatives
Traditional caulk requires a scraping tool for removal. Renters should avoid it. Lightweight spackle wipes away with a wet sponge when you move out. It fills the gaps beautifully. It takes regular wall paint perfectly.
Styling Your Room After Installation
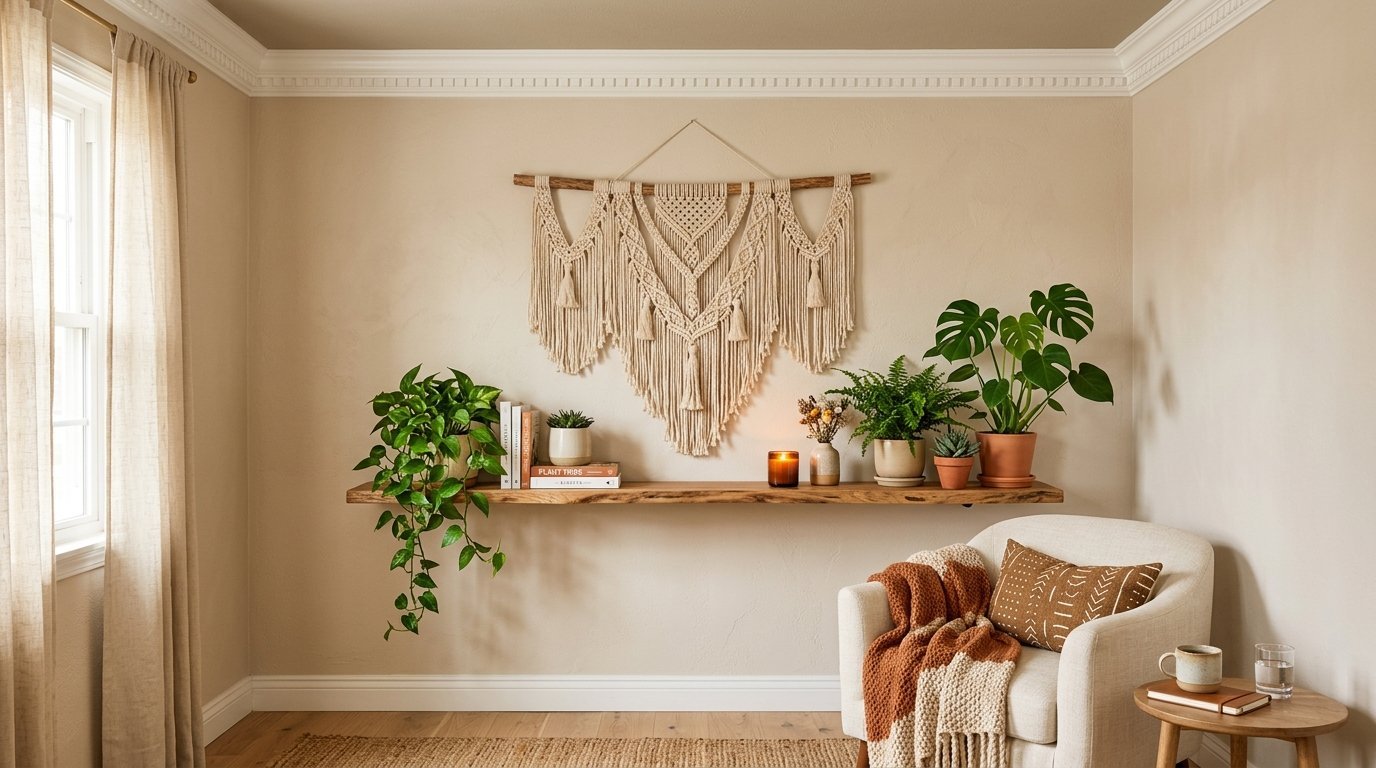
Your walls look completely different now. The architectural lines draw the eye upward. The room feels taller. You can now match your decor to your upgraded space.
Creating A Bohemian Living Room Feel
Boho styling loves texture. Hang a large macrame wall hanging directly below your new trim. The crisp white lines of the molding contrast beautifully with natural cotton ropes. The structured top balances the relaxed bohemian vibe below.
Farmhouse Kitchen Trim Touches
You can install this same Diy Wall Molding above your kitchen cabinets. It bridges the empty gap to the ceiling. Paint the foam trim to match your upper cabinets. It makes standard rental cabinets look like expensive custom built ins.
Removing The Trim Safely At Move Out
Your lease ends. You must pack your boxes. You must restore the walls. Ripping the trim directly off will tear the drywall paper. You must be gentle.
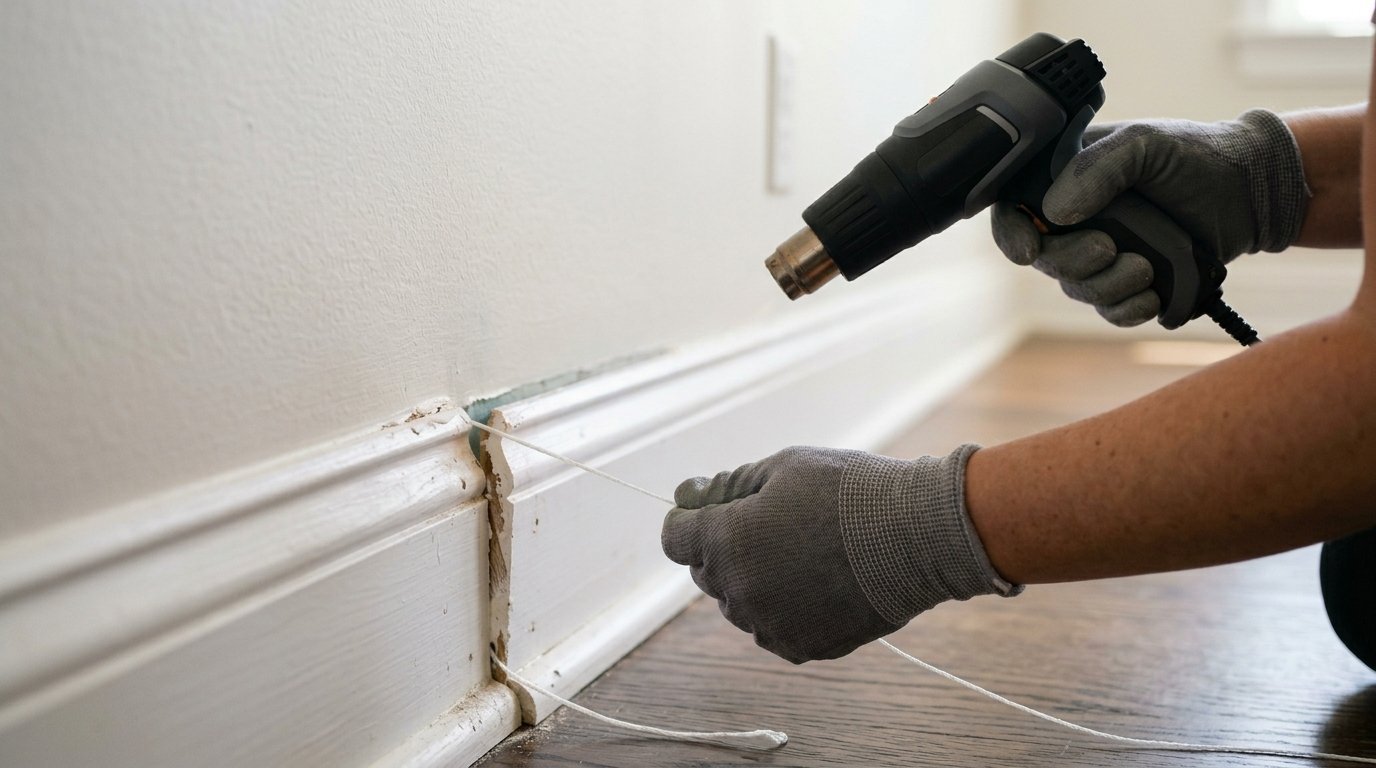
The Heat Gun Secret
- Plug in a standard hair dryer or low heat gun
- Aim the warm air directly at the tape locations
- Hold the heat there for thirty seconds
- The heat softens the heavy duty adhesive
- Slide a piece of thick dental floss behind the trim
- Saw the floss gently back and forth through the warm tape
- The foam trim falls right off the wall
Cleaning Leftover Residue
You will see sticky spots left on the drywall. Grab your high purity isopropyl alcohol. Put some on your microfiber cloth. Rub the sticky spots gently. The alcohol breaks down the glue. The wall looks completely untouched.
Frequently Asked Questions

Can I put tape on textured walls?
Yes you can. You must use thicker foam mounting tape instead of thin strips. The thick foam squishes into the wall texture. It grabs the high points of the bumps. Press extra hard during installation.
Will heavy duty tape rip my paint off?
It can rip paint if you pull it straight off. You must always use heat to soften the glue first. You must use the dental floss trick to slice the tape. Never pull outward away from the wall.
How much does temporary molding cost?
You can upgrade an entire standard bedroom for under 100 dollars. The polyurethane pieces cost around 40 dollars. The miter shears cost 20 dollars. The adhesive tape makes up the rest of the budget.
What happens if I make a bad corner cut?
Foam trim is extremely cheap. You simply cut a new piece. You can also use lightweight spackle to fill small cutting mistakes. Nobody will see a small gap once you fill it.
Can I paint over the tape?
You should not paint over the tape itself. You should paint the foam trim before you put it on the wall. If you must paint after installation put painters tape on the wall first.
Do command strips work for ceiling borders?
Command strips work well for the middle sections. They sometimes fail at the corners due to room humidity. You should mix Command strips with heavy duty mounting tape for the best hold.
How do I measure my room correctly?
Measure along the floor first. Floor measurements usually match the ceiling closely. Take your tape measure up a ladder to verify. Always buy 15 percent more material than your measurements say you need.
Can I put this in my bathroom?
Bathrooms have extreme humidity from showers. Standard double sided tape will fail eventually. You must use outdoor rated mounting tape if you try this in a full bathroom. A half bath without a shower works perfectly fine.
What is the best material for fake wood?
High density polyurethane ranks best. It feels hard like real pine. It takes paint beautifully. It cuts without splintering. It weighs very little.
How long does peel and stick last?
A proper installation lasts for years. If you clean the walls with isopropyl alcohol first the tape bonds permanently. It stays up until you apply heat to remove it.
Can I hang things on this trim?
No you cannot. This trim serves purely visual purposes. It holds its own weight only. Never hang pictures or heavy decorations from adhesive mounted foam.
Do I need to buy a laser level?
A laser level makes the job much faster. You do not strictly need one. A long standard bubble level works fine. You will just have to draw faint pencil lines on your wall.
What do I do about uneven ceilings?
Do not follow an uneven ceiling line. Your trim will look completely crooked. You must use a level. Leave a small gap at the ceiling if necessary. Straight trim tricks the eye into thinking the ceiling is straight.
How do I clean the walls first?
Use a microfiber cloth. Mix distilled water with isopropyl alcohol. Wipe the top perimeter of your room. Wait one full hour for all moisture to evaporate.
Can I reuse the molding when I move?
Yes you can. You simply peel the old tape off the back of the foam pieces. You apply fresh strips of tape. You can install the exact same pieces in your next apartment.
Final Thoughts On Temporary Crown Molding

You now hold the exact blueprint for upgrading your rental space. You know the exact tools to buy. You know how to prep your drywall for maximum stick. You understand how to cut perfect angles without touching a dangerous saw. Your blank apartment walls wait for this exact upgrade. Grab your miter shears and your mounting tape. Turn your basic rental into a custom designed home this weekend.

Anya Castellan is the Founder and Editor-in-Chief of Home Wall Trends. An art history graduate of the Rhode Island School of Design with twelve years of experience writing for leading American design publications, she specializes in composition, gallery wall theory, and the quiet architecture of domestic space. A former contributing editor at Architectural Digest and guest lecturer at Parsons School of Design, Anya personally reads and signs off on every piece before it is published.