Standing in front of a blank wall feels like facing a giant puzzle. You have your favorite memories in hand. You have beautiful art pieces ready for display. Yet the thought of making a mistake stops you. I have been there many times. I remember my first attempt at a gallery wall in my old apartment. I ended up with fifteen extra holes in the drywall. It looked like a woodpecker had moved in. My frames were crooked. The spacing was off. I felt defeated.
That experience taught me that hanging art is a science. It is not just about a hammer and a nail. It is about preparation and the right tools. You want your home renovation project to look professional. You want guests to stop and stare for the right reasons. This guide shares exactly how to get that level look without the stress. I have refined this process over ten years of decorating homes. These steps work for any frame and any wall.
Executive Summary
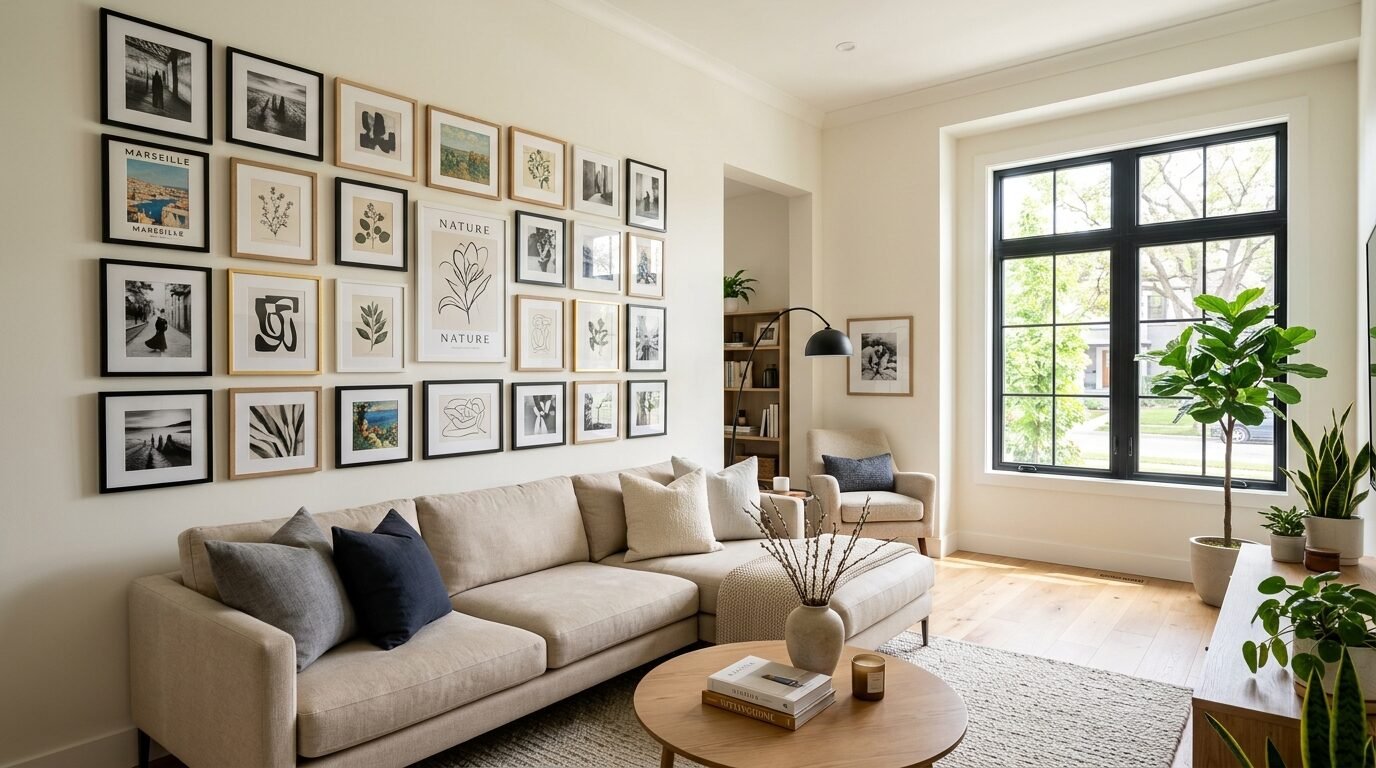
Creating a gallery wall is the fastest way to personalize your space. This guide provides a foolproof system to align your art perfectly. You will learn how to use paper templates to prevent wall damage. We look at the exact measurements pros use to find the perfect height. I share why the 57 inch rule is your best friend. This article compares tools like the Bosch Laser Level and Command Strips.
You will see real examples of gallery walls that stay straight for years. I include a case study of a staircase project that usually scares people. We cover costs for various hanging methods. You will find tips for renters and homeowners alike. By the end of this post you will have the confidence to transform your room. Your wall will look like a curated museum display. Best of all you will save yourself from the frustration of crooked frames.
1. Choose Your Layout Before Touching the Wall
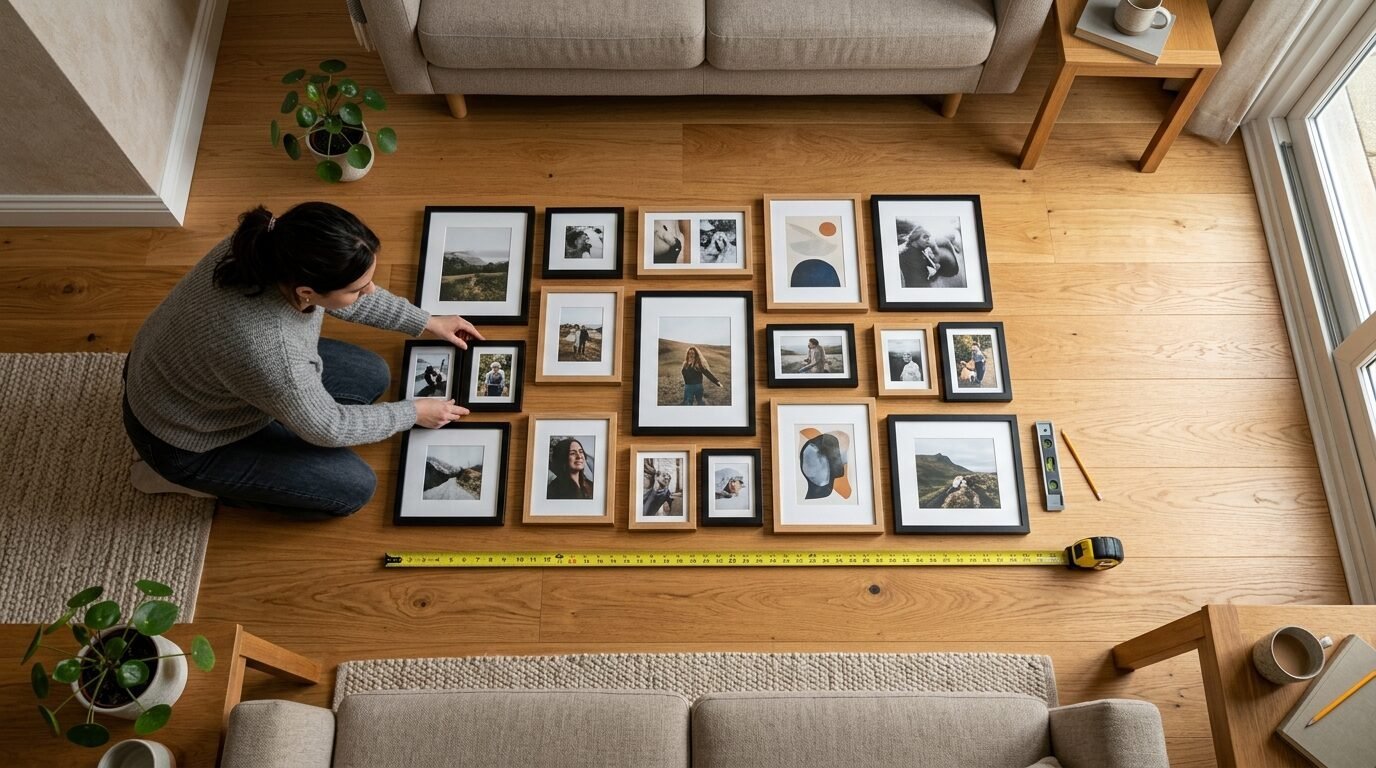
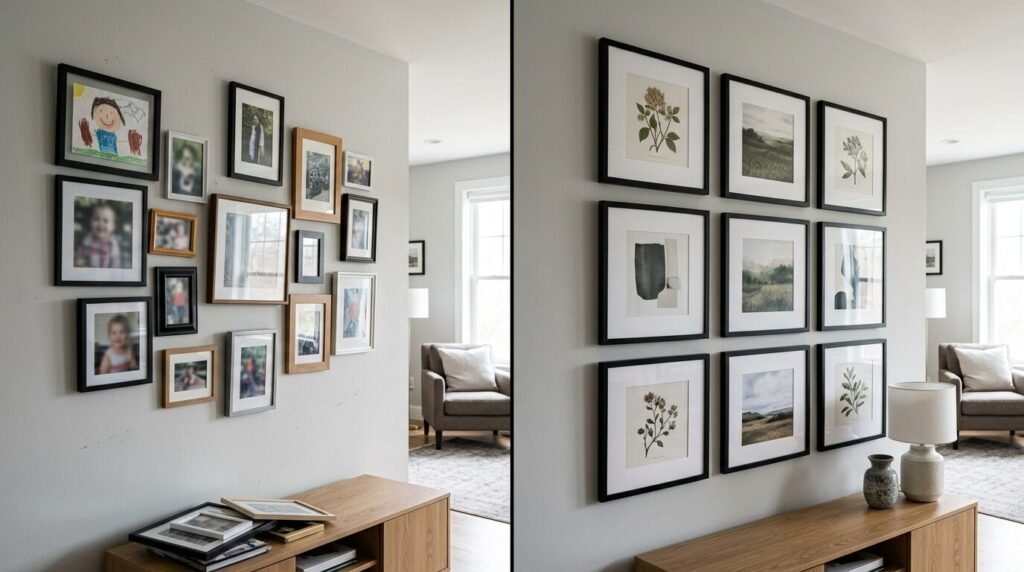
Planning is the most important part of hanging pictures. I see people start by hammering a nail in the middle of the wall. This is a mistake. You must visualize the entire group first. In my experience laying everything out on the floor is the best start. I use the rug in my living room to mimic the size of my wall. This allows me to move pieces around without making marks.
Think about the balance of your frames. If you have one large frame and five small ones place the large one slightly off center. This creates visual interest. I often use IKEA Ribba frames for a clean look. They are affordable and come in many sizes. If you want a more high end feel West Elm has beautiful metal options. Laying them out lets you see how colors interact. You might notice two dark photos are too close together. Fix these issues on the floor. It takes twenty minutes but saves hours of repair work later.
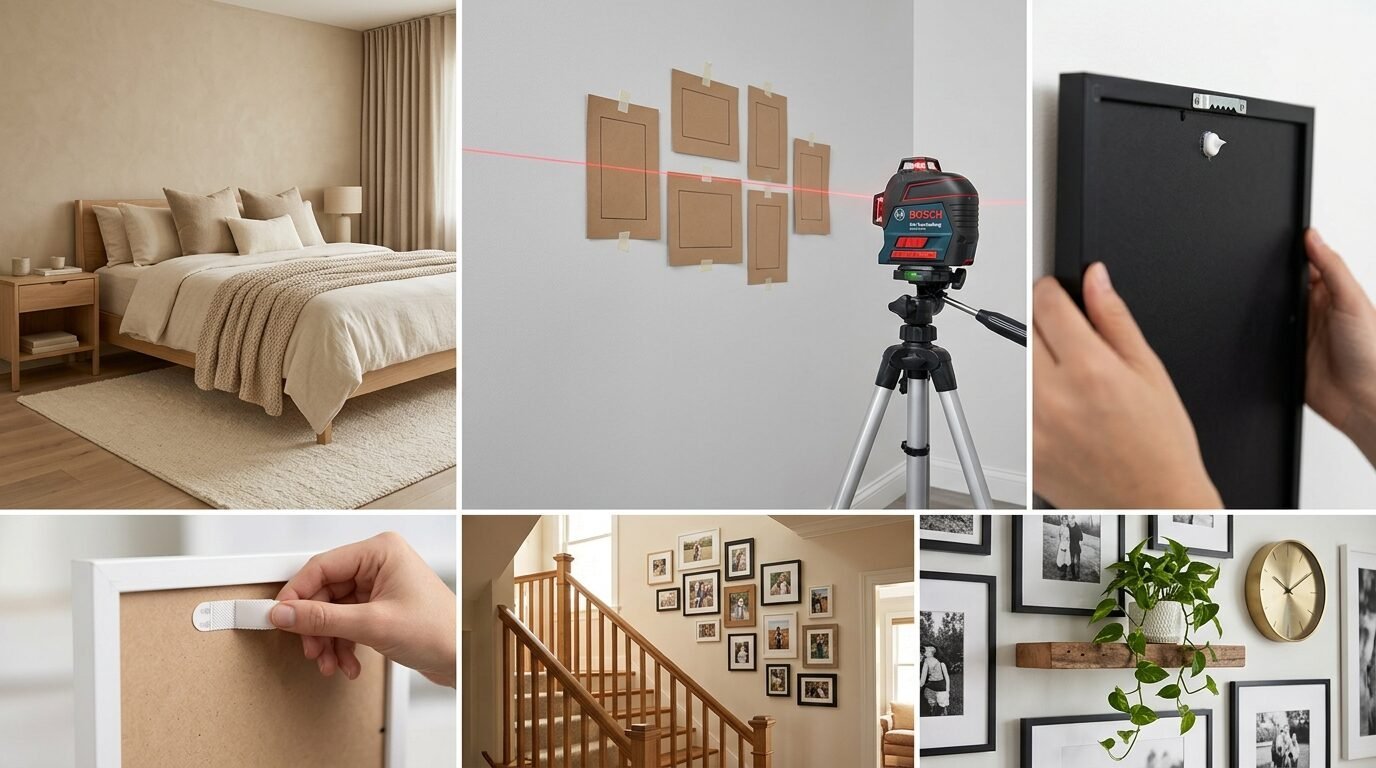
2. Create Paper Templates for Every Frame

This step is the secret to a perfect gallery wall. I always buy a roll of brown butcher paper or use old grocery bags. Trace every frame onto the paper. Cut out these shapes. Mark the exact spot where the hanging hardware sits on the back of the frame. This is a critical detail. Many people mark the top of the frame but the nail needs to be lower.
I once skipped this for a small three frame set. I thought I could eyeball it. All three ended up at different heights. Now I use FrogTape to stick these paper templates to my wall. This tape does not pull off paint. You can move the paper around until the arrangement feels right. It lets you see the scale of the gallery wall from across the room. You can walk by it for a day to make sure you love the flow. It turns a permanent decision into a flexible one.
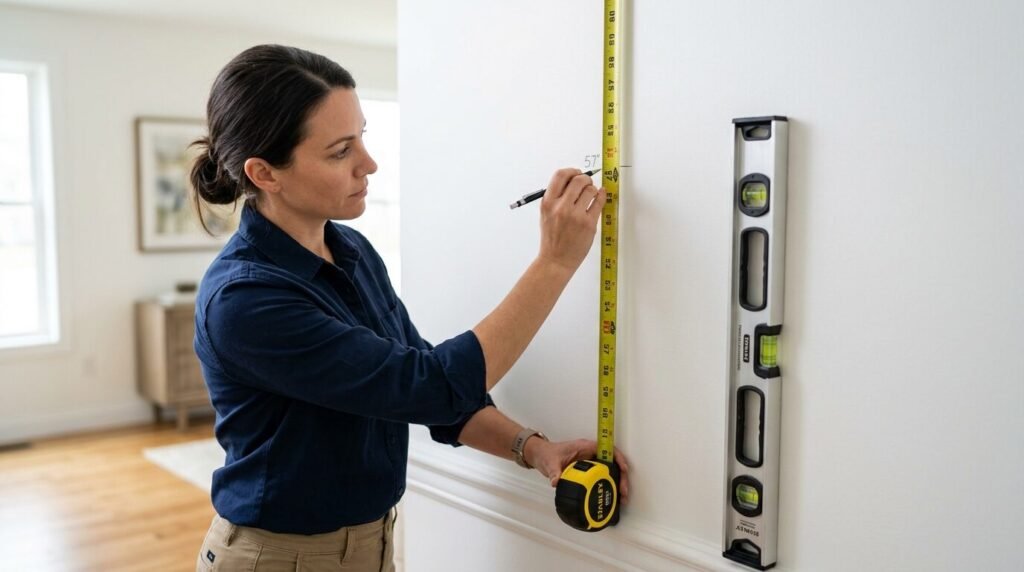
3. Use the 57 Inch Rule for Professional Height
Most people hang their art too high. I see this in almost every home I visit. Art should be at eye level. Museums use a standard height of 57 inches from the floor to the center of the piece. This creates a cohesive line throughout your home renovation. For a gallery wall this 57 inch mark should be the center of the entire grouping.
I tested this rule in a client project last year. We had a massive wall with twelve mixed frames. We measured 57 inches up and marked it with a light pencil. We centered the largest piece on that line. The result felt natural and grounded. If you are hanging art above a sofa stay 6 to 8 inches above the back of the couch. This keeps the art connected to the furniture. It prevents the art from looking like it is floating away.
4. Invest in a Reliable Laser Level
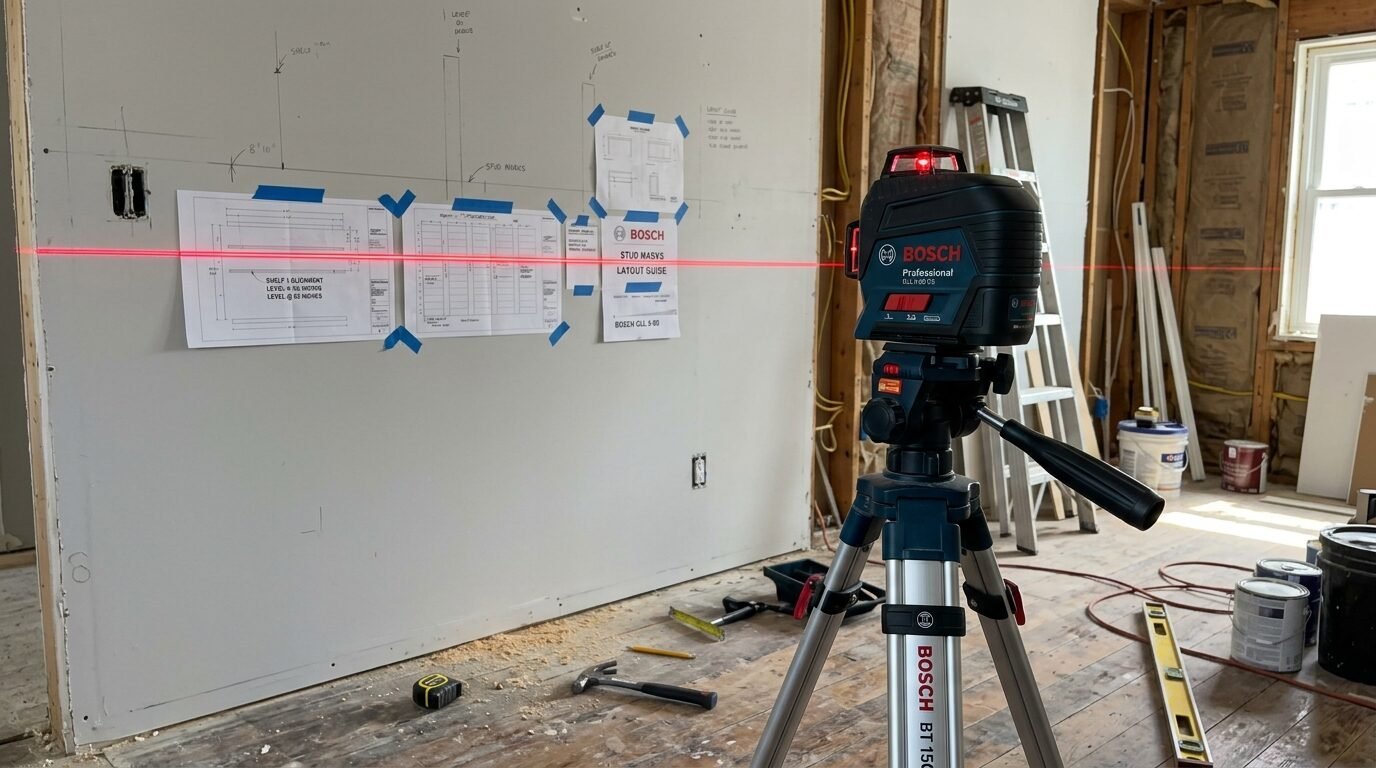
A bubble level is fine for one frame. For a full gallery wall a laser level is a game changer. I use the Bosch GLL25 for my projects. It projects a bright red crosshair onto the wall. This gives you a perfect vertical and horizontal line at once. You can align the tops or centers of your templates with the laser light.
I have seen people try to use strings and weights. That method is slow and frustrating. The laser level stays still while you work. It ensures that frames on opposite sides of the wall are exactly even. If you are on a budget a standard T-Square also works well. It helps you maintain 2 or 3 inch gaps between frames consistently. Consistent spacing is what makes a gallery wall look intentional. Even a quarter inch difference is visible to the eye.
5. Master the Toothpaste Trick for Nail Placement
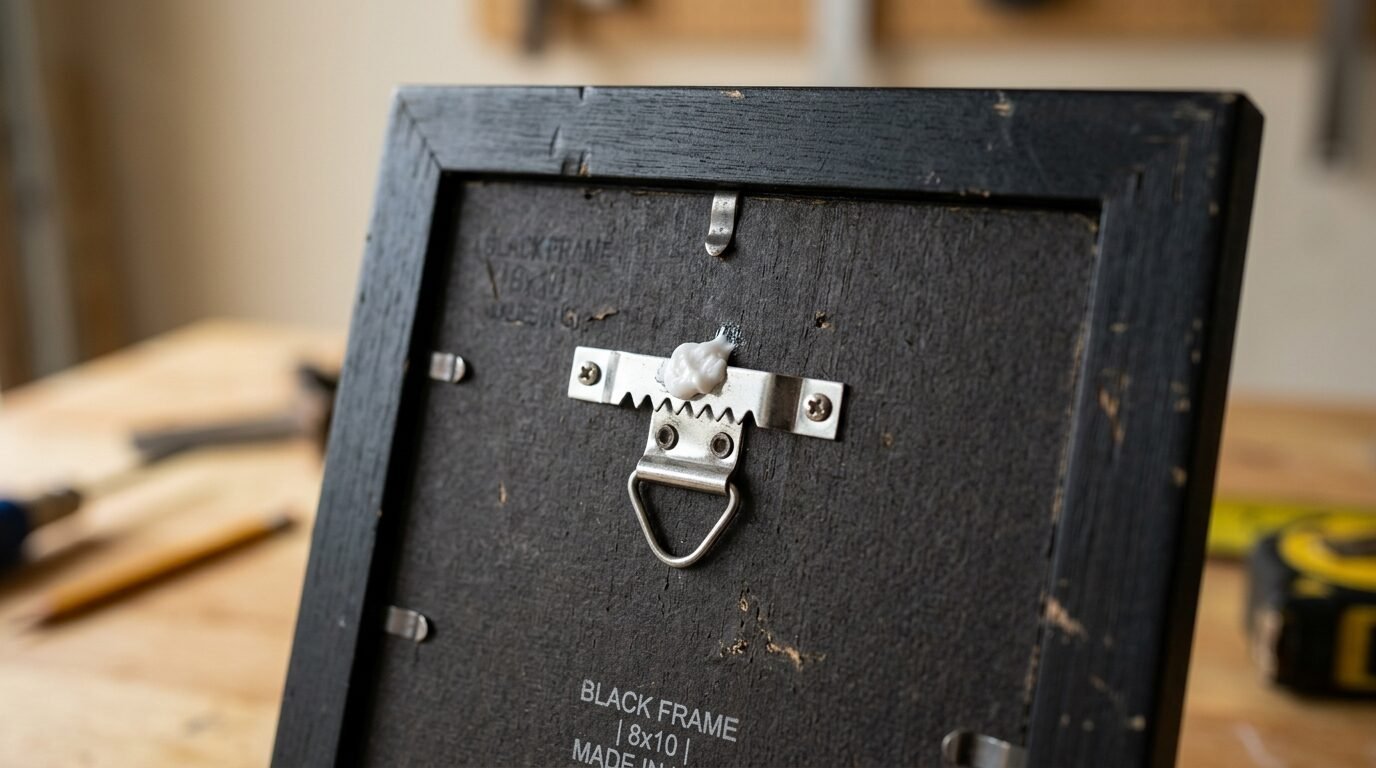
Finding the exact spot for the nail is hard. You measure the back of the frame but it still ends up off. I use a tiny dab of white toothpaste on the hanging bracket. I then press the frame against the paper template on the wall. The toothpaste leaves a small dot on the paper. That dot is exactly where your nail or screw needs to go.
This works much better than measuring with a ruler. Hardware on the back of frames is often slightly crooked. This trick accounts for those imperfections. I used this for a heavy mirror last month. The mirror had two D-rings on the back. Measuring between them is a nightmare. The toothpaste method took five seconds. It was perfectly level on the first try. Just wipe the toothpaste off the frame hardware when you are done.
6. Renters Should Rely on Command Strips
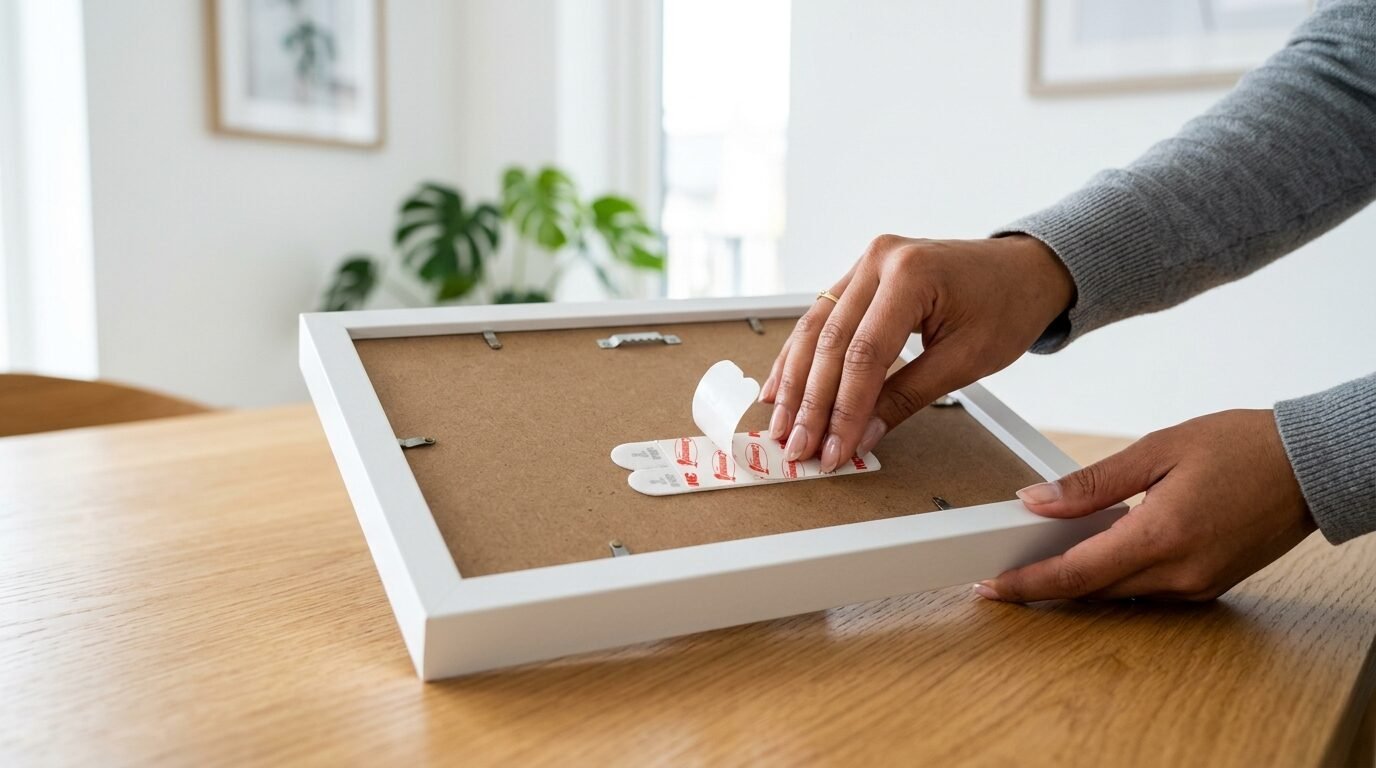
I lived in rentals for six years. I learned how to decorate without losing my security deposit. Command Large Picture Hanging Strips are the best solution. They work like Velcro. You can click the frame into place. The best part is the removal. They pull off cleanly if you follow the instructions.
In my experience these strips work best on smooth walls. If you have textured plaster they might struggle. I once had a heavy wooden frame fall because I used too few strips. Always check the weight rating on the package. For a medium frame I use four pairs of strips. This prevents the frame from tilting over time. It keeps the gallery wall locked in place even if someone slams a door nearby.
7. Case Study: The Staircase Gallery Wall Success
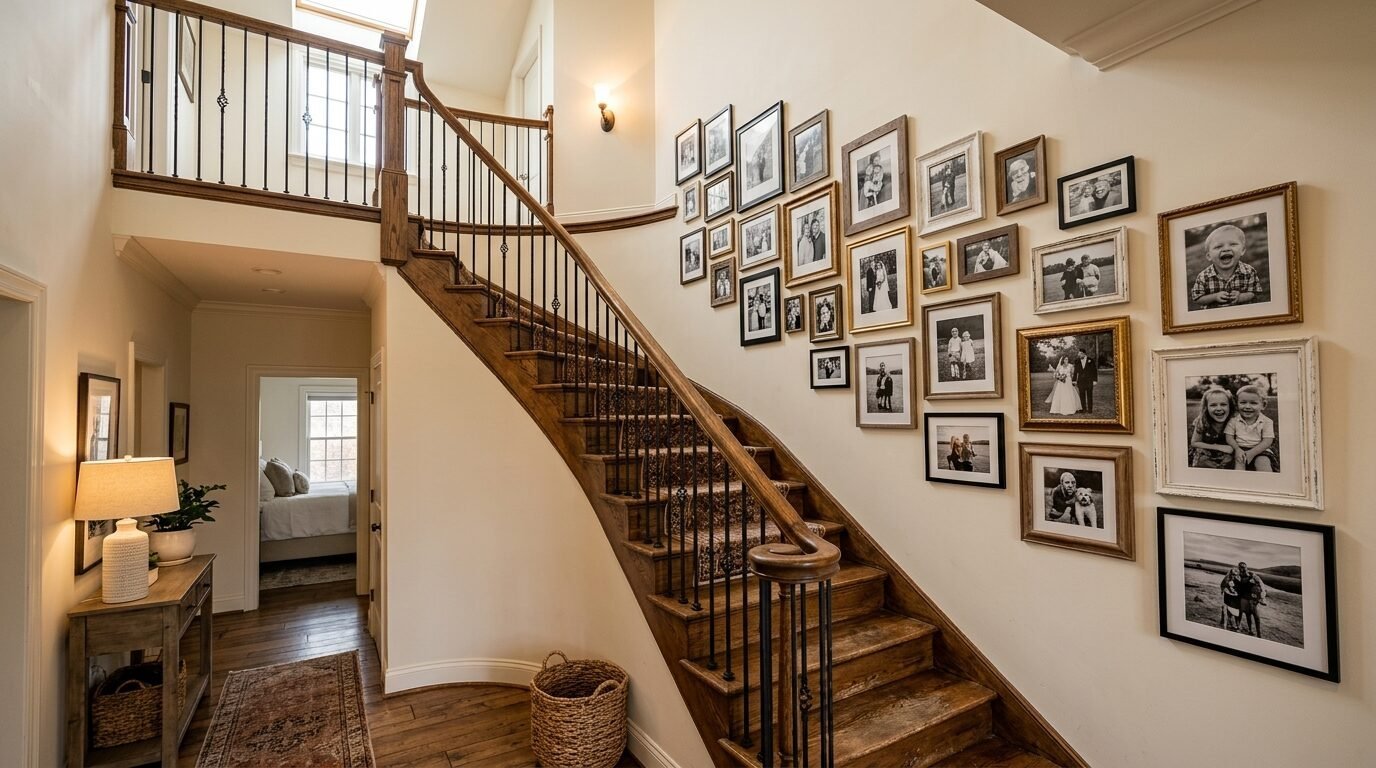
Staircases are the hardest places to hang art. The floor is at an angle but the frames must stay level. I helped my sister with her staircase last summer. We used fifteen frames of different sizes from Pottery Barn. We followed the angle of the handrail for the bottom line of the gallery.
We started in the middle of the stairs. We worked our way out to the top and bottom. Using paper templates was mandatory here. We spent two hours just moving the paper around. We kept a 3 inch gap between every frame. This consistent spacing tied the random frame styles together. She has two kids who run up and down those stairs. We used Museum Wax on the bottom corners of every frame. This sticky wax keeps the frames from shifting when the house shakes. They have stayed perfectly straight for a full year.
8. Mix Art and 3D Objects for Depth
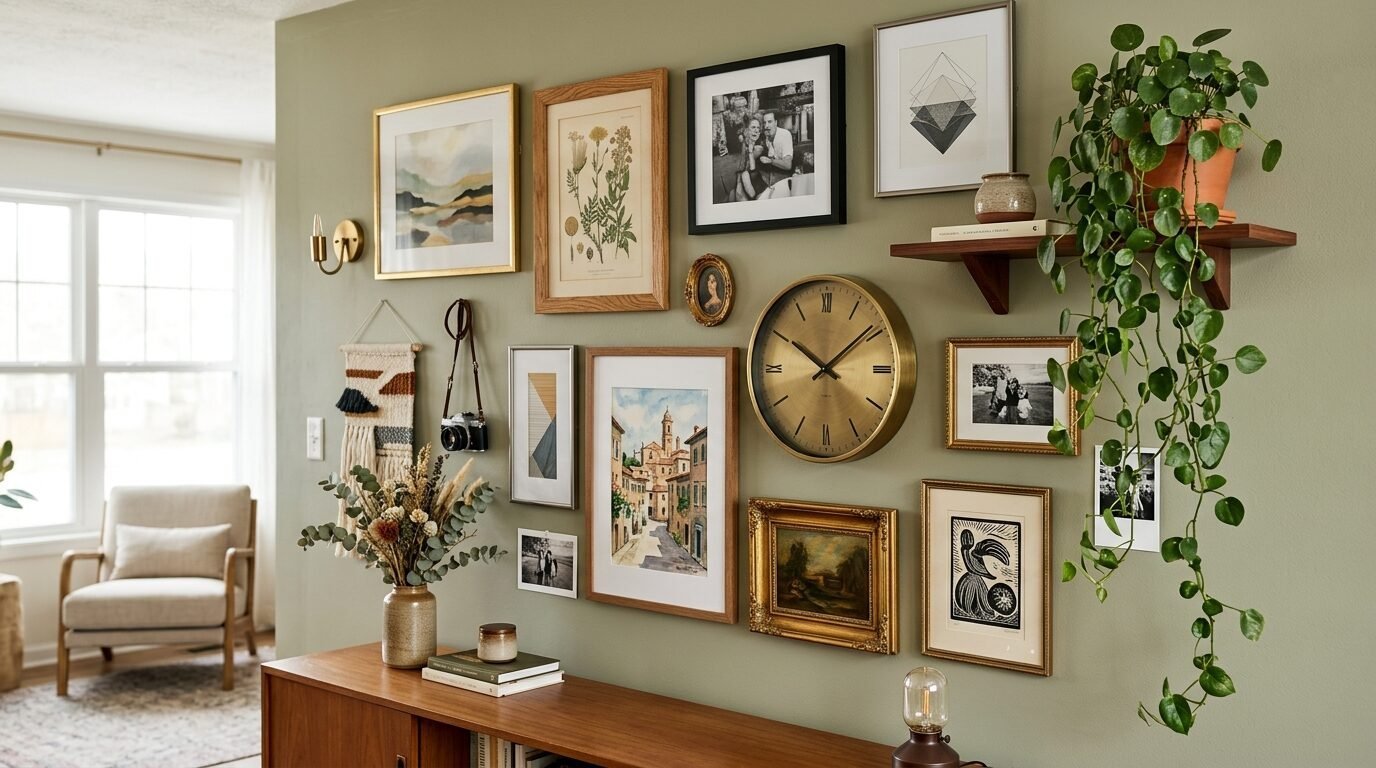
A gallery wall does not have to be only flat frames. I like to add depth with small shelves or hanging plants. I have a brass clock in the middle of my own wall. It breaks up the square lines of the frames. This adds a human touch to the design. It feels less like a catalog and more like a home.
I once added a small wooden carving I found at a flea market. It sat between two black and white photos. The texture of the wood made the photos pop. When mixing items keep the weight balanced. Do not put all the heavy items on one side. Spread them out to keep the eye moving across the wall. Use heavy duty anchors for any 3D objects. Wallbox offers great options for mounting heavier decor safely.
9. Tool Comparison for Every Budget
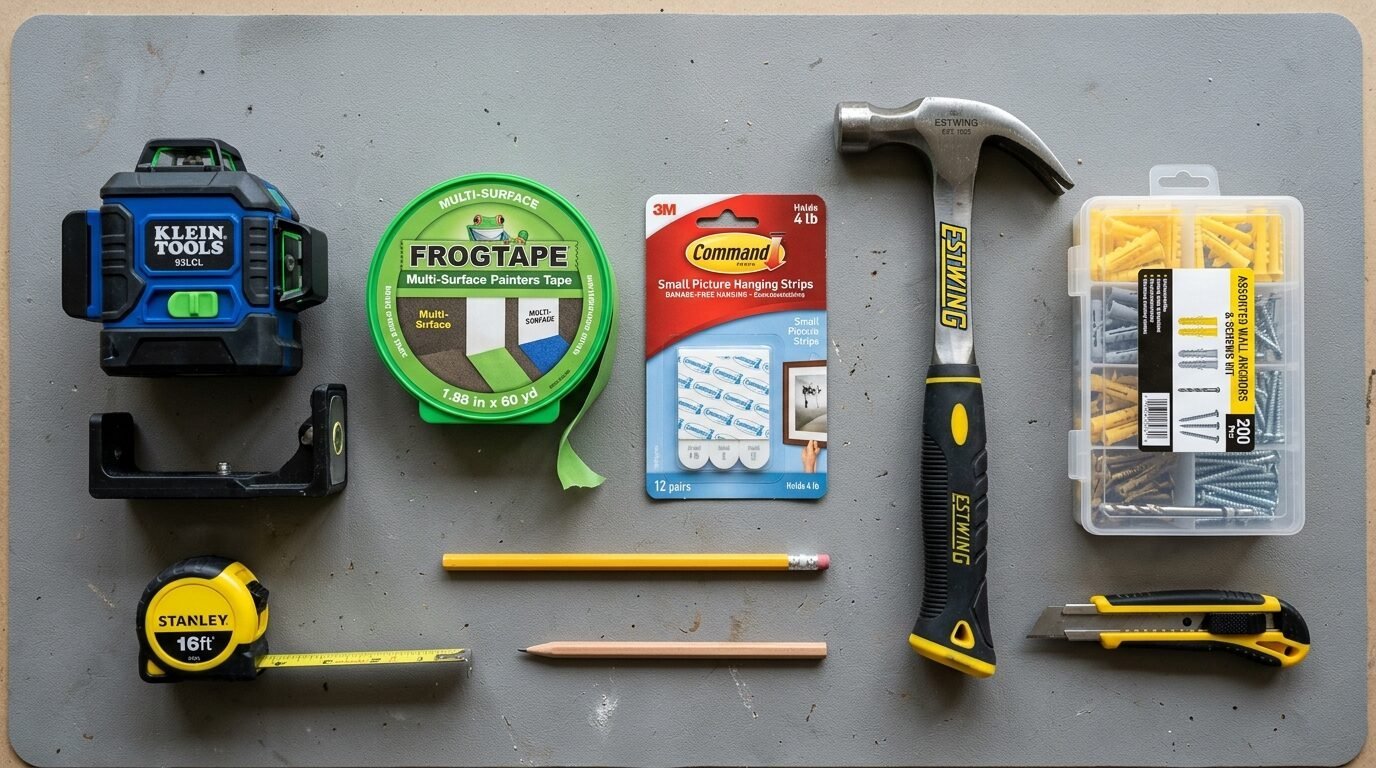
| Tool Type | Best Brand | Cost | Best For |
| Laser Level | Bosch | $40 – $100 | Large gallery walls and precision |
| Hanging Strips | Command | $10 – $20 | Renters and light frames |
| Painter’s Tape | FrogTape | $6 – $12 | Marking spacing and holding templates |
| Picture Wire | OOK | $5 – $10 | Traditional heavy frames |
| Wall Anchors | Toggler | $10 – $15 | Drywall security for heavy art |
I have used every tool on this list. For a small project Command Strips are enough. If you plan to do your whole house buy the Bosch laser level. It pays for itself in time saved. I prefer FrogTape over standard blue tape. It has better adhesion but never leaves a sticky residue.
10. Avoid Common Gallery Wall Failures

The biggest failure I see is poor spacing. Some people put frames too far apart. This makes the wall look cluttered rather than curated. Aim for 2 to 3 inches between pieces. If the frames are very large you can go up to 4 inches. I saw a wall recently where the gaps were 8 inches wide. The art looked lost on the wall.
Another mistake is using the wrong hardware for the weight of the frame. I once saw a glass frame shatter because it was hung on a tiny finishing nail. Always use a proper hook rated for the weight. If your frame is over 20 pounds find a stud in the wall. If no stud is available use a toggle bolt. These spread the weight behind the drywall. It is much safer for your art and your floors.
11. Frequently Asked Questions
What is the best spacing for a gallery wall?
I recommend a gap of 2 to 3 inches between each frame. This distance feels tight enough to look like a single unit. It is wide enough to let each piece of art breathe. If your frames are all the same size use exactly 2 inches for a clean grid. For eclectic mixes 3 inches gives you more flexibility.
Can I hang a gallery wall without nails?
Yes you can use adhesive strips. Command Strips are the industry leader for this. Make sure your wall is clean and dry before applying them. I use rubbing alcohol to prep the spot. This ensures the strongest bond. Avoid using these on wallpaper as they can tear the surface.
How do I keep frames from tilting?
Use two hanging points instead of one. If a frame hangs on a single nail it will eventually tilt. Using two nails or two Command Strips keeps it level. You can also put a small piece of Blue-Tac or Museum Wax on the bottom corners. This grips the wall and prevents movement.
Should I match all my frames?
This depends on your style. A grid of matching frames looks modern and organized. A mix of wood and metal frames feels more cozy and personal. In my experience keeping one element consistent helps. Maybe all the art is black and white. Maybe all the frames have white mats. This creates a sense of order in the chaos.

12. Final Steps for a Perfect Finish
Once all your frames are up step back. Look at the wall from different angles. Use your level one last time to check the tops. Sometimes a frame shifts as you set it on the nail. I like to stand in the doorway of the room to see how it looks as you enter. This is the view your guests will have.
I have noticed that lighting makes a big difference. If your wall looks dull consider adding a picture light. These sit above the art and make it glow. It turns a simple wall into a focal point. My gallery wall is my favorite part of my living room. It tells the story of my life through photos and art. Following these steps ensures your story is told beautifully and straight. You have the tools and the plan. Now go create something amazing.

Anya Castellan is the Founder and Editor-in-Chief of Home Wall Trends. An art history graduate of the Rhode Island School of Design with twelve years of experience writing for leading American design publications, she specializes in composition, gallery wall theory, and the quiet architecture of domestic space. A former contributing editor at Architectural Digest and guest lecturer at Parsons School of Design, Anya personally reads and signs off on every piece before it is published.