Bare walls around your cooking space make the room feel entirely cold and unfinished. Many homeowners struggle endlessly with styling these tricky, moisture-heavy zones. Grease splatters from cooking and constant water splashes from washing dishes often ruin delicate art. You need specific pieces that withstand daily, messy life. I have spent years personally testing different materials in these exact tricky spots. The right stylistic choices turn a bland, sterile cooking area into the true heart of your home. A beautifully styled space actually makes daily meal prep feel far less like a heavy chore. Placing items thoughtfully protects your investment while giving you that perfect Pinterest aesthetic. I once left a naked wall above my sink for two years because I feared water damage. Finding the right balance of beauty and durability changed everything for my daily routine.
You will get exactly twenty two actionable styling ways for your culinary space right here. These specific item placements protect your curated pieces from intense heat and steam. Expect to see budget friendly options costing well under fifty dollars. I share my exact placement measurements for optimal visual balance in every single section. You will find realistic ways to blend old vintage pieces with modern convenience. Putting these ideas into action takes less than a single weekend for most weekend warriors. We cover everything from hanging heavy copper pots to creating beautiful visual flow. You will leave with a clear plan for your bare spaces.
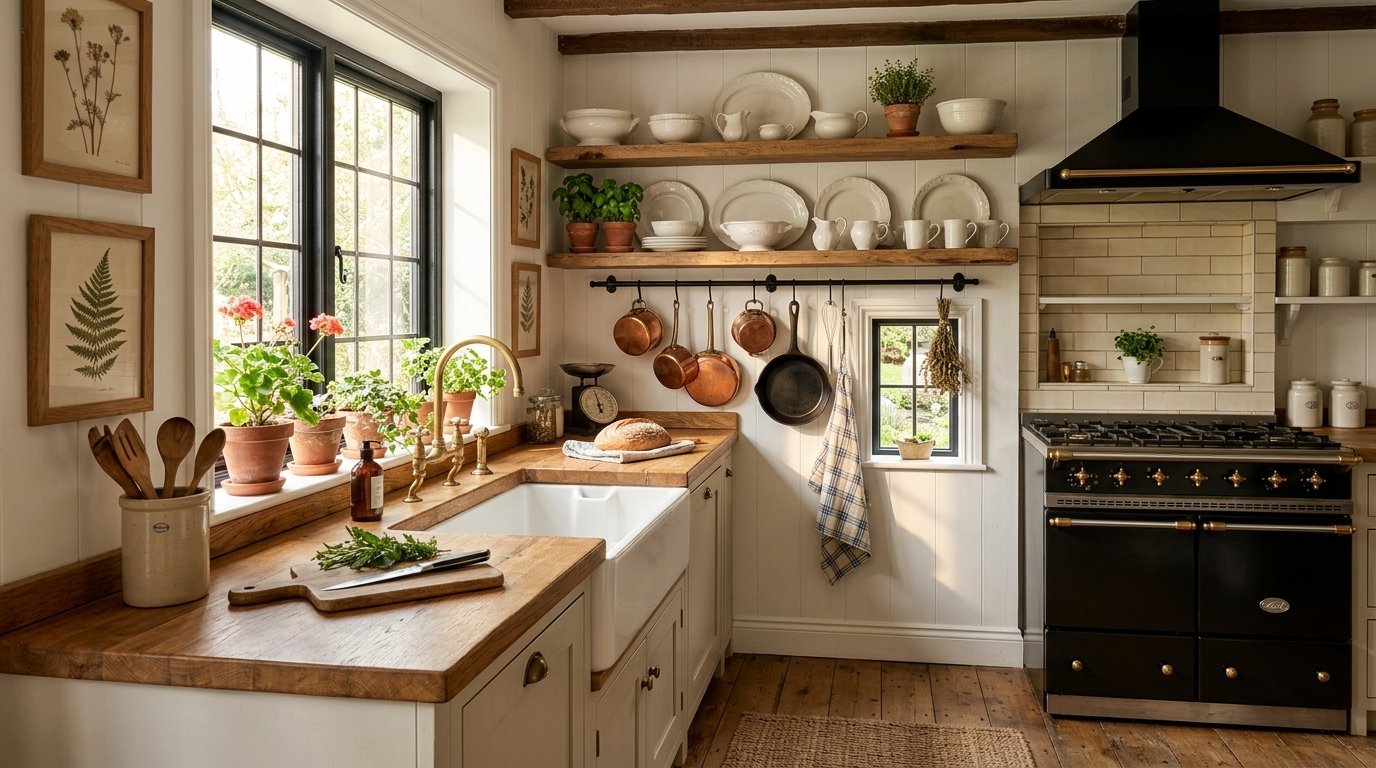
1. Hang Vintage Copper Pots Over the Range
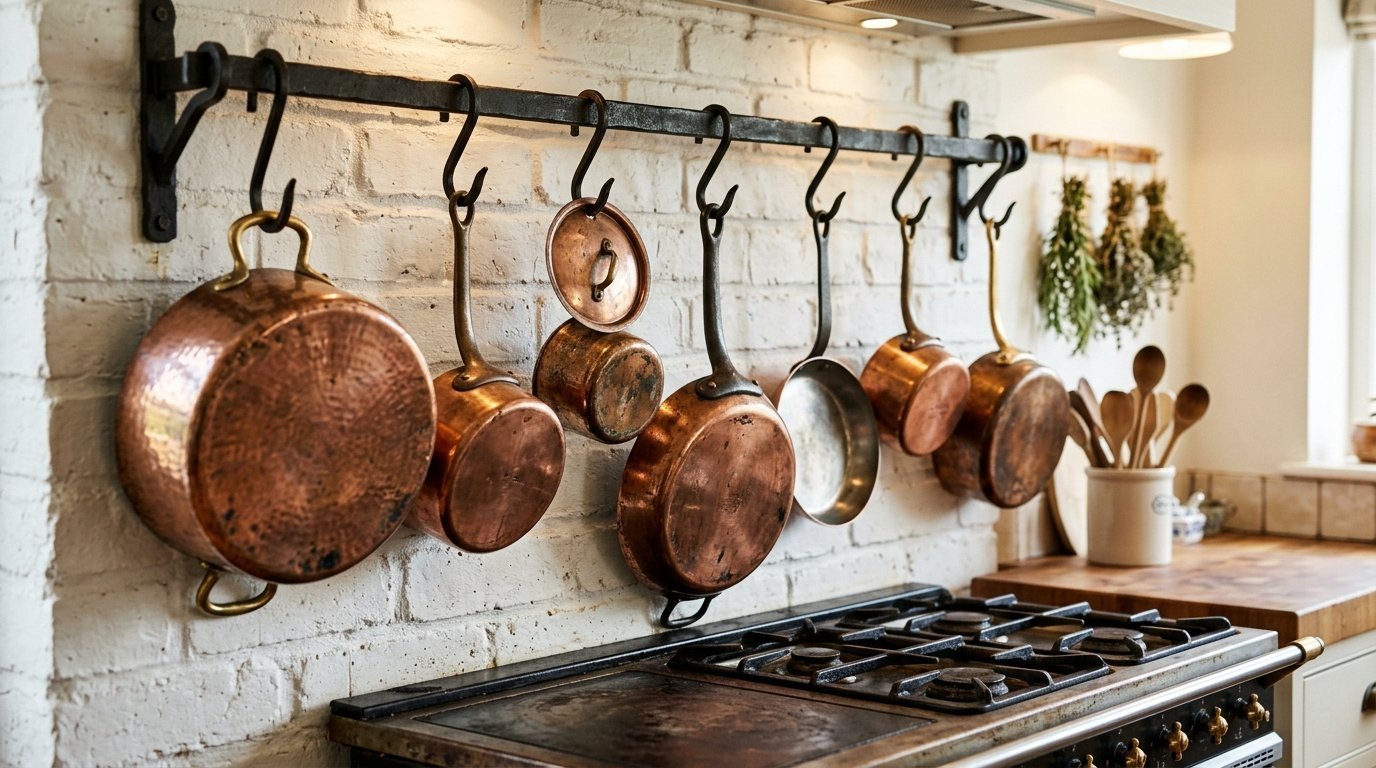
Hanging copper cookware directly above the stove provides instant rustic charm. The warm metallic tones perfectly capture that classic farmhouse kitchen feel. I always recommend sourcing authentic vintage pieces from local antique markets or online auctions. Modern replicas often lack the heavy patina that gives these pots their soul. You must locate the wall studs before mounting anything heavy above a cooking surface. I once hung a skillet using only drywall anchors and it crashed down during dinner. Use a heavy duty wrought iron rail firmly anchored into the wooden wall studs. Space the S-hooks evenly so the pots do not clang together when you walk past. Keep the bottoms of the lowest pots at least twenty inches above the burners. This exact clearance prevents heat damage and gives you plenty of room to cook comfortably.
2. Install Chunky Floating Wood Shelves
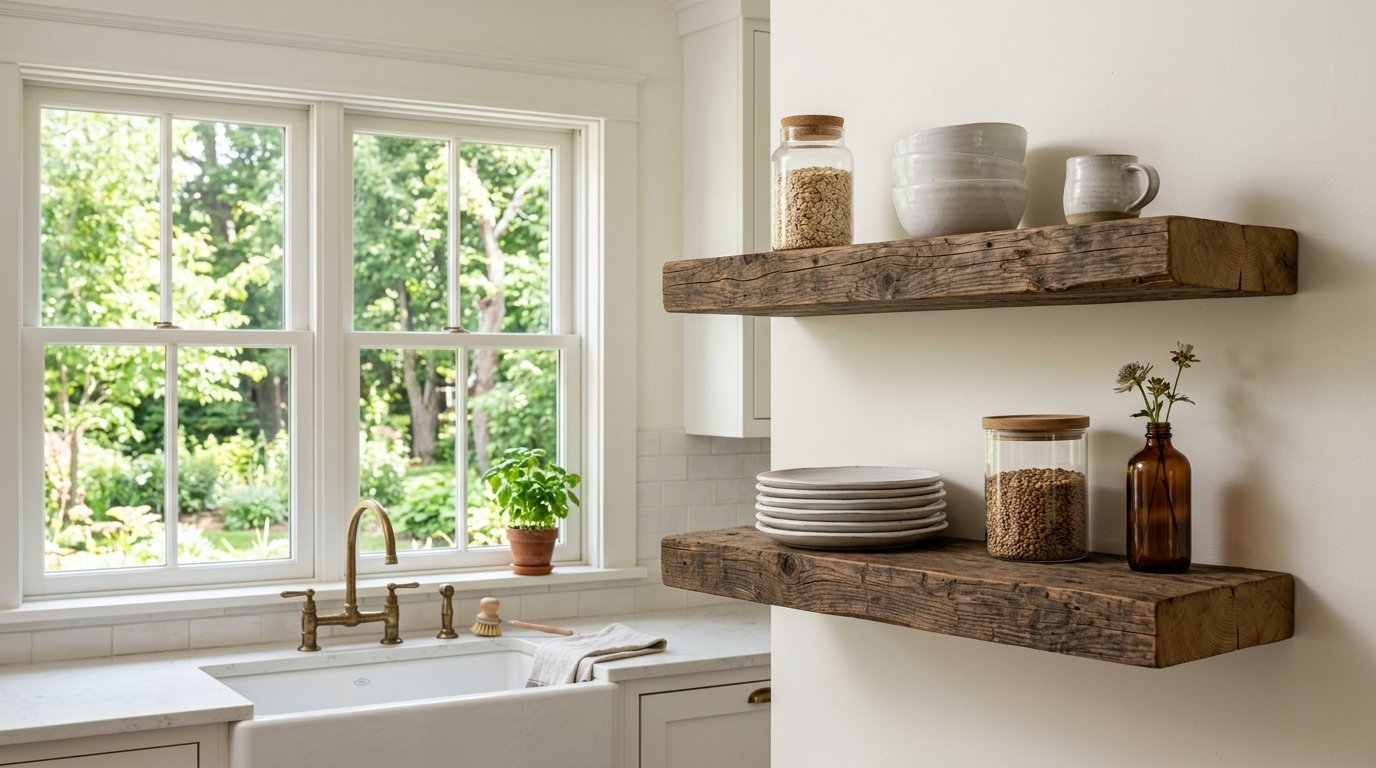
Floating shelves give you open storage right where you need it most. Placing these directly next to the sink keeps your daily items within easy reach. I prefer using reclaimed barn wood for that authentic, weathered farmhouse texture. You need shelves at least two inches thick so they look visually grounded. Mount the first shelf exactly eighteen inches above your countertop surface. This spacing leaves plenty of room for your coffee maker or tall appliances underneath. Style the open shelves with a mix of stacked white plates and clear glass jars. Do not overcrowd the boards or the area will quickly look messy. I like to leave at least thirty percent of the shelf surface completely empty. This negative space allows the eye to rest and highlights your favorite ceramic pieces perfectly.
3. Display Antique Ironstone Platters

Ironstone platters bring a bright, crisp white element to darker painted walls. Creating a symmetrical display flanking your range hood draws the eye upward immediately. You should hunt for pieces featuring subtle crazing or tiny imperfections. Those small flaws tell a story and make the farmhouse kitchen feel lived-in and real. Use specialized spring-loaded plate hangers coated in plastic to protect the antique edges. I always cross two heavy duty wall hooks for each platter for extra security. Map out your arrangement on the floor first using newspaper cutouts taped to the wall. This trick saves you from drilling unnecessary holes in your beautiful backsplash. Keep the platters tightly grouped with only two inches of space between their widest points. The tight grouping makes them look like a single, cohesive art installation.
4. Frame Small Botanical Prints
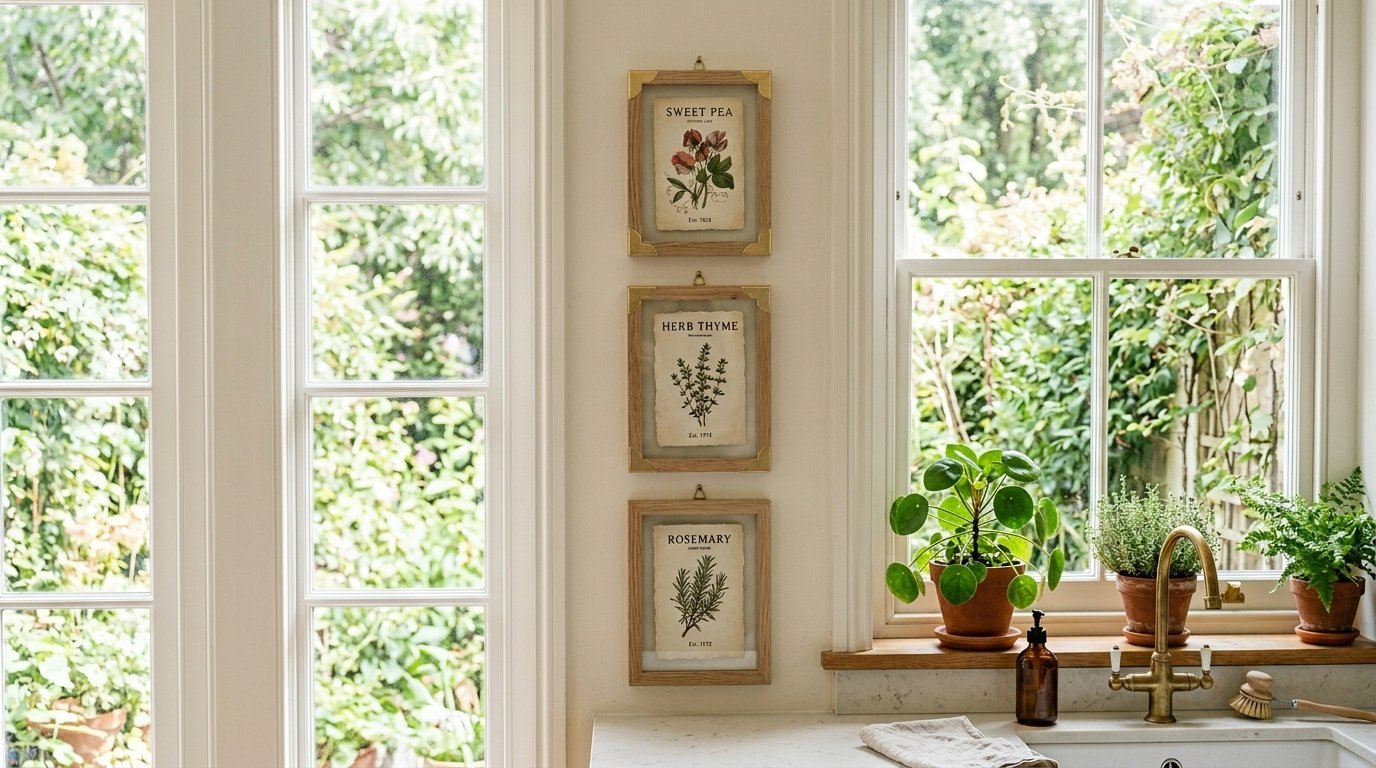
Small botanical prints introduce a natural, outdoor feeling right near your sink window. I have found gorgeous vintage seed packet illustrations in old farming magazines. You can place these small frames directly on the window trim if you lack wall space. Always place the prints behind genuine glass rather than cheap plastic acrylic. Glass wipes clean easily when rogue dishwater inevitably splashes upward. Seal the back of the wooden frames with professional framing tape to block out moisture. I love grouping these in sets of three or five for an odd-numbered visual balance. Choose frames made of raw, unstained oak to keep the look light and airy. Keep the artwork small, typically no larger than five by seven inches. The smaller scale prevents the art from overpowering the delicate window area.
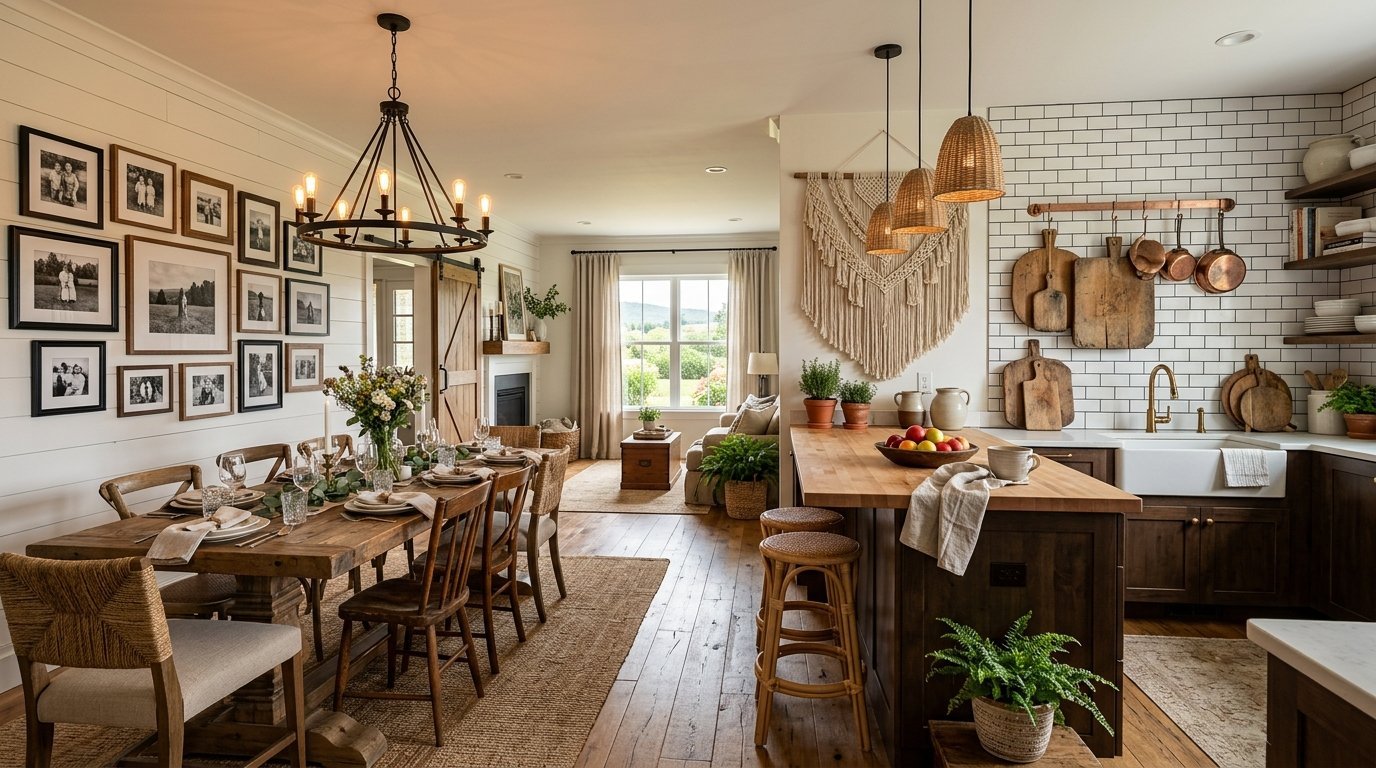
5. Create a Localized Photo Wall
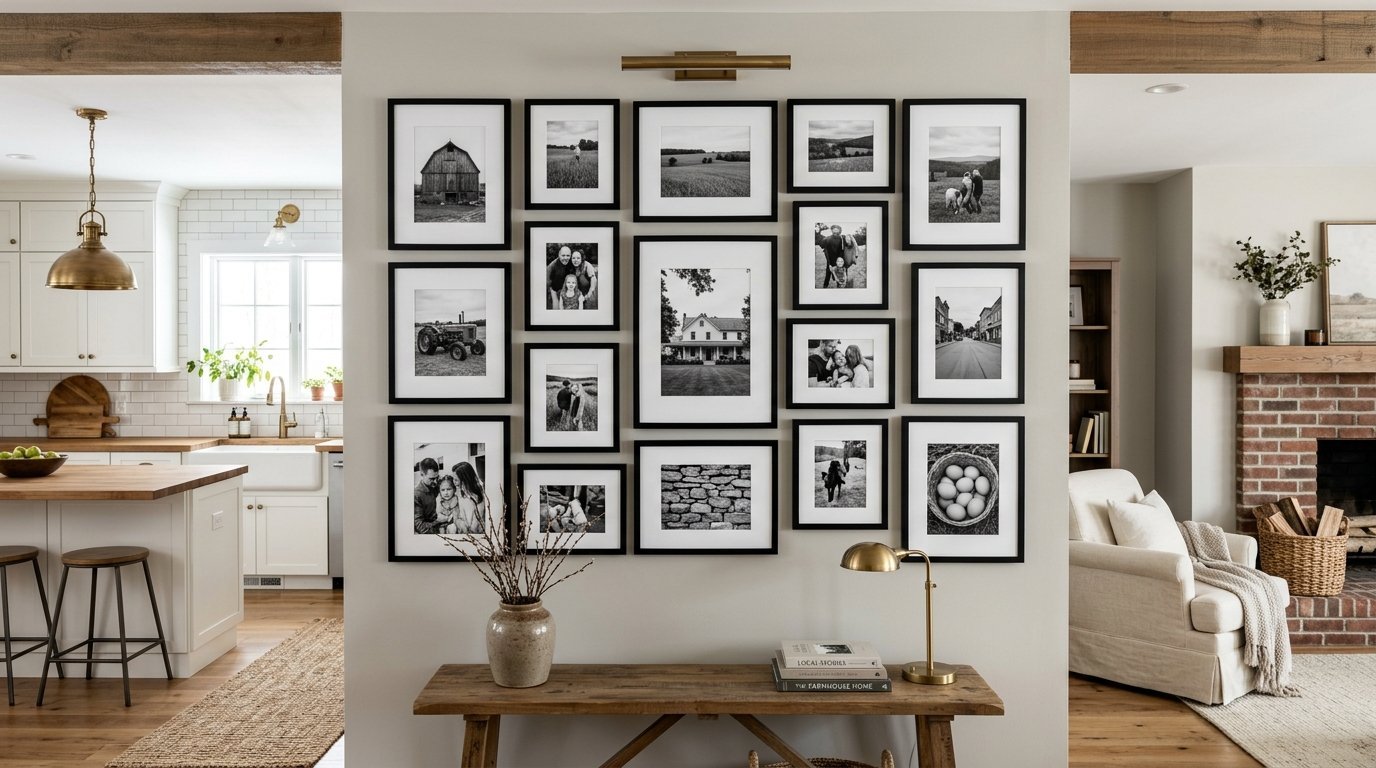
A photo wall bridges the gap between your cooking zone and the living space perfectly. This works incredibly well in modern open concept homes. I like to keep the frames uniform in color but completely varied in size. Black wooden frames with crisp white mats create a very tailored, sophisticated look. I once styled a gold frame in my classy bedroom and replicated that exact look near the dining table. It tied the whole house together beautifully. Keep the photos strictly black and white to avoid clashing with your food or colorful cookware. Hang the center frame at exactly eye level, which averages fifty seven inches from the floor. Build the rest of the gallery outward from that single center anchor point. This deeply personal touch turns a cold wall into a family storytelling space.
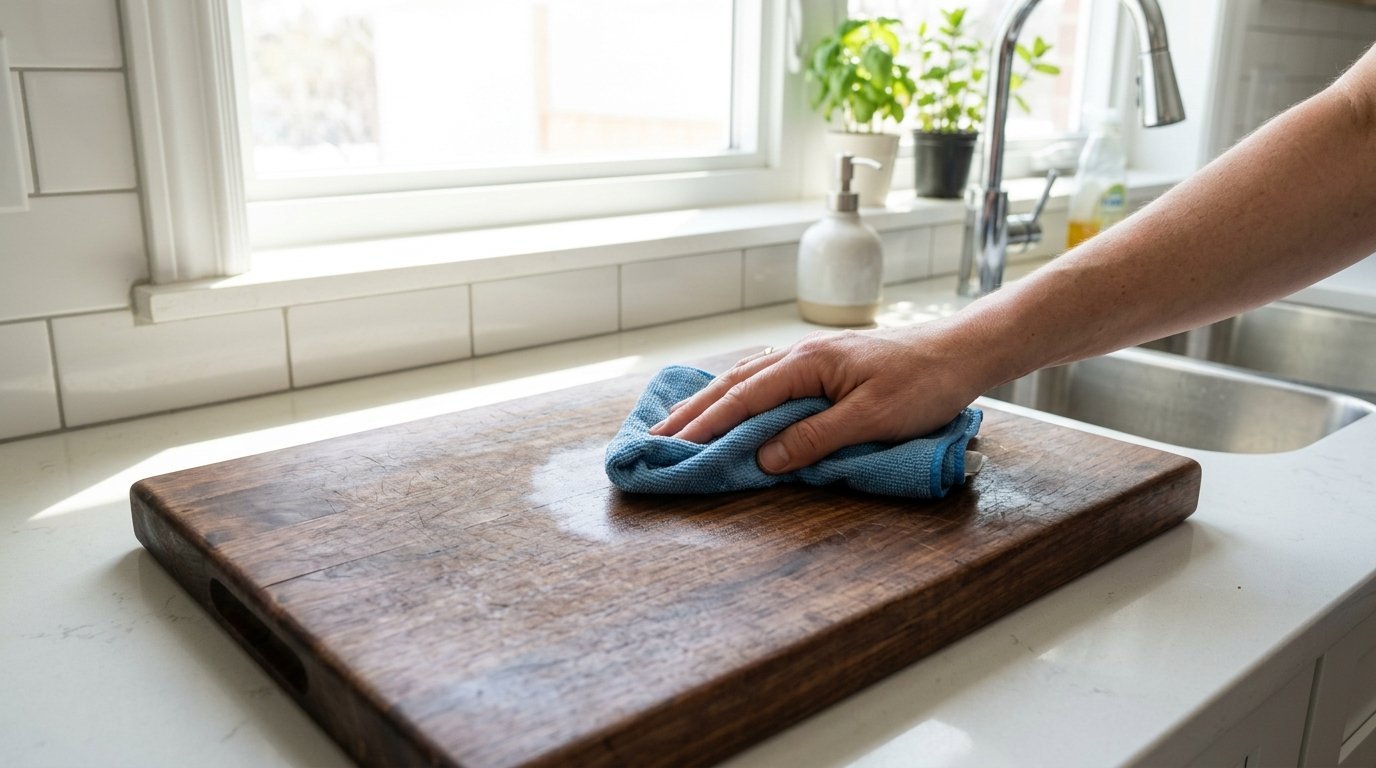
6. Layer Weathered Wooden Cutting Boards
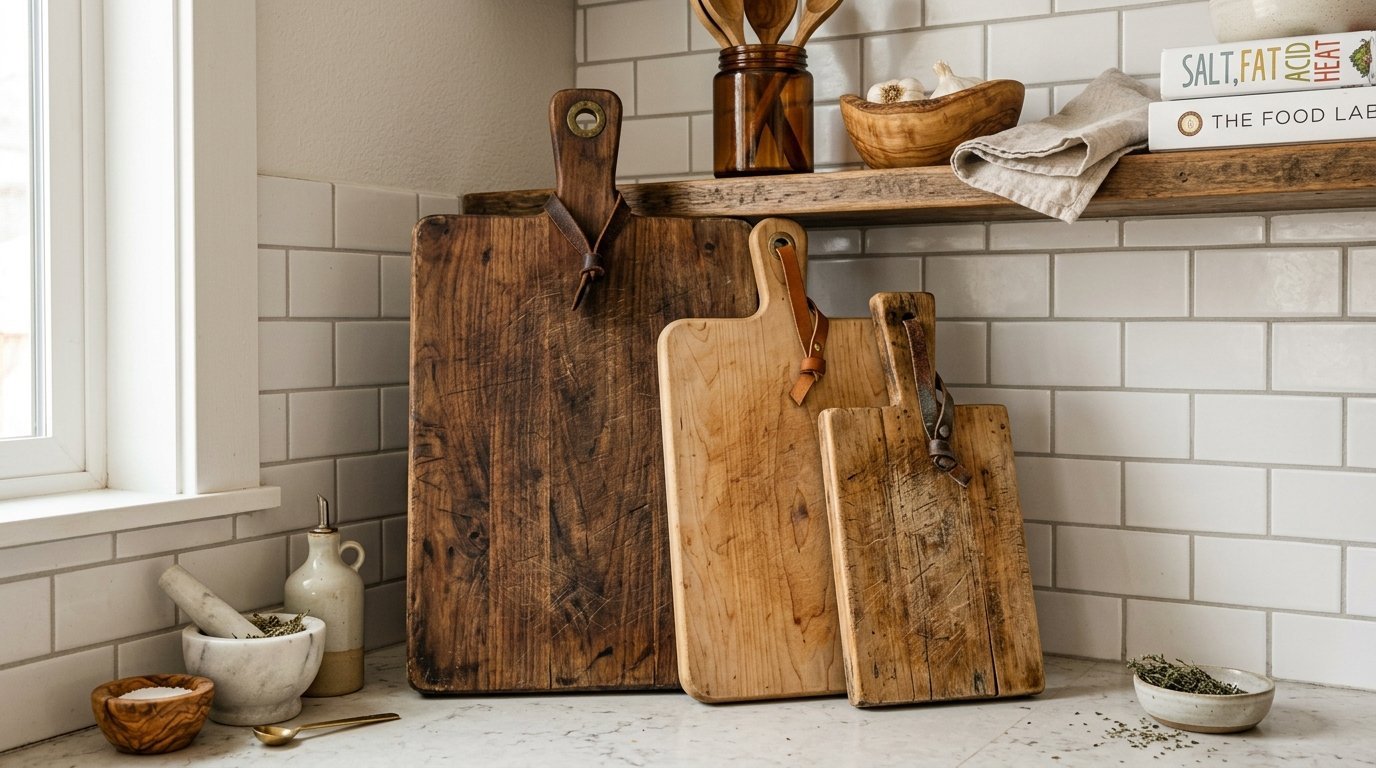
Wooden cutting boards leaning against the backsplash soften hard tile and stone surfaces. You do not even need to drill holes for this specific wall decor idea. Find boards showcasing different wood tones, from pale maple to dark, rich walnut. I always look for boards with interesting handles or old leather hanging straps. Prop the tallest, widest board against the wall first as your foundational background layer. Lean a medium, slightly lighter board directly in front of the large one. Place a small, uniquely shaped cheese board right at the front. Put small rubber bumpers on the bottom edges to stop them from sliding on slick counters. Keep these layered displays pushed into the corners behind your sink or stove. They hide ugly electrical outlets perfectly while keeping functional tools nearby.
7. Suspend Dried Herb Bundles

Hanging dried herbs brings incredible fragrance and texture right over your cooking area. I clip fresh rosemary, thyme, and sage right from my summer garden. Tie the stems tightly with simple cotton butcher twine or natural jute string. Suspend a thin birch branch or metal rod across the window above your sink. Tie the bundled herbs to the rod and let them air dry naturally in the sunlight. The green colors fade slightly into beautiful, muted earthy tones over a few weeks. Replace the bundles every six months when they start getting dusty or lose their scent. This styling feels incredibly authentic to a historical, working farmhouse kitchen. I have noticed guests always comment on the fresh, earthy smell when they walk in. It gives the room a truly sensory, lived-in atmosphere.
8. Incorporate Macrame Wall Decor
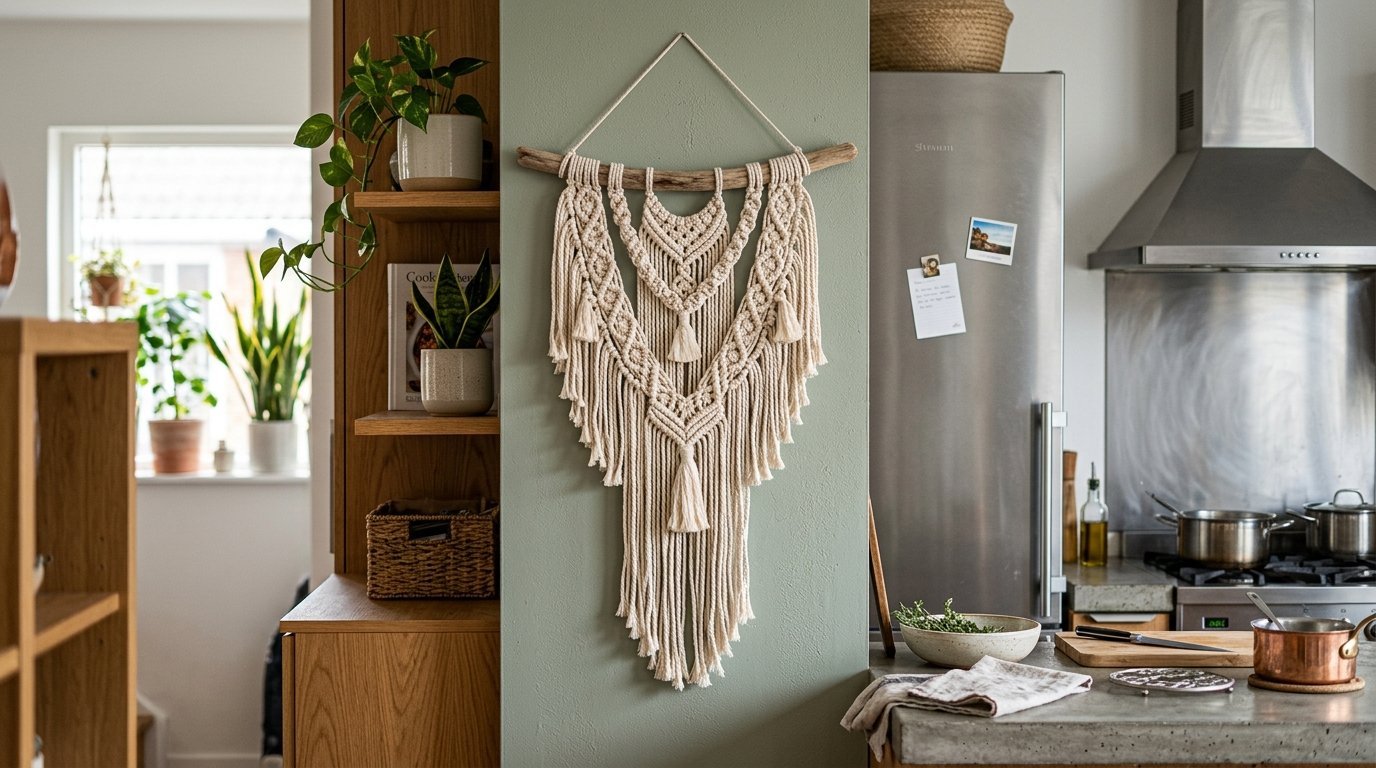
Woven macrame hangings soften the hard edges of metal appliances and stone counters. I love bringing a boho aesthetic into functional spaces whenever I can. Find a narrow macrame piece to hang on that skinny strip of wall between your cabinets. The knotted cotton cord brings a rich, three dimensional texture that flat art simply cannot match. You must keep fabric pieces at least three feet away from any open stove flame. I prefer hanging these near the sink or a designated coffee station instead. Spot clean the cotton cords gently using mild dish soap and warm water if they get stained. A medium sized macrame piece instantly creates a cozy kitchen vibe. This textural layer pairs beautifully with smooth subway tile and sleek stainless steel.
9. Mount a Vintage Kitchen Scale
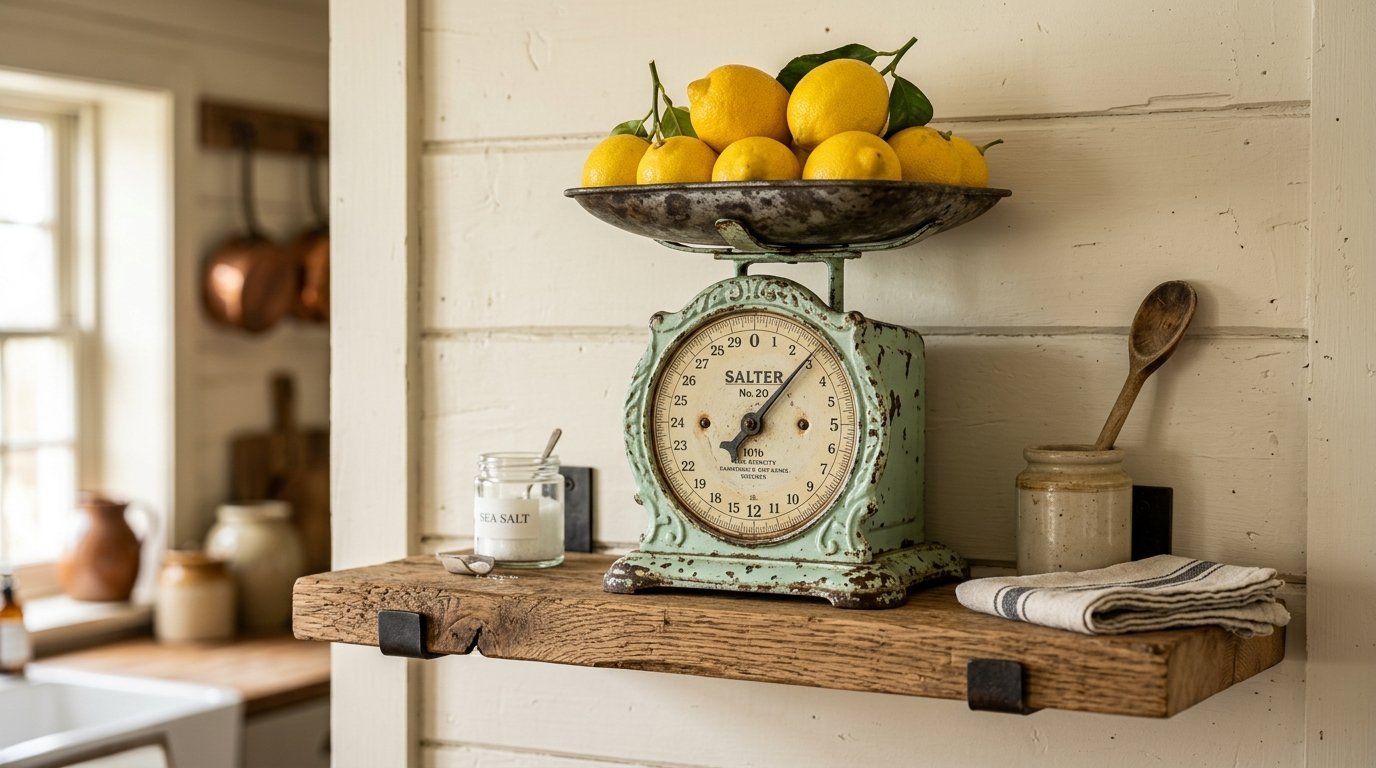
An old metal kitchen scale serves as both three dimensional art and practical storage. I hunt for scales featuring chippy pastel paint or rusted black iron. Mount a heavy duty floating shelf specifically to hold the antique scale. The shelf needs to sit right near your primary food preparation area. I place fresh green apples or bright yellow lemons right in the metal scale bowl. The vibrant fruit pops perfectly against the old, weathered metal of the scale. This piece alone establishes a vintage kitchen decor theme better than a dozen small signs. You can also place small potted succulents in the bowl during the winter months. Just ensure the shelf brackets are rated for at least thirty pounds. Old cast iron scales carry surprisingly heavy weight.
10. Install Wrought Iron Utensil Rails
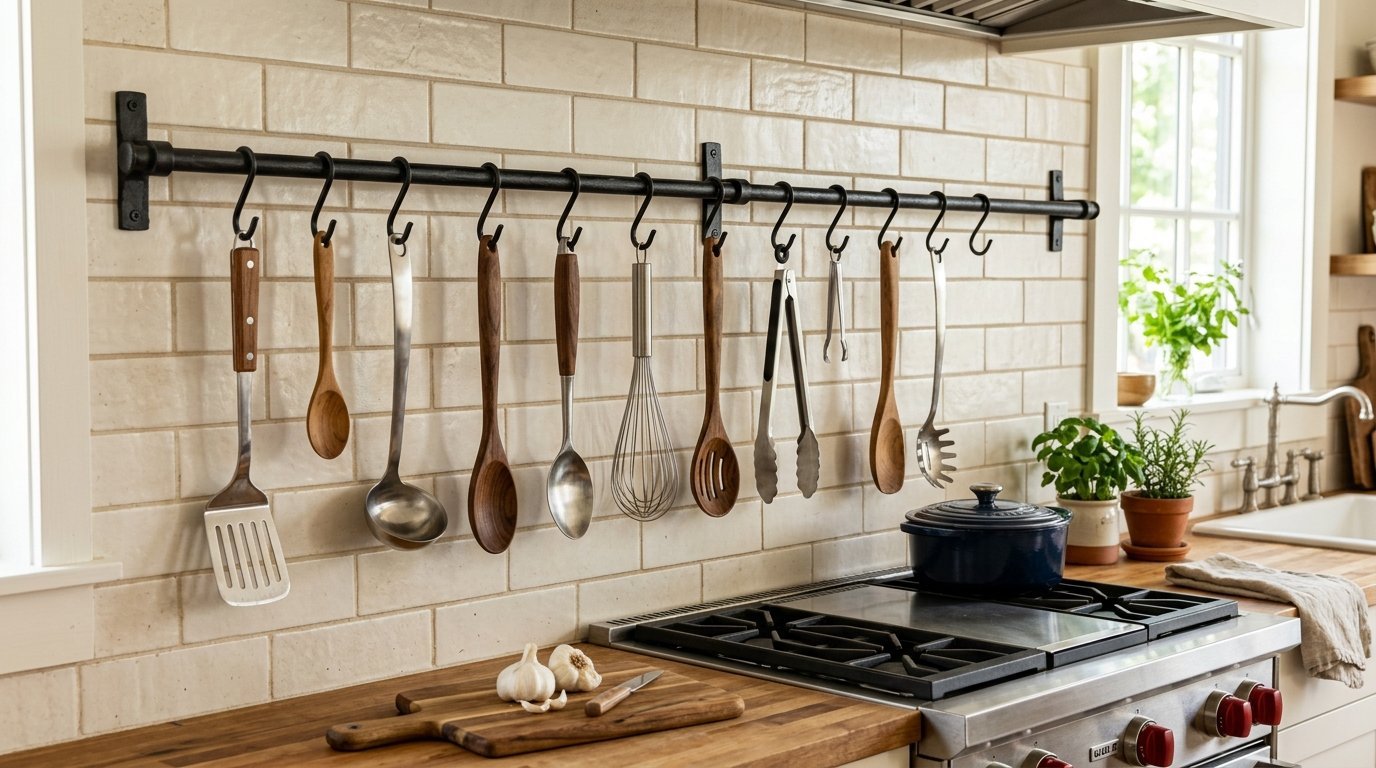
A long utensil rail transforms your daily cooking tools into an intentional display. Run a thick black iron bar horizontally across the entire backsplash behind your stove. Hang your most frequently used items like spatulas, ladles, and wire whisks right there. I buy matching stainless steel or carved wooden utensils so the display looks purposeful. Hanging mismatched, brightly colored plastic spatulas just looks cluttered and messy. The visual repetition of hanging tools mimics a professional restaurant kitchen perfectly. This setup completely frees up your precious drawer space for bulkier items. Wipe the iron rail down weekly to prevent airborne cooking grease from building up. I use this exact setup in my own home and never have to dig through drawers while cooking.
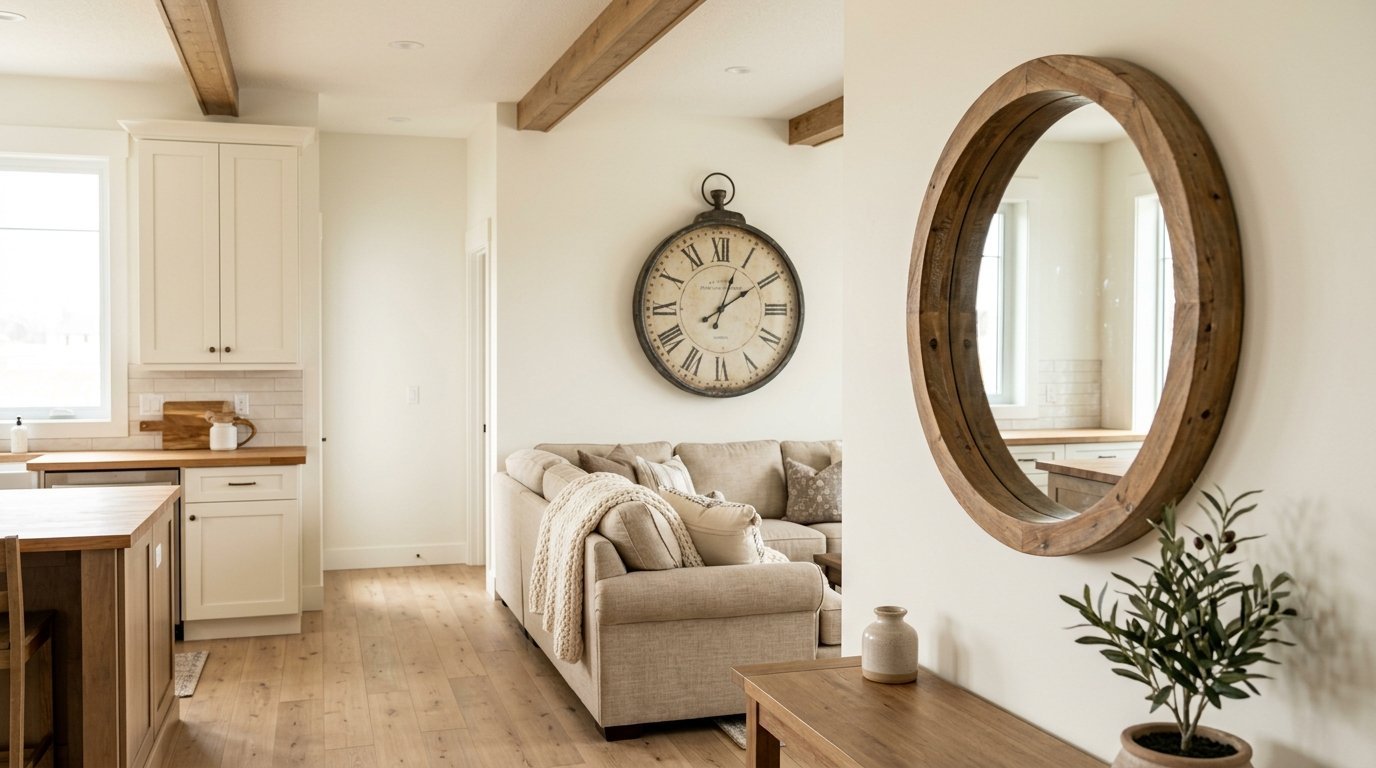
11. Position Ornate Mirrors Near the Window
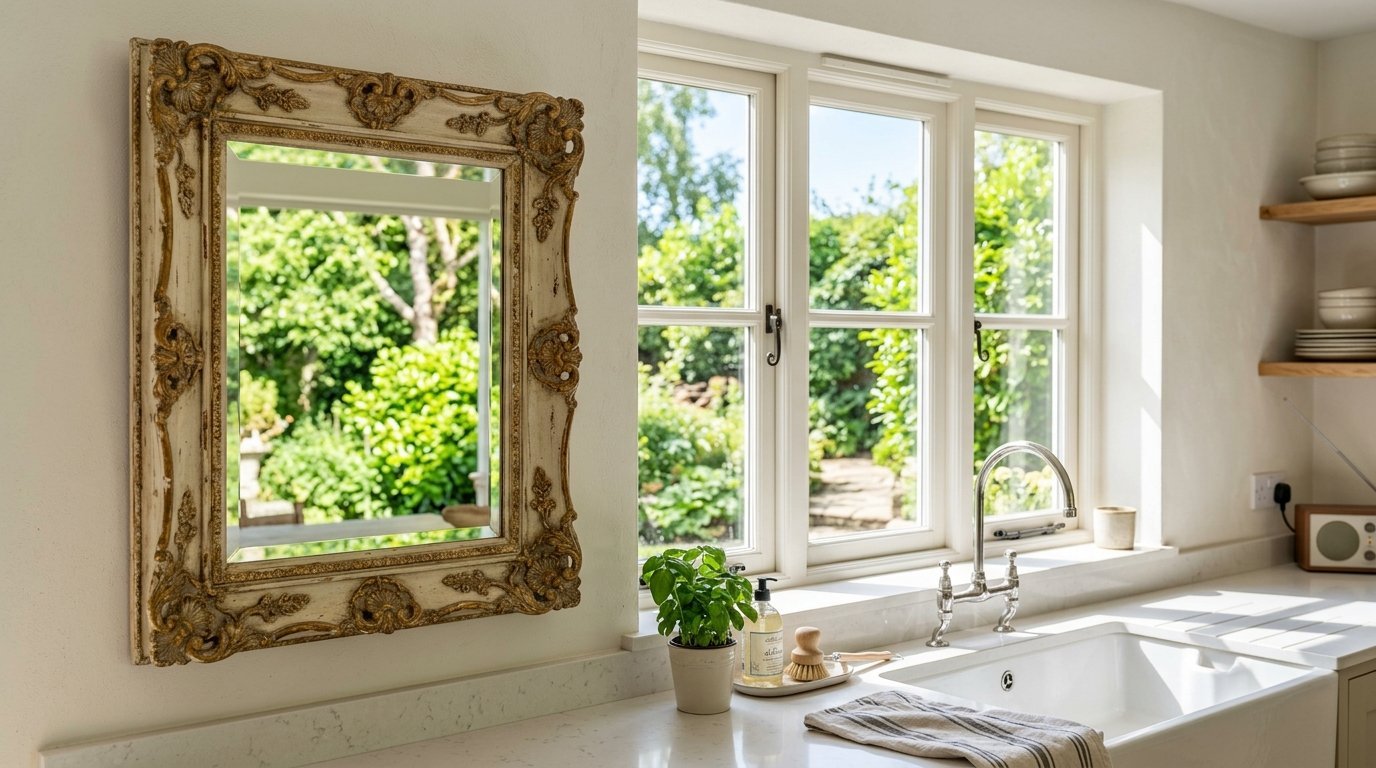
Hanging a mirror right near the sink window bounces gorgeous natural light around the room. I love using vintage frames painted in creamy white or distressed gold tones. You have to keep the glass perfectly clean for this to look right. I use a specific routine to keep glass flawless here. You must wipe with distilled water and isopropyl alcohol. I wipe in precise vertical and horizontal patterns to stop moisture damage and silver rot. A good microfiber cloth from Norwex or a spray from Sprayway keeps the surface pristine. This level of care keeps your space looking like a true Vida De Luxo home. The reflection instantly makes a tight, cramped cooking area feel twice as large. Place the mirror so it reflects the outdoors, not a blank interior wall.
12. Mount Salvaged Architectural Corbels
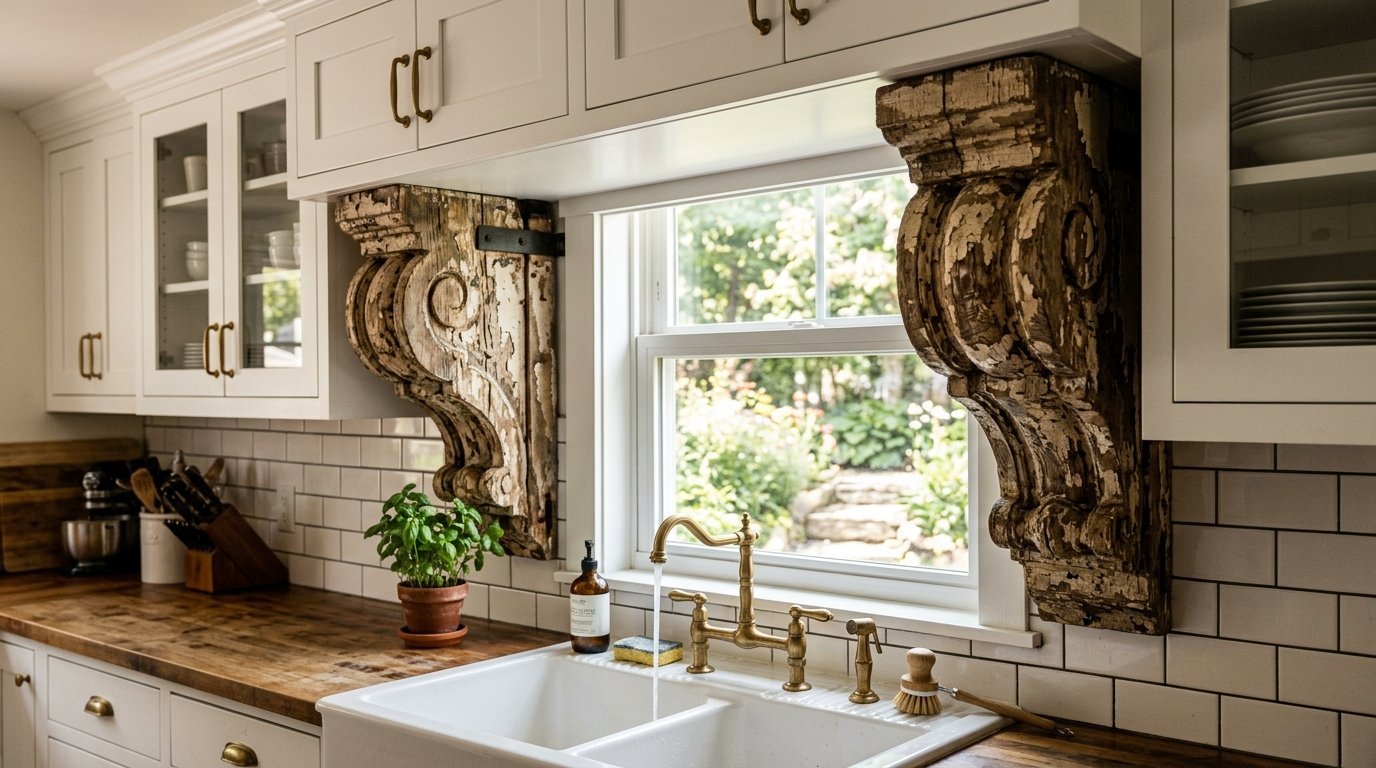
Wooden architectural corbels add structural interest beneath your standard upper cabinets. You can salvage these heavy wooden brackets from old porches or historic torn-down houses. Sand the rough edges slightly but leave the peeling, chippy paint intact. Mount them tightly into the corner where the upper cabinet meets the wall. They do not actually support any weight, but they create the illusion of custom cabinetry. This small detail elevates standard builder grade boxes into something special. I have seen this work beautifully framing the space directly above the kitchen sink. It creates a defined, almost theatrical stage for your window area. Use heavy duty construction adhesive and finishing nails to secure them permanently.
13. Style Open Spice Racks
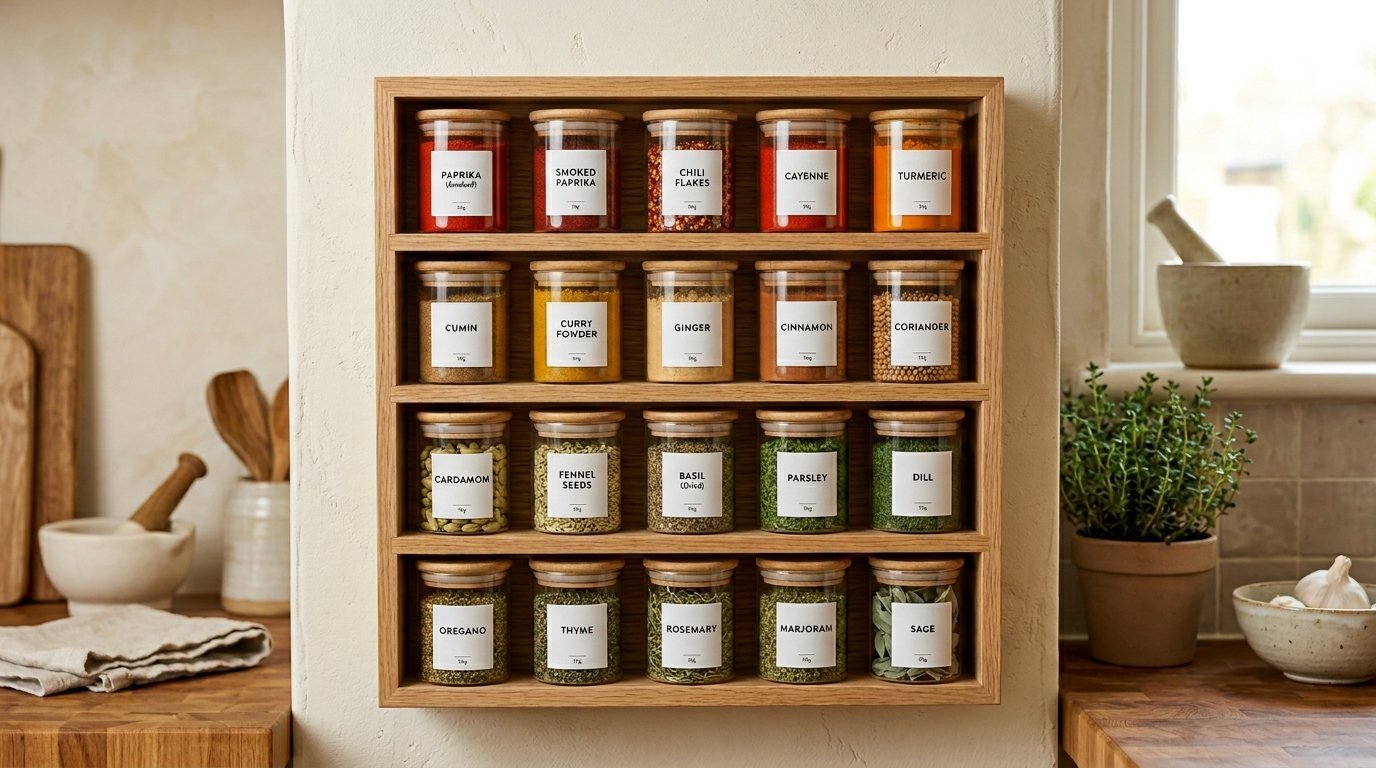
A wall mounted spice rack serves as a colorful, highly textured piece of art. Build or buy a shallow wooden rack that fits perfectly beside your stove. You must transfer all your store bought spices into identical clear glass jars. Throw away the ugly plastic containers with their loud, mismatched commercial labels. Print simple, minimalist labels on waterproof sticker paper for a clean look. The varying shades of red paprika, yellow turmeric, and green oregano look genuinely beautiful. Organize the jars alphabetically or completely by color gradient. I keep my rack at least twelve inches away from the direct heat of the oven. Extreme heat destroys the flavor of dried spices very quickly. This functional display makes cooking faster and looks incredibly tailored.
14. Hang Wire Produce Baskets
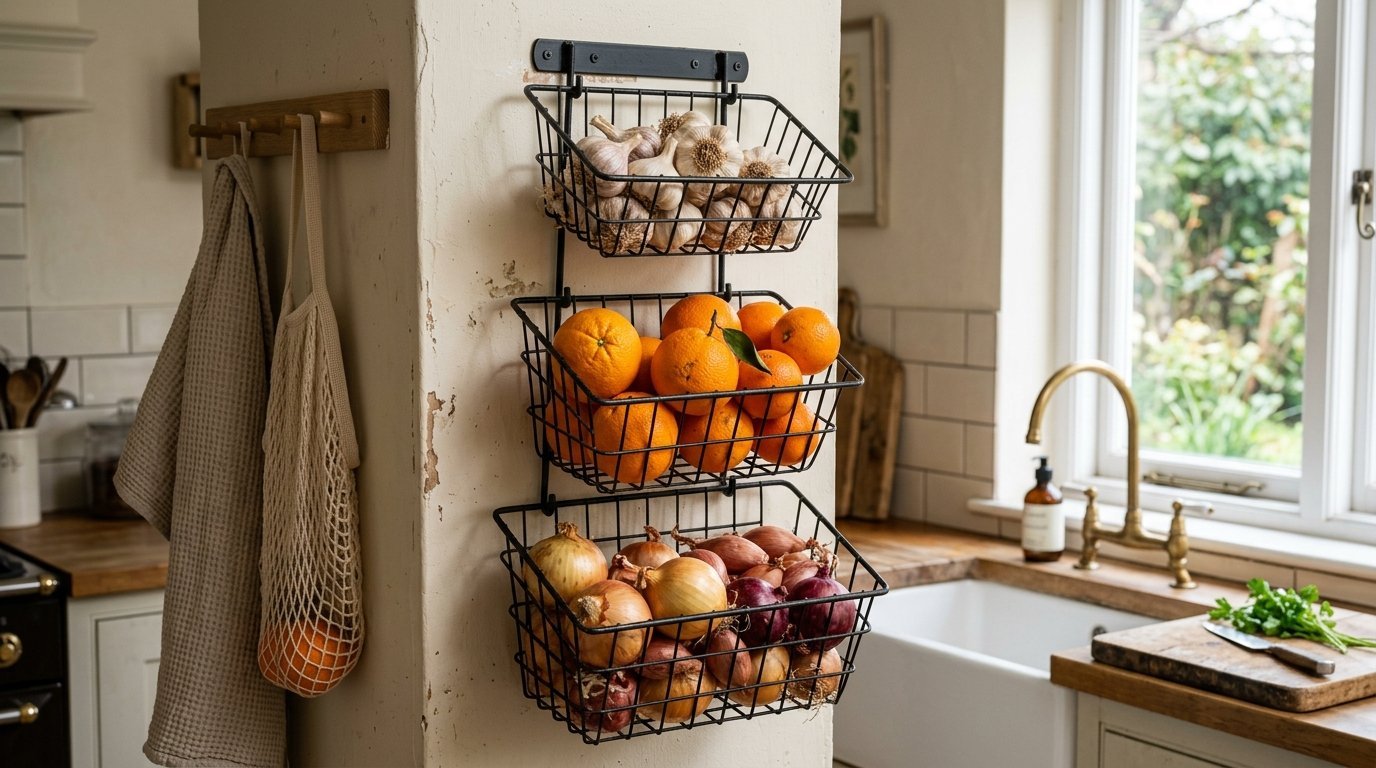
Tiered wire baskets keep fresh produce off your counters while filling empty vertical space. Mount a three tier black wire rack on a narrow strip of drywall. I usually place this near the sink for easy access when washing vegetables. Fill the bottom tier with heavy onions and earthy potatoes. Place bright citrus fruits like oranges and lemons in the middle tier. Use the top, smallest basket for fresh garlic bulbs or small shallots. The wire mesh allows proper air circulation so your produce stays fresh much longer. Line the bottoms with simple linen napkins to stop onion skins from falling through. This setup brings organic shapes and vivid natural colors to an otherwise rigid room. It screams classic farmhouse style loudly and clearly.
15. Display Ceramic Measuring Cups
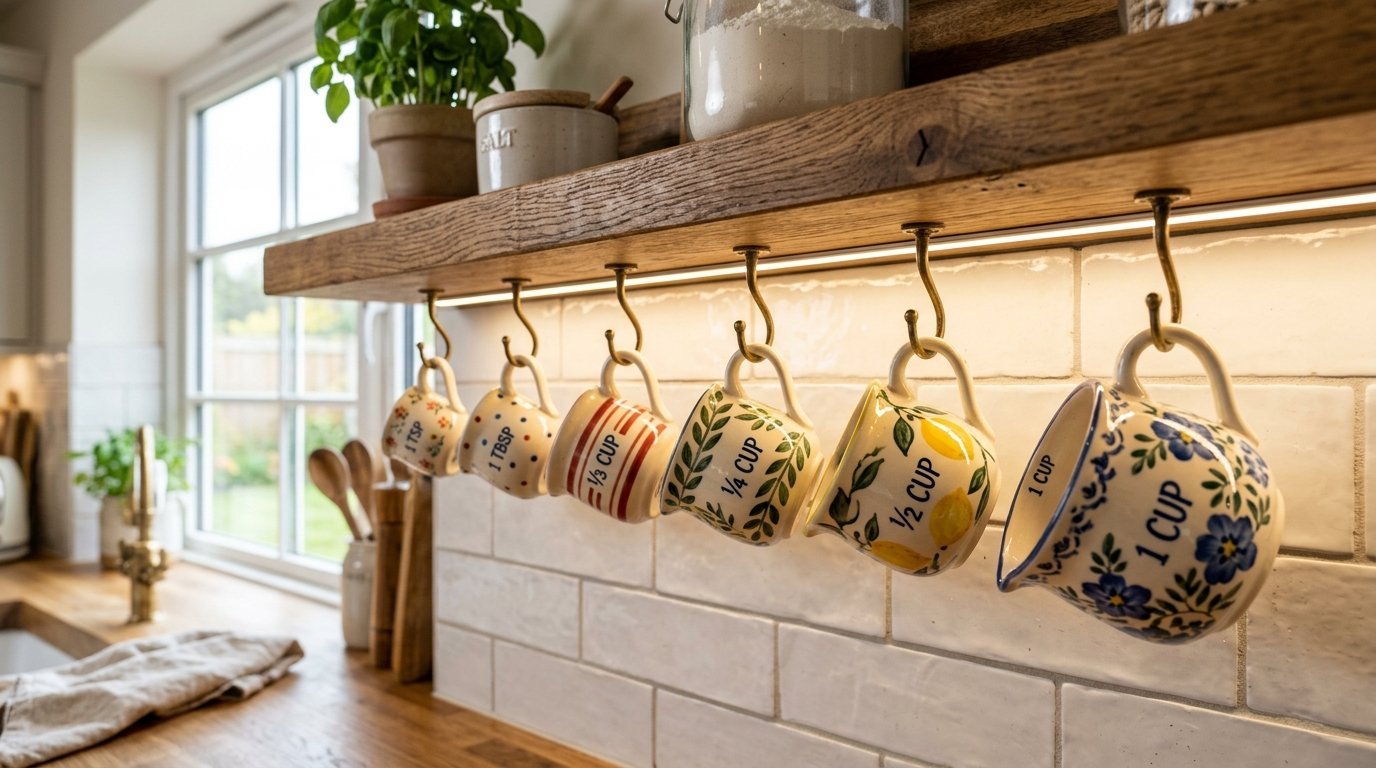
Beautiful ceramic measuring cups deserve wall space instead of hiding in a dark drawer. I collect the heavy, hand painted stoneware cups shaped like tiny pitchers. Install a row of small, vintage style cup hooks under a floating shelf. Hang each measuring cup by its small ceramic handle in perfect descending size order. This creates a charming, scalloped visual line right above your countertop. I place this display right by my mixing bowls and baking supplies. It makes grabbing the right measurement incredibly fast during busy holiday baking sessions. The glossy ceramic glaze reflects the under cabinet lighting beautifully. If you move often, rely on heavy duty 3M strips with metal hooks instead of drilling.
16. Flank the Sink with Sconce Lighting
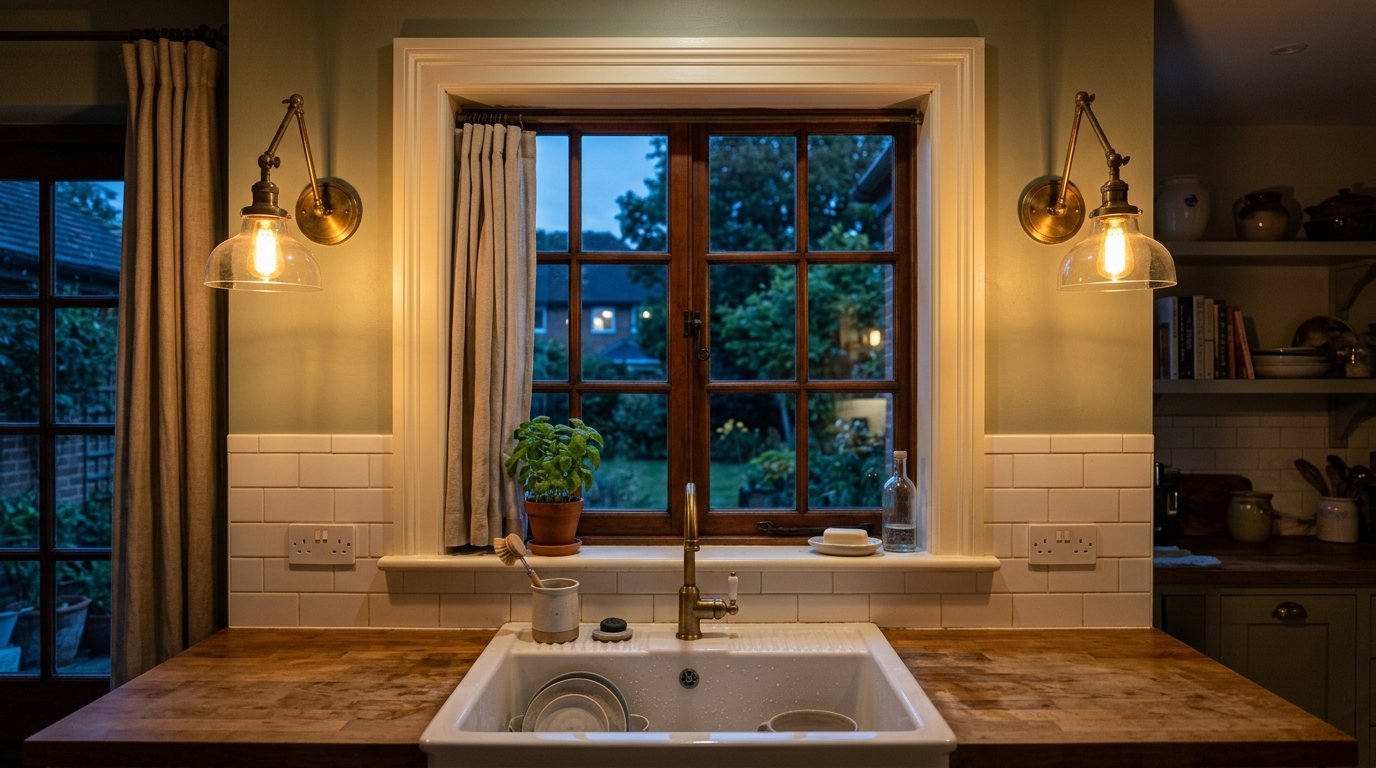
Wall sconces act as functional jewelry for your kitchen walls. Placing matching sconces on either side of the sink window frames the area perfectly. I prefer fixtures made of aged brass or matte black iron with clear glass shades. Hardwiring them into the wall provides the cleanest, most professional look. If you cannot do electrical work, buy battery operated LED bulbs and just mount the fixtures. I have done this exact trick in rental houses with incredible success. Turn them on in the evening to cast a warm, cozy glow across your sink. This soft lighting makes washing the final dinner dishes feel much more relaxing. It brings a sophisticated dining room wall decor element right into the working kitchen.
17. Mount Heirloom Rolling Pins
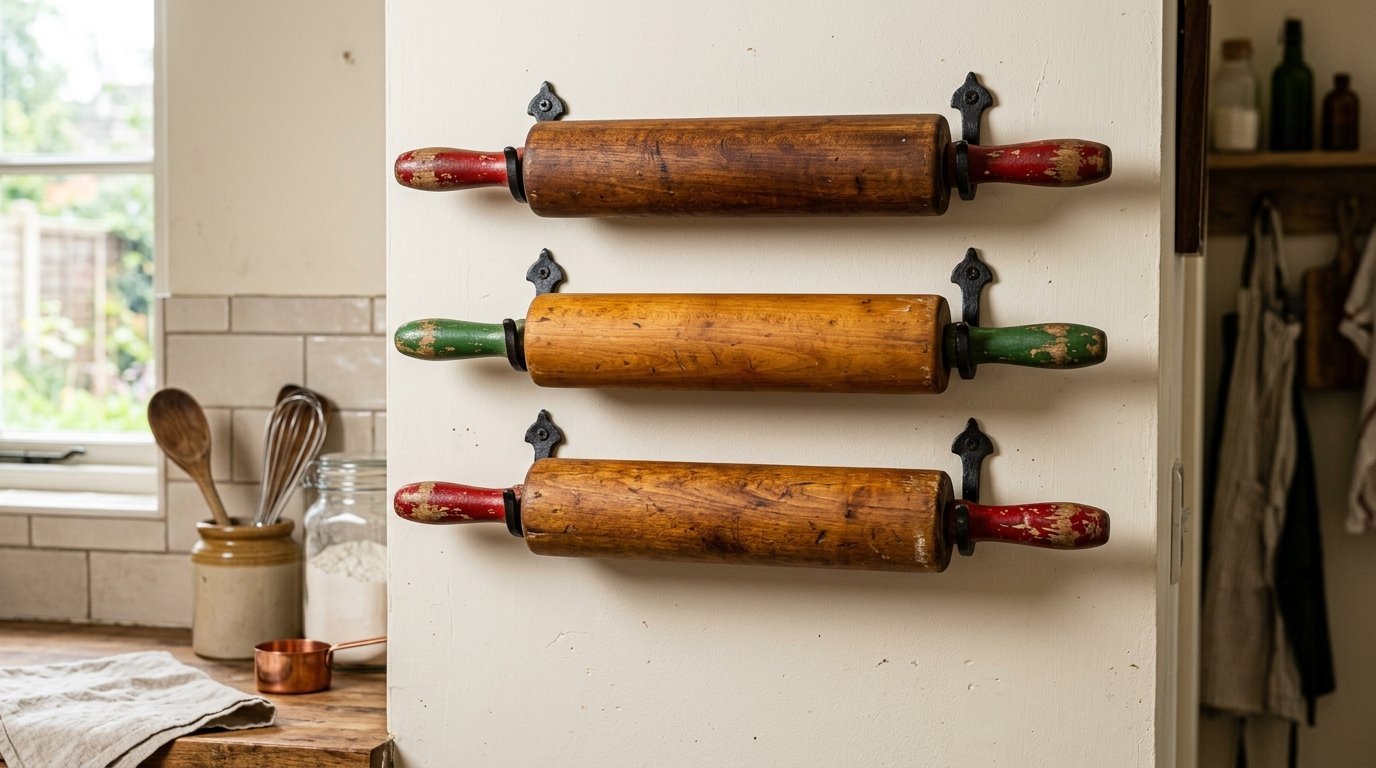
Old wooden rolling pins carry decades of baking history and look fantastic on walls. I scour estate sales for pins with brightly painted red or green handles. You can buy specialized U-shaped brackets meant for holding curtain rods to mount them. Space three rolling pins horizontally, stacked right above each other. Keep exactly four inches of vertical space between each wooden pin. Place this display next to your pantry door or over a baking station. The varied wood tones and different shapes create a highly textured, interesting display. I always rub a little food safe mineral oil into the wood before hanging them. The oil brings out the rich grain and keeps the old wood from cracking.
18. Build a Cozy Kitchen Gallery

A mixed media gallery wall brings massive personality to a blank eating area. Combine small paintings, metal letters, and wooden signs in one tight grouping. I lay everything out on the floor first to get the spacing exactly right. Keep the outer edges of the gallery strict and straight to contain the visual chaos. Mix different frame finishes like raw wood, black metal, and chipped white paint. Include one three dimensional object, like a small metal cow head or a hanging plate. This breaks up the flat frames and keeps the eye moving around. Place this gallery on the wall opposite your stove so you can see it while cooking. A cozy kitchen gallery gives your guests something fun to look at while you prepare food.
19. Style a Functional Pegboard
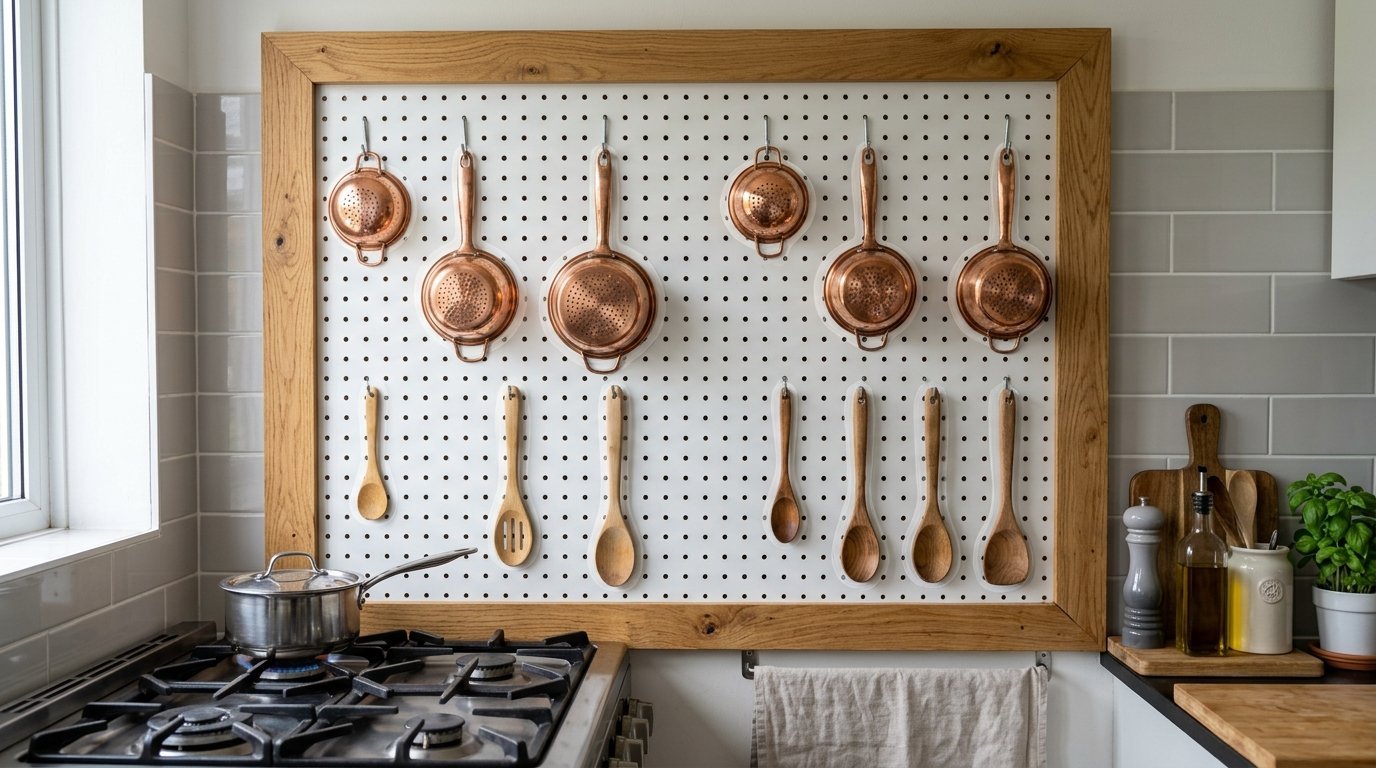
A large pegboard gives you ultimate flexibility for farmhouse styling. Paint a large sheet of standard hardware store pegboard the same color as your walls. Frame the outer edges with thick wooden trim so it looks like a custom piece. Hang this directly beside the stove to hold all your oddly shaped tools. Use metal hooks to hang copper strainers, wooden spoons, and small cutting boards. I trace the outline of each tool with a white paint pen directly on the board. This classic Julia Child trick ensures everything goes back to its exact right spot. You can rearrange the entire wall in ten minutes when you buy new tools. It is the ultimate mix of serious function and quirky farmhouse charm.
20. Extend Dining Room Wall Decor

Do not let your styling stop abruptly where the kitchen meets the eating area. Carrying the same design elements across both spaces makes the entire room feel larger. If you have a plate wall in the dining space, hang two matching plates near the sink. Use the exact same metal finishes for your cabinet hardware and your dining room chandelier. I always match the wood stain of floating kitchen shelves to the main dining table. This creates a seamless visual flow that tricks the eye perfectly. Extending your dining room wall decor into the cooking zone blurs the rigid lines between rooms. It makes a small, choppy floor plan feel like one grand, continuous space.
21. Match Above Sofa Wall Decor Ideas
Open floor plans require your kitchen decor to speak directly to your living room. The items hanging over your sink must coordinate with your above sofa wall decor ideas. If you have a massive rustic clock over the couch, echo that shape with a round mirror in the kitchen. Keep the color palette perfectly consistent across both distinct areas. I have tried using bright reds in the kitchen and cool blues in the living room, and it failed miserably. Stick to a unified base of warm whites, natural woods, and matte black metals. When you sit on the sofa, the kitchen walls you see should feel like a natural extension. Treat the entire open space as one single, cohesive styling project.
22. Mount Floating Wicker Baskets
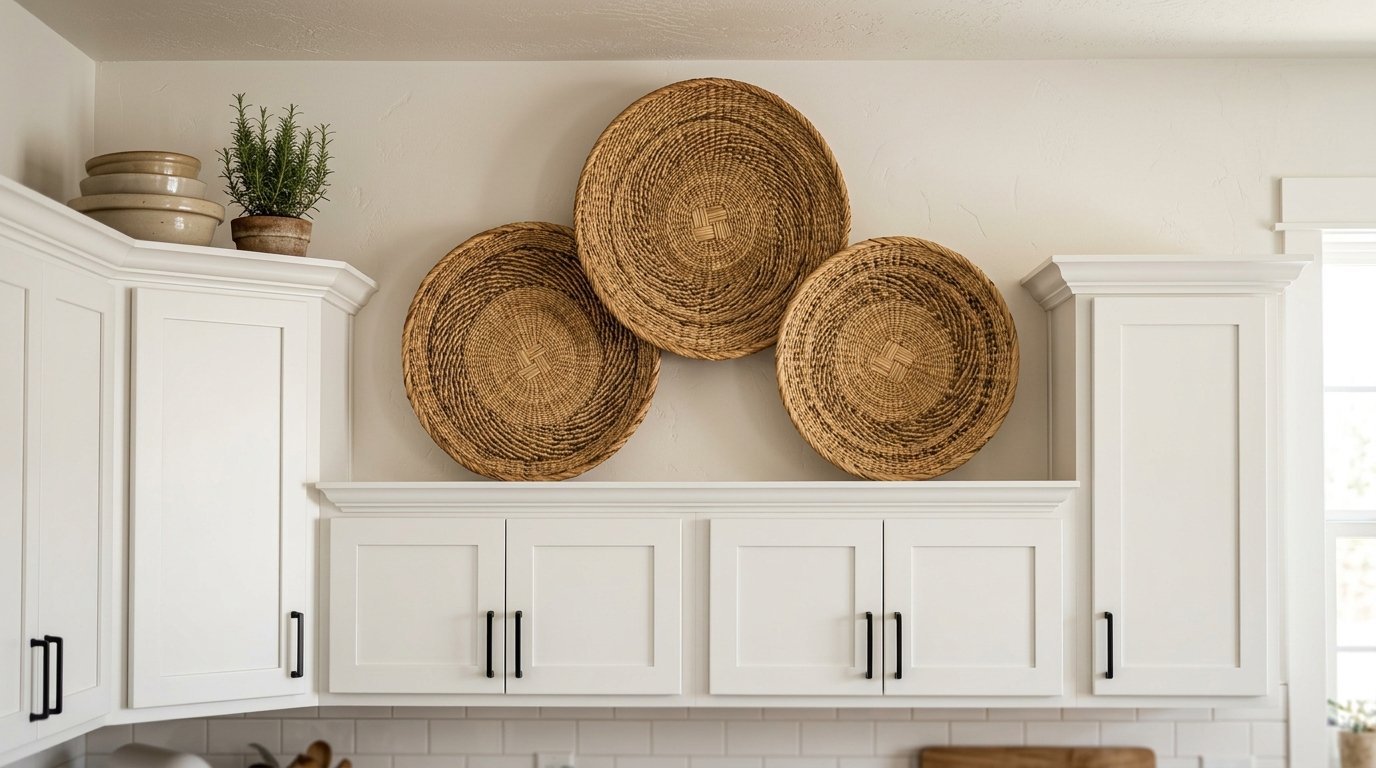
Shallow wicker baskets hung flat against the wall bring incredible warmth and texture. I find flat, tightly woven African or vintage tobacco baskets at flea markets. Drive a single small nail through the center weave right into the drywall. Group three baskets of different sizes together in a loose, overlapping triangle shape. Place this arrangement high up on the wall above your kitchen cabinets. The woven texture perfectly fills that awkward empty void near the ceiling. They weigh almost nothing, so you never have to worry about finding wall studs. The natural dried grass colors pair perfectly with classic white farmhouse cabinets. It is a cheap, high impact way to finish off your kitchen styling.
Frequently Asked Questions
How do I protect wall decor from stove grease?
Keep all framed art and fabric at least thirty inches away from the active burners. Use glass over any paper prints, as glass wipes clean with simple degreasing soap. I recommend wiping down metal or wooden decor weekly with a damp microfiber cloth. Avoid hanging porous items directly behind the stove entirely.
What is the best height for floating shelves near a sink?
Mount your lowest floating shelf eighteen to twenty inches above the actual countertop. This specific height gives you plenty of clearance to use tall blenders or coffee makers underneath. Ensure the shelf does not block your view out of the sink window.
Can I hang real plants on my kitchen walls?
Yes, but you must choose plants that tolerate high humidity and fluctuating temperatures. Pothos and trailing ivy do incredibly well on high shelves near the sink. Do not place living plants directly over the stove, as the sudden heat blasts will kill them quickly.
How should I clean vintage wooden kitchen decor?
Never soak old wooden cutting boards or rolling pins in the sink. Wipe them quickly with a damp cloth and dry them immediately with a towel. Rub food grade mineral oil into the wood every three months to prevent cracking and splitting.
Does a photo wall look weird in a kitchen?
Not at all, as long as you keep the frames cohesive and clean. I strictly use black and white photos in the kitchen to keep the space looking calm. Hang the gallery slightly away from high splash zones to protect the delicate frames.
Wrapping Up Your Farmhouse Kitchen Journey

Styling the walls around your stove and sink completely changes how your home feels. You no longer have to stare at cold, empty spaces while chopping vegetables or washing plates. Taking the time to curate vintage pieces and functional displays makes the space uniquely yours. I have watched countless kitchens go from boring builder grade to magazine ready with just these simple changes. Start small by hanging a single row of copper pots or one chunky wooden shelf this weekend. You will quickly see how much warmth and character these small details bring to your daily routine. Please share your own kitchen styling wins or ask questions in the comments below.

Anya Castellan is the Founder and Editor-in-Chief of Home Wall Trends. An art history graduate of the Rhode Island School of Design with twelve years of experience writing for leading American design publications, she specializes in composition, gallery wall theory, and the quiet architecture of domestic space. A former contributing editor at Architectural Digest and guest lecturer at Parsons School of Design, Anya personally reads and signs off on every piece before it is published.