Blank walls feel cold. You want a home that shows your style. Expensive art is not the only way to fix a room. I spent years trying to make my first apartment look high-end on a tiny budget. I learned that paper is the most underrated tool for interior design. It is cheap. It is colorful. You can change it whenever you want. This guide gives you 23 ways to transform your space using simple paper techniques. We will focus on projects that look professional but take very little time.
Executive Summary
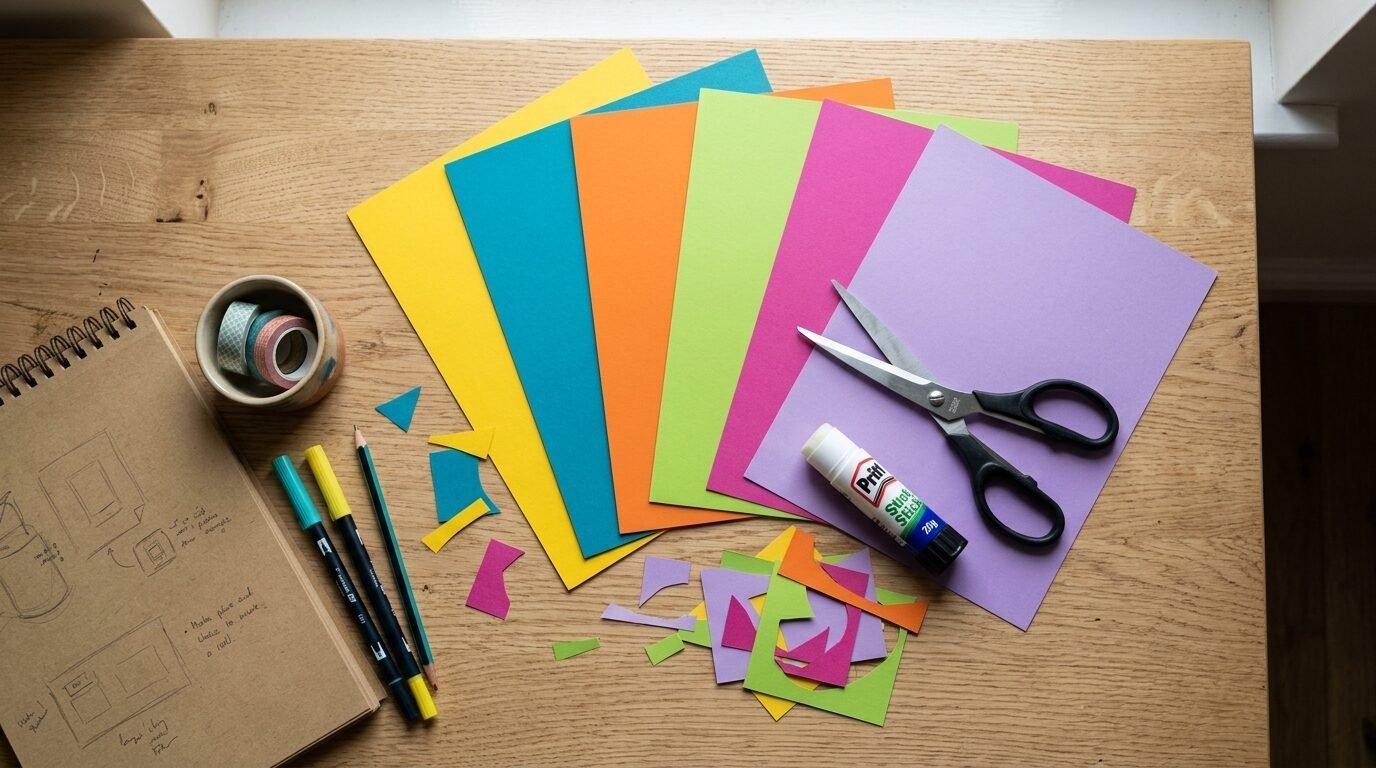
You can turn a boring bedroom into a curated space in 48 hours. This article provides 23 specific projects ranging from 3D cardstock art to anime-inspired gallery walls. We cover techniques like origami, quilling, and simple cutting. You will see how to use $5 worth of paper to create looks that resemble $200 boutique decor. I include real-life tests of adhesives so you do not ruin your paint. We also look at the best paper brands for durability. By the end of this weekend, your room will feel fresh and personalized. You will have a space that looks great on camera and feels cozy in person.
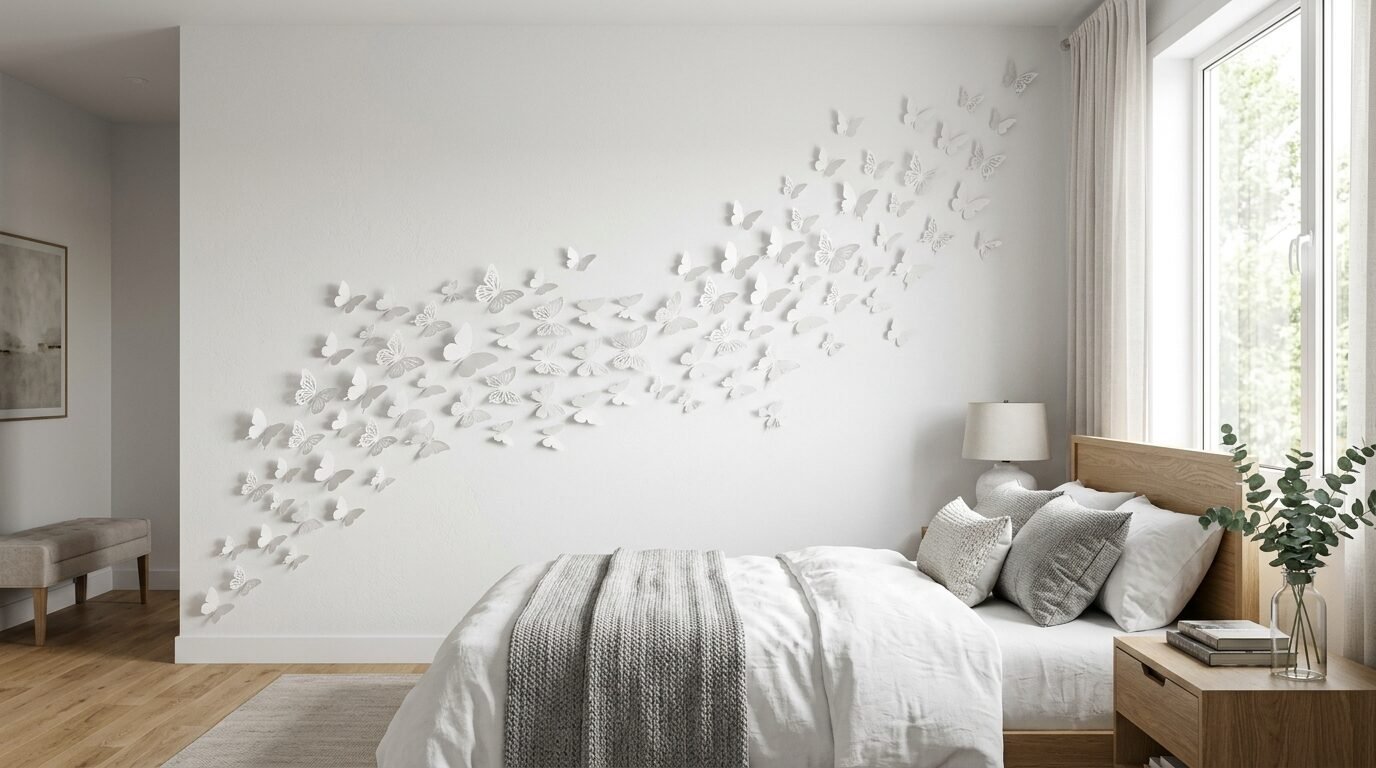
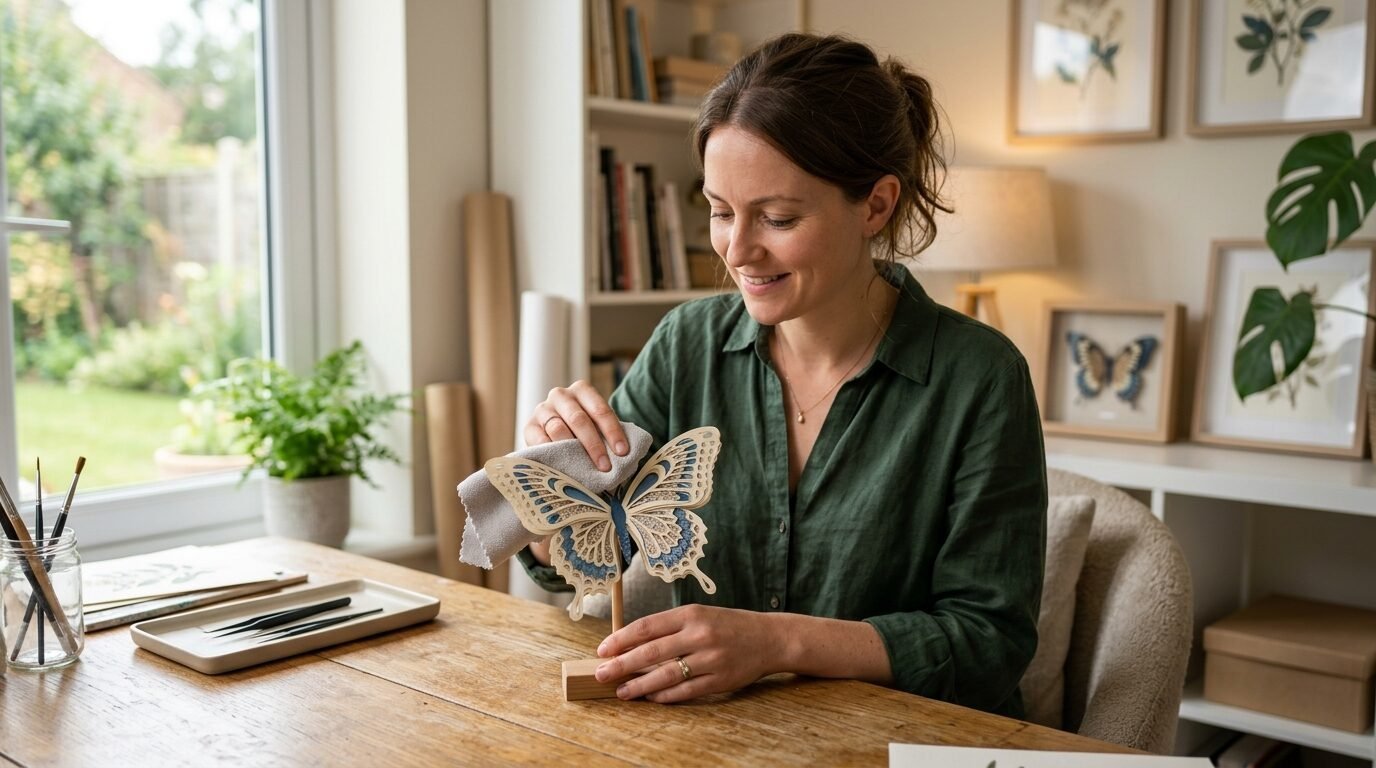
1. 3D Cardstock Butterfly Swarm
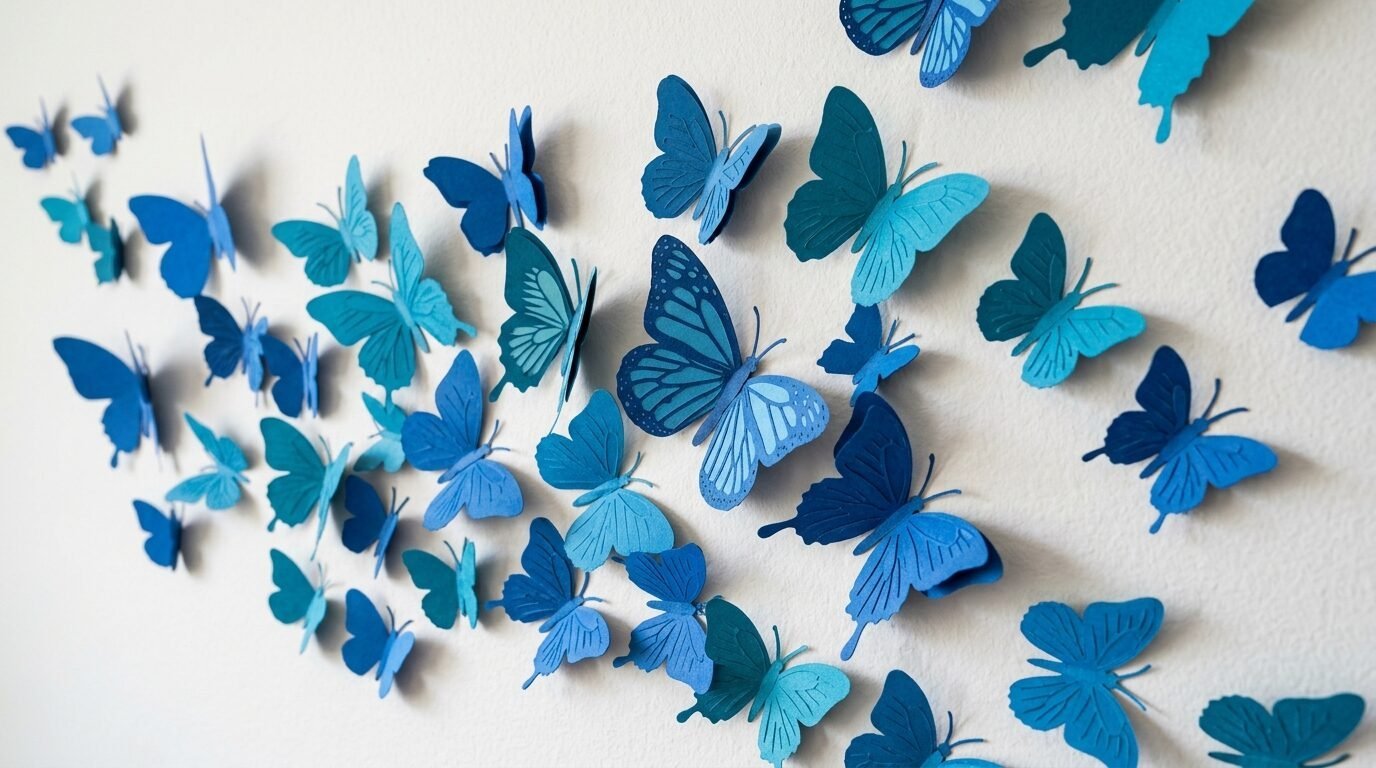
I tried this in my own bedroom last spring. The effect is stunning. You cut out 40 to 50 butterflies of different sizes. Use heavy cardstock. Fold the wings upward. This creates a shadow on the wall. It looks like they are flying across the room. I recommend using 65 lb cardstock from Astrobrights. Use small dots of blue poster tack. This allows you to move them without leaving marks. Arrange them in a soft curve. Start dense in one corner. Let them spread out as they go up. It adds movement to a flat wall. People always ask where I bought them. They are shocked when I say I made them for $3.
2. Woven Paper Heart Gallery
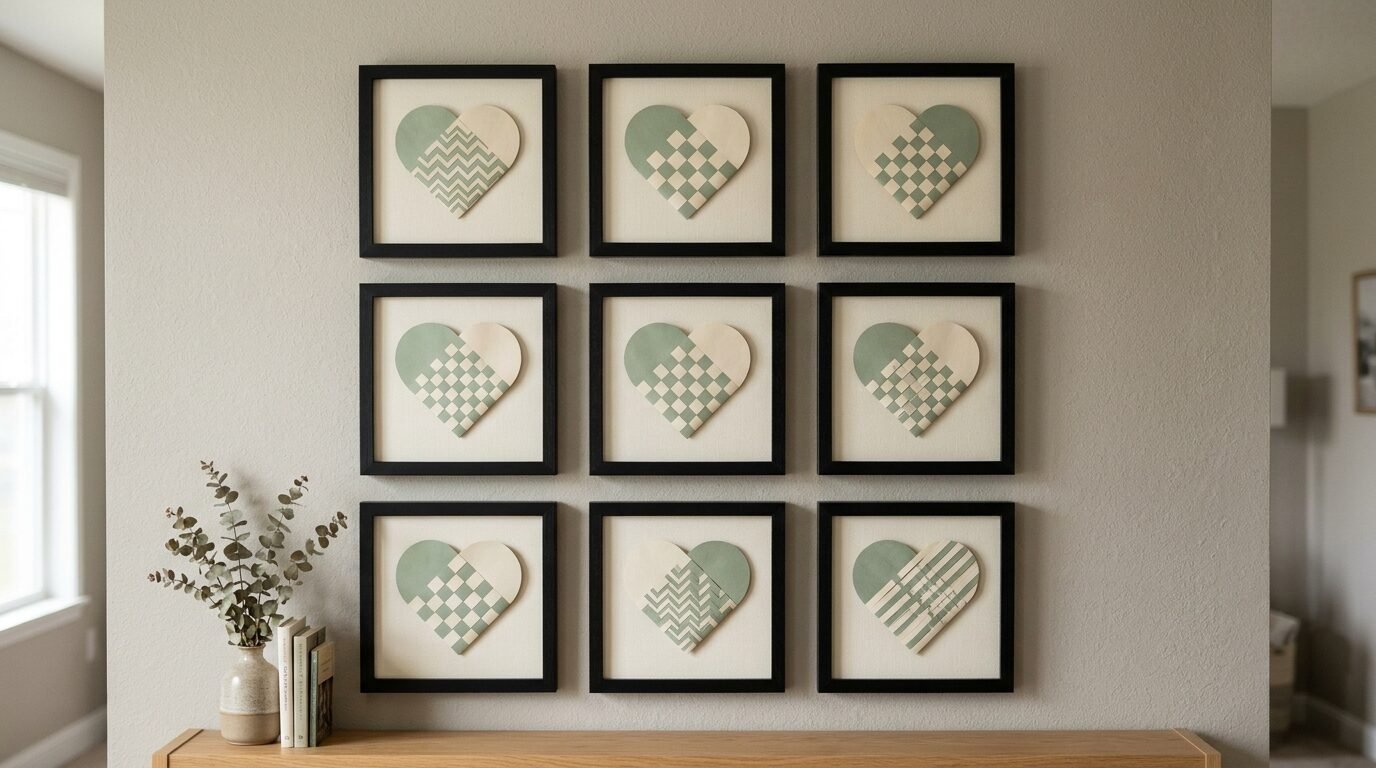
This project is perfect for adding texture. Use two colors of construction paper. Red and pink are classic choices. I prefer using muted tones like sage green and cream. Cut strips of paper and weave them into heart shapes. This is a great way to use up scrap paper. Mount them on a white background. Put them in a simple black frame from IKEA. It looks like a high-end textile piece. In my experience, using a paper trimmer makes this look much cleaner. Hand cutting can look a bit messy. Keep the weave tight for the best look.
3. Geometric Origami Tiles
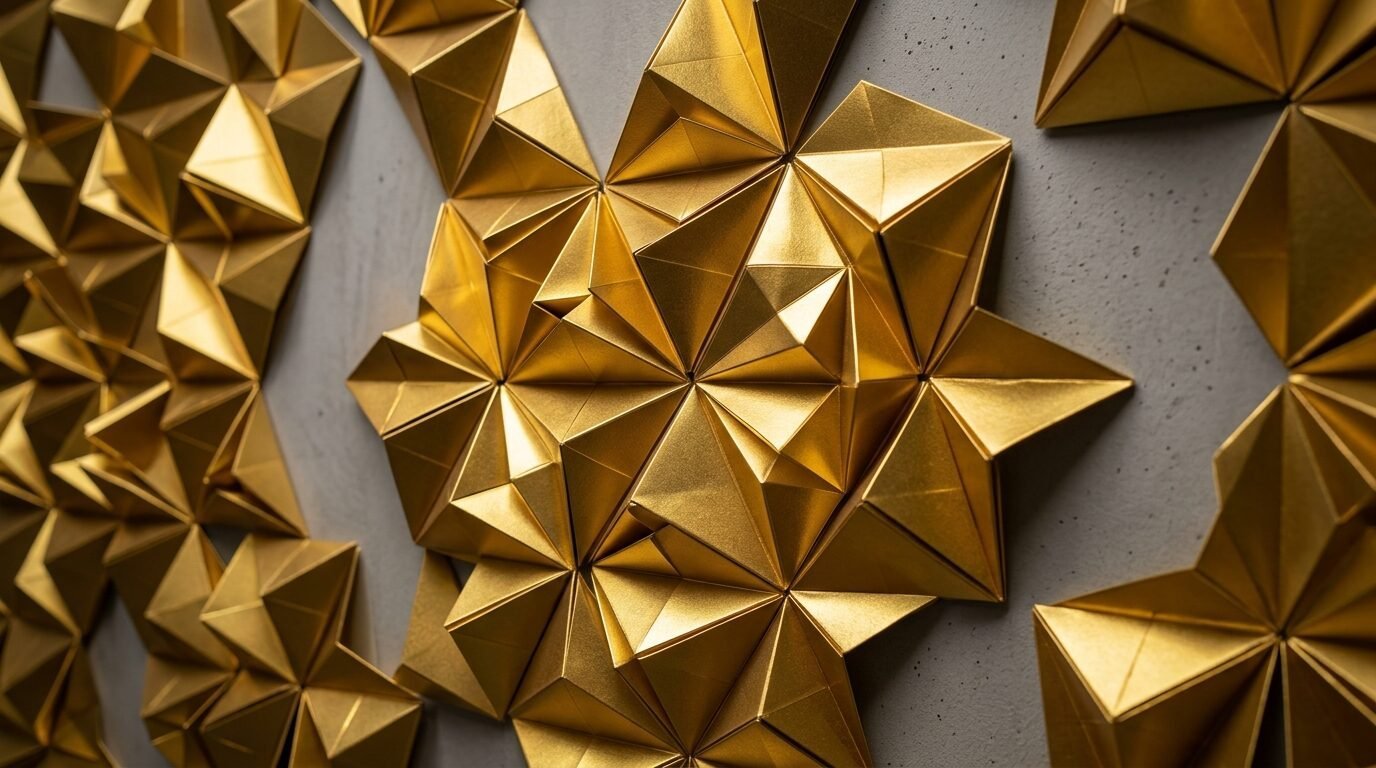
Origami is not just for small animals. You can fold simple square tiles. Use 6-inch squares of double-sided paper. Fold the corners toward the center to create a 3D diamond. Glue these tiles onto a large canvas or directly to the wall. I saw a designer do this in a luxury hotel once. I recreated it using metallic gold paper. The way the light hits the angles is beautiful. It creates a modern architectural look. You can make a grid of 20 tiles. It fills a large wall space for almost no cost.
4. Hanging Paper Fan Installations
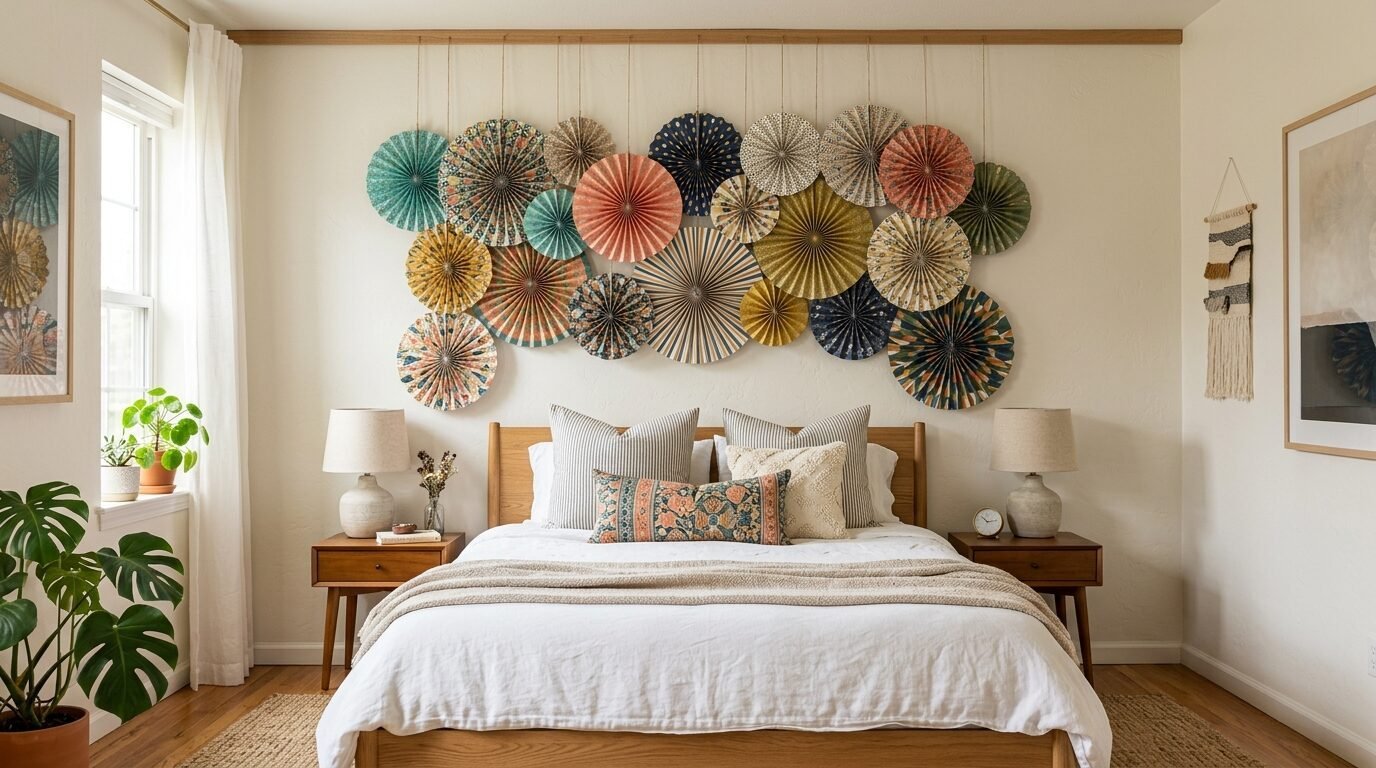
Paper fans are not just for parties. Large fans can act as a headboard alternative. Use heavy weight gift wrap for this. Fold the paper into one-inch pleats. Secure the center with a staple. Open it into a full circle. Mix sizes from 10 inches to 24 inches. I like to overlap them. Use Command Hooks to hang them. They are light so they stay up easily. This is a great solution for renters who cannot drill holes. Choose patterns that match your bedding. It makes the room feel cohesive and intentional.
5. Quilled Floral Initials
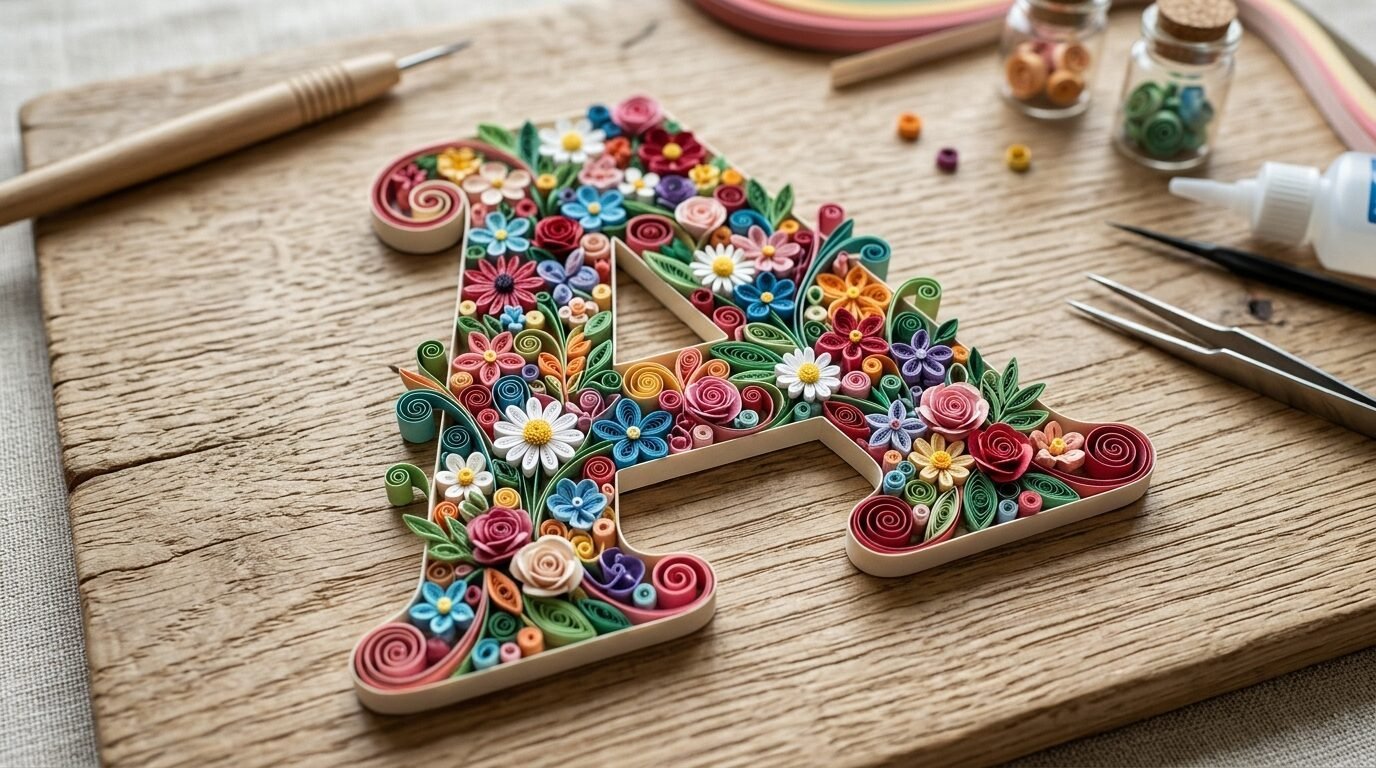
Quilling involves rolling thin strips of paper. It takes some patience but the result is intricate. I made a large letter ‘A’ for my desk area last year. Use a quilling tool and 1/8 inch strips. Create small coils and pinch them into leaf shapes. Fill a cardboard letter frame with these shapes. Use Mod Podge to glue them down. It looks like professional filigree. I recommend using a toothpick for small details. This project is a great gift idea too. It shows a lot of effort and care.
6. Modern Paper Chain Wall Hanging
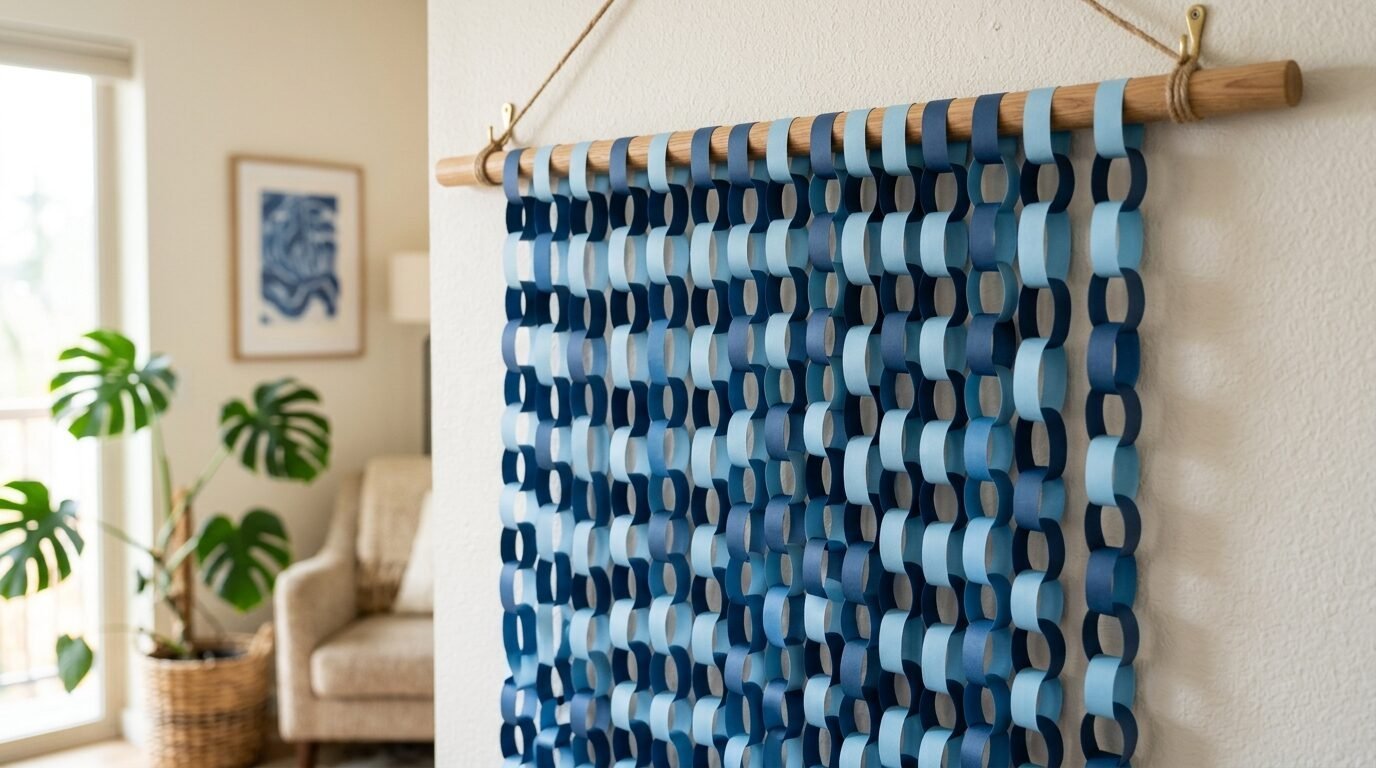
Forget the chains you made in grade school. Use high-quality linen paper. Cut strips two inches wide. Connect them to form long vertical strands. Hang these strands from a wooden dowel. It creates a soft, flowing room divider or wall piece. I tried this using ombre colors. Start with dark navy at the bottom. Fade to light blue at the top. It mimics a woven wall tapestry. This project is very calming to make while watching a movie. Use a glue stick for a flat finish. Staples look too industrial here.
7. Pressed Paper Foliage
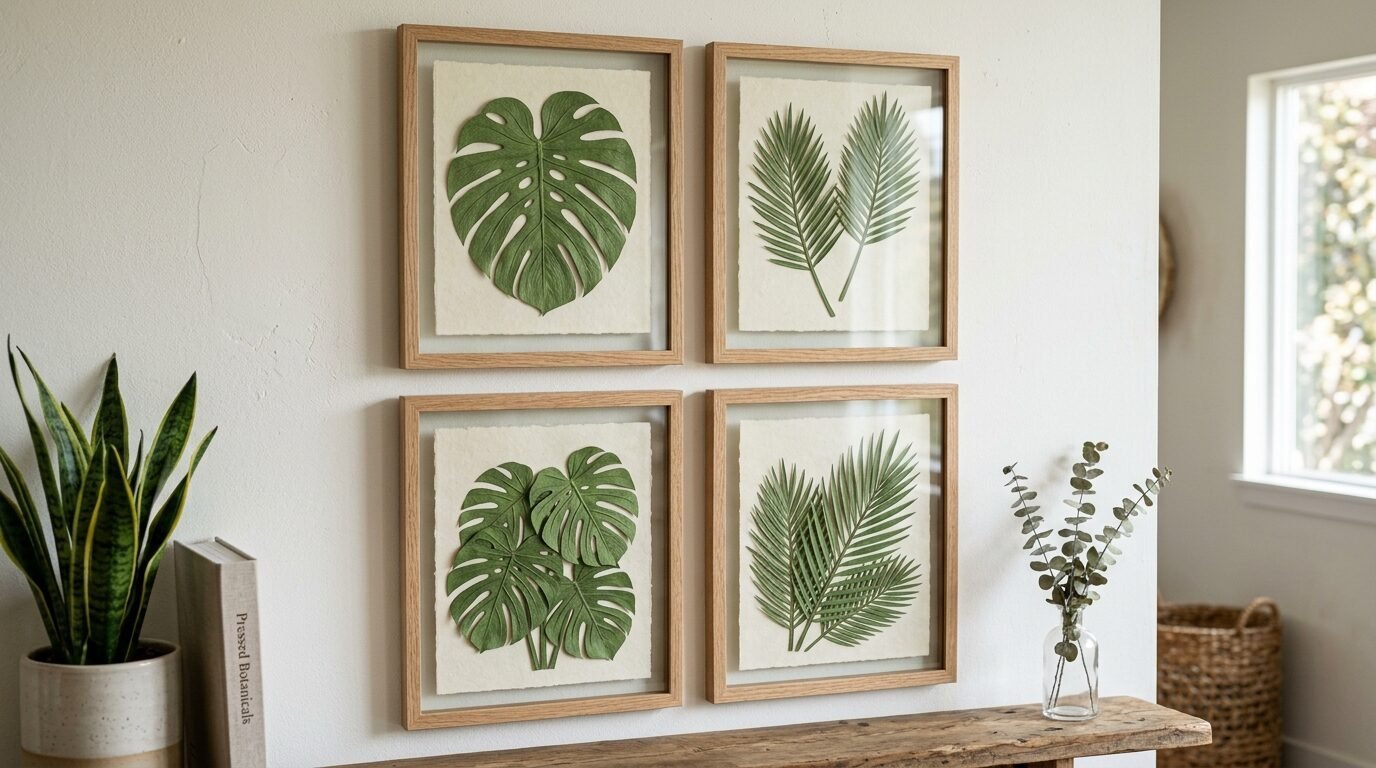
Real plants die. Paper plants last forever. Use green cardstock to cut out monstera or palm leaf shapes. Score the center of the leaf to create a vein. This makes the paper bend like a real leaf. Place these inside glass frames. I noticed that using different shades of green adds depth. Use a dark forest green and a lime green together. This looks great in a home office. It brings a touch of nature inside. You do not even have to water them.
8. Paper Feather Garlands
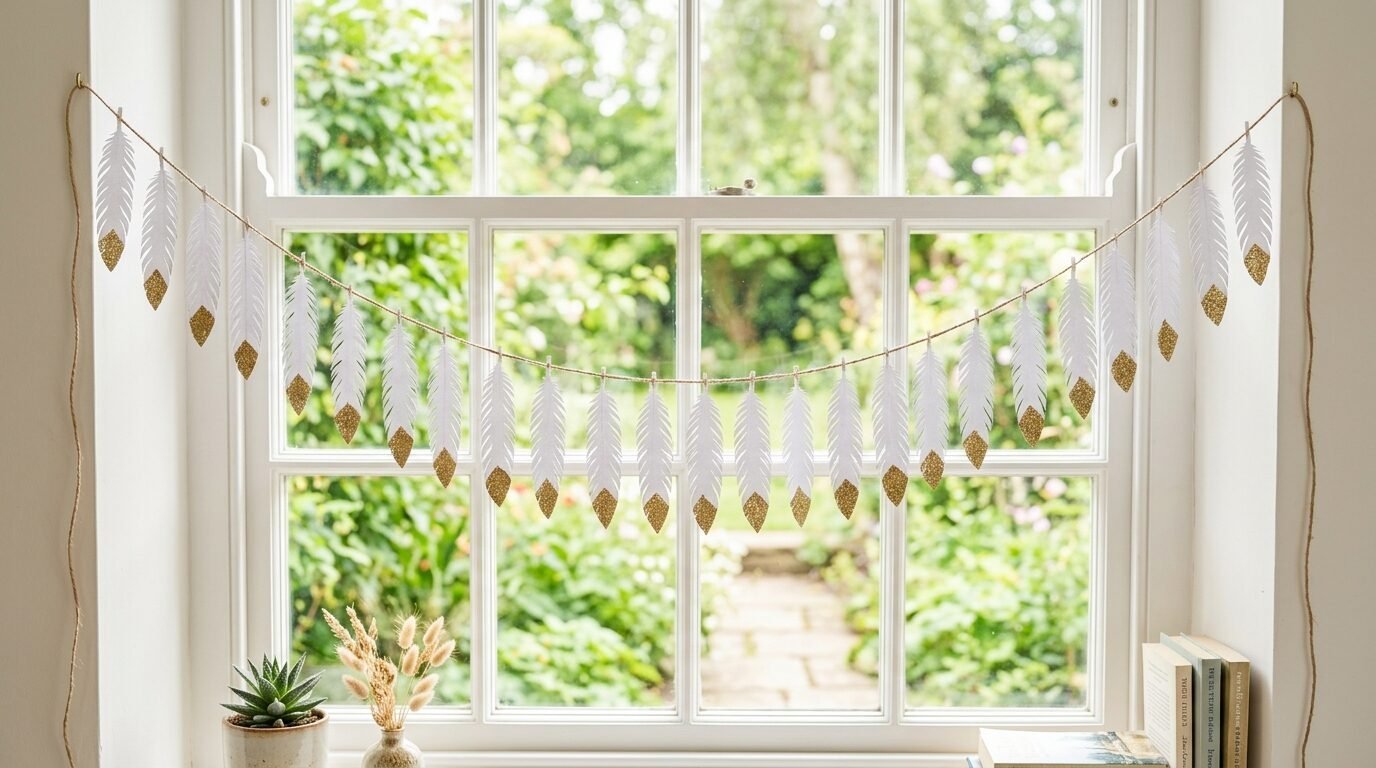
This is a quick way to add a boho vibe. Cut long oval shapes from white paper. Use scissors to make tiny cuts along the edges. These represent the barbs of a feather. Dip the tips in gold paint or glitter. String them along a piece of twine. I hang these over my window. They catch the light beautifully. Use a heavyweight watercolor paper for the best texture. It holds the shape without curling too much. This is one of the fastest crafts on this list.
9. Cut-Out Silhouette Portraits
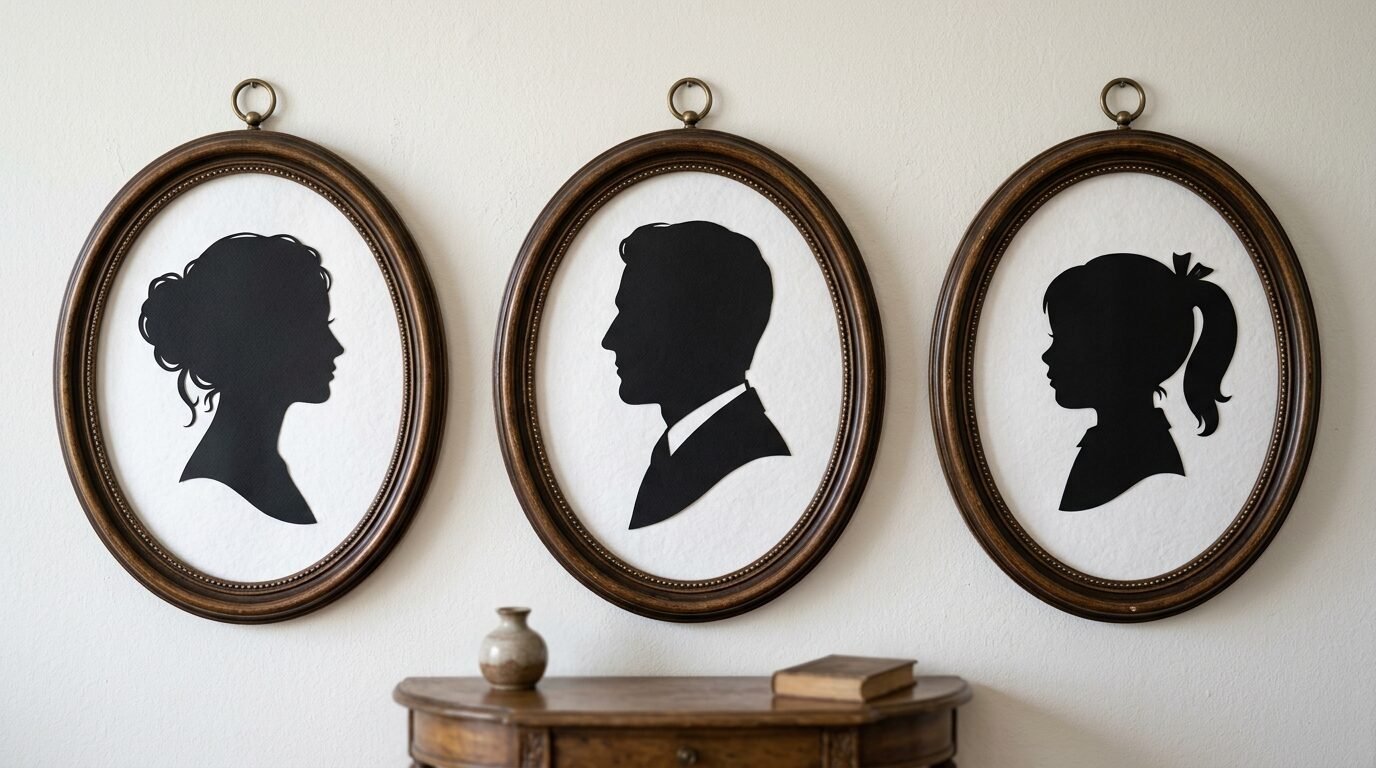
This is a classic craft that feels very personal. Take a profile photo of a friend or family member. Print it out. Trace the outline onto black cardstock. Cut it out carefully with an X-Acto knife. Mount it on a white background. These look amazing in a gallery wall. I have a row of four silhouettes in my hallway. It feels sophisticated and timeless. Use a sharp blade for the hair details. Dull blades will tear the paper.
10. Abstract Paper Collage
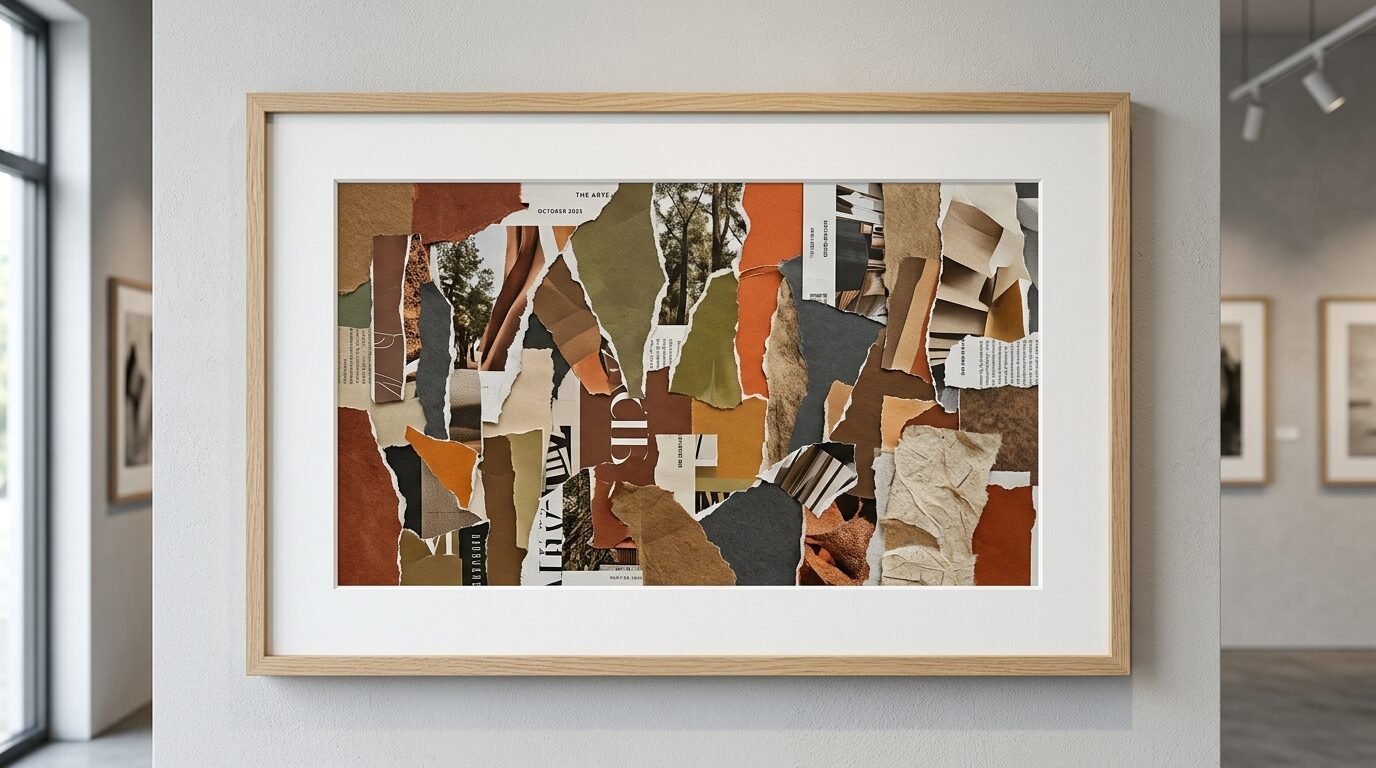
Do not overthink this one. Tear various shapes from magazines or colored paper. Look for interesting textures. Layer them on a heavy piece of card. I find that staying within a specific color palette helps. Try all blues or all earthy browns. This creates a professional look. Use a matte gel medium to glue the pieces. This prevents the paper from wrinkling. It is a fun way to express your mood. Frame it in a thick white mat to make it look like gallery art.
11. Paper Bag Flower Stars

You only need lunch bags for this. Glue eight paper bags on top of each other. Cut a triangle shape out of the top and sides. Open the stack and watch it turn into a giant star. I use these for holiday decor. They also look great year-round in a corner. Use white bags for a clean look. Use brown bags for a rustic feel. They are very lightweight. I use a single piece of fishing line to hang them from the ceiling. They spin slowly with the air.
12. Scalloped Paper Borders
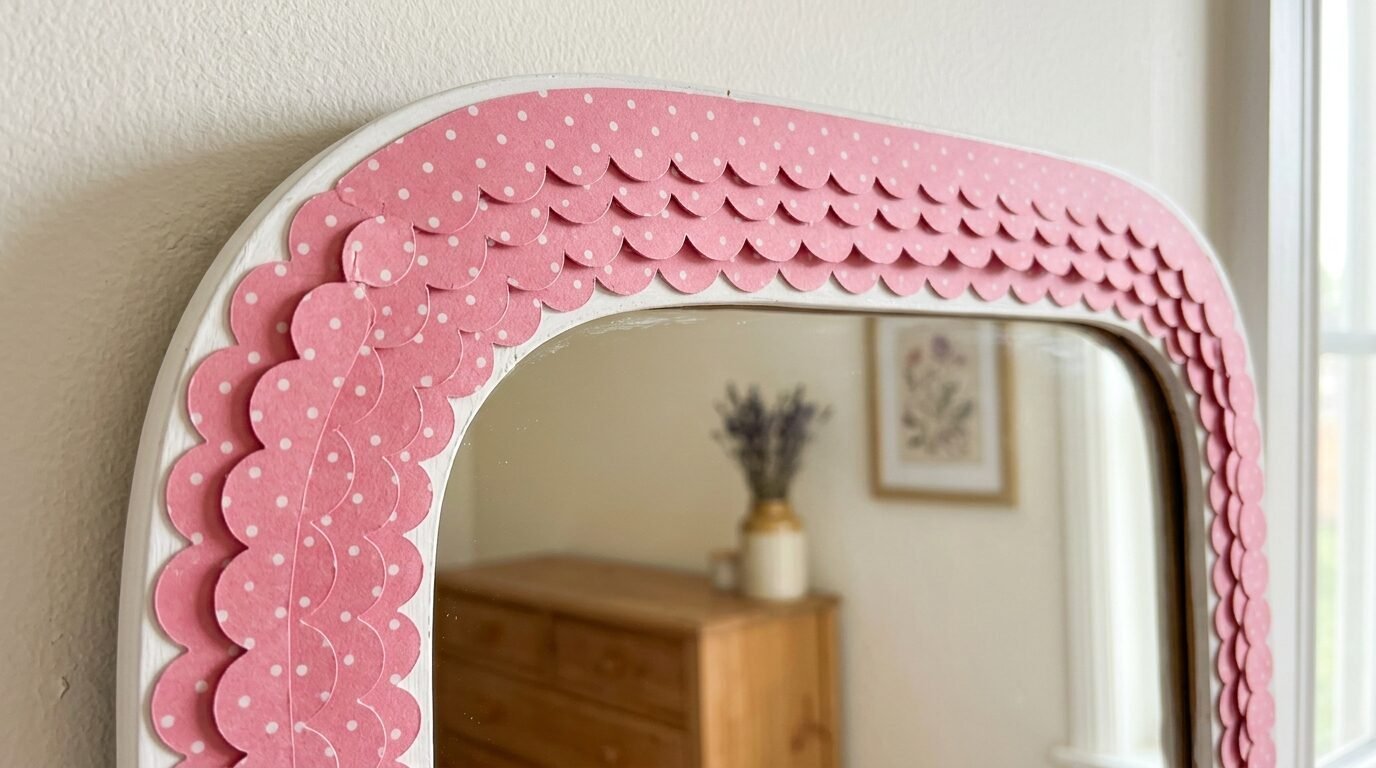
This is a great way to frame a mirror or a doorway. Cut long strips of paper with a scalloped edge. Layer them to look like shingles. I used this on the edges of my bookshelf. It hid the plain wood and added a cute detail. Use double-sided tape to attach them. I suggest using a pattern like polka dots or stripes. It adds a playful touch to a teen bedroom. It is easy to remove if you get bored of it.
13. 3D Paper Gems
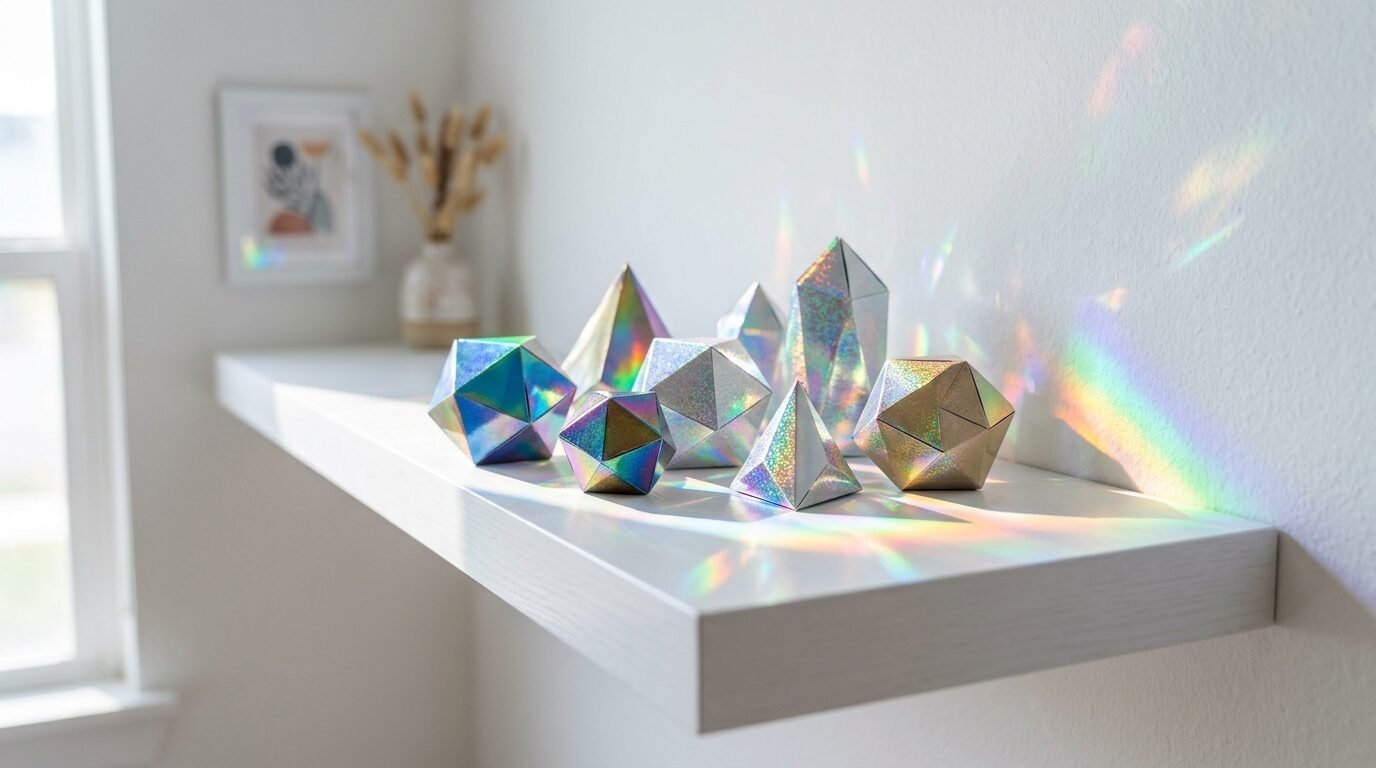
Download a template for geometric gems. Cut them out of metallic paper. Fold along the lines and glue the tabs. These look like expensive crystals. I like to group them on a floating shelf. You can also string them into a mobile. Use different sizes for a more natural look. I tried this with holographic paper and the effect was wild. It looks like something from a modern art museum.
14. Accordion Fold Maps
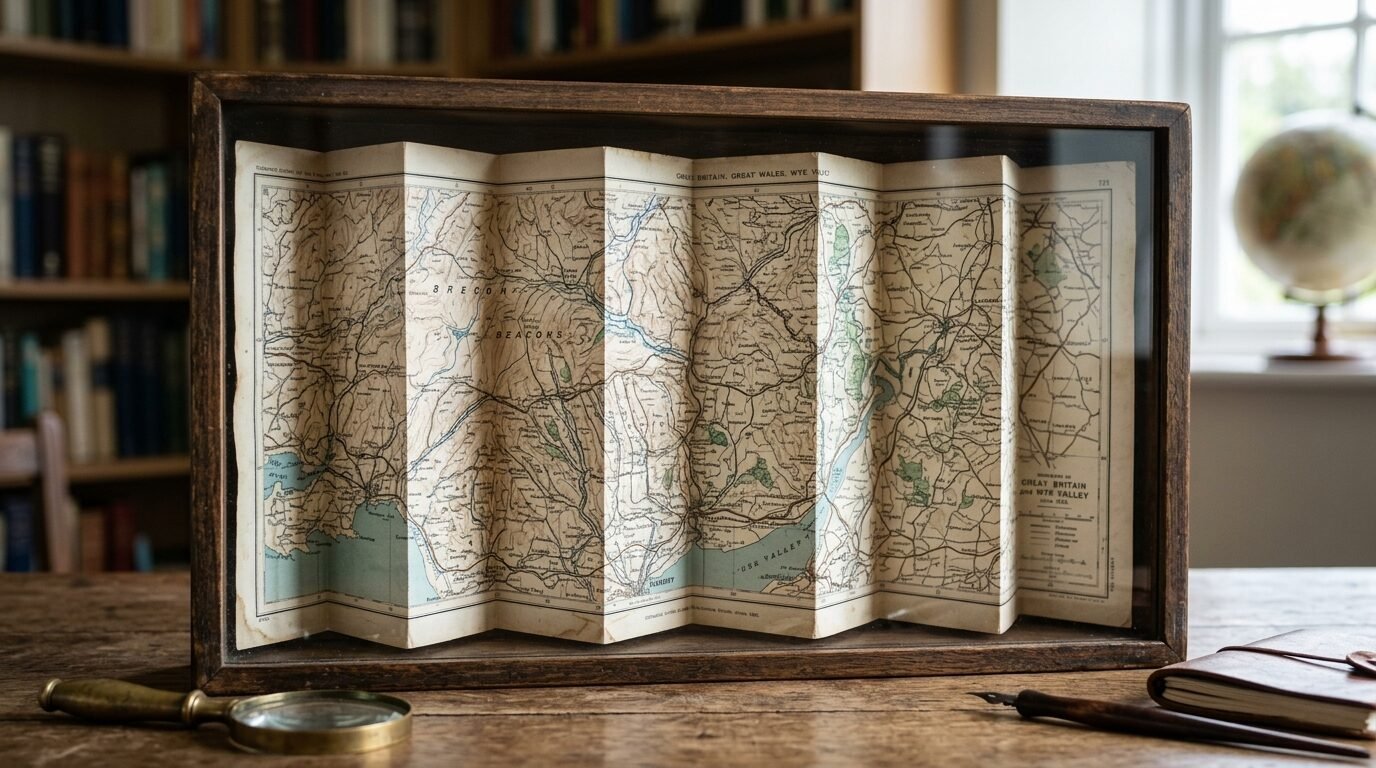
If you love to travel, use old maps. Fold them into fans or birds. I prefer a simple accordion fold. Mount the folded maps inside a shadow box. It shows off the colors and the locations. I used a map of my hometown for this. It is a great conversation starter. This is a smart way to reuse items you already have. Make sure the folds are crisp. Use a bone folder for the best results.
15. Anime Manga Wall
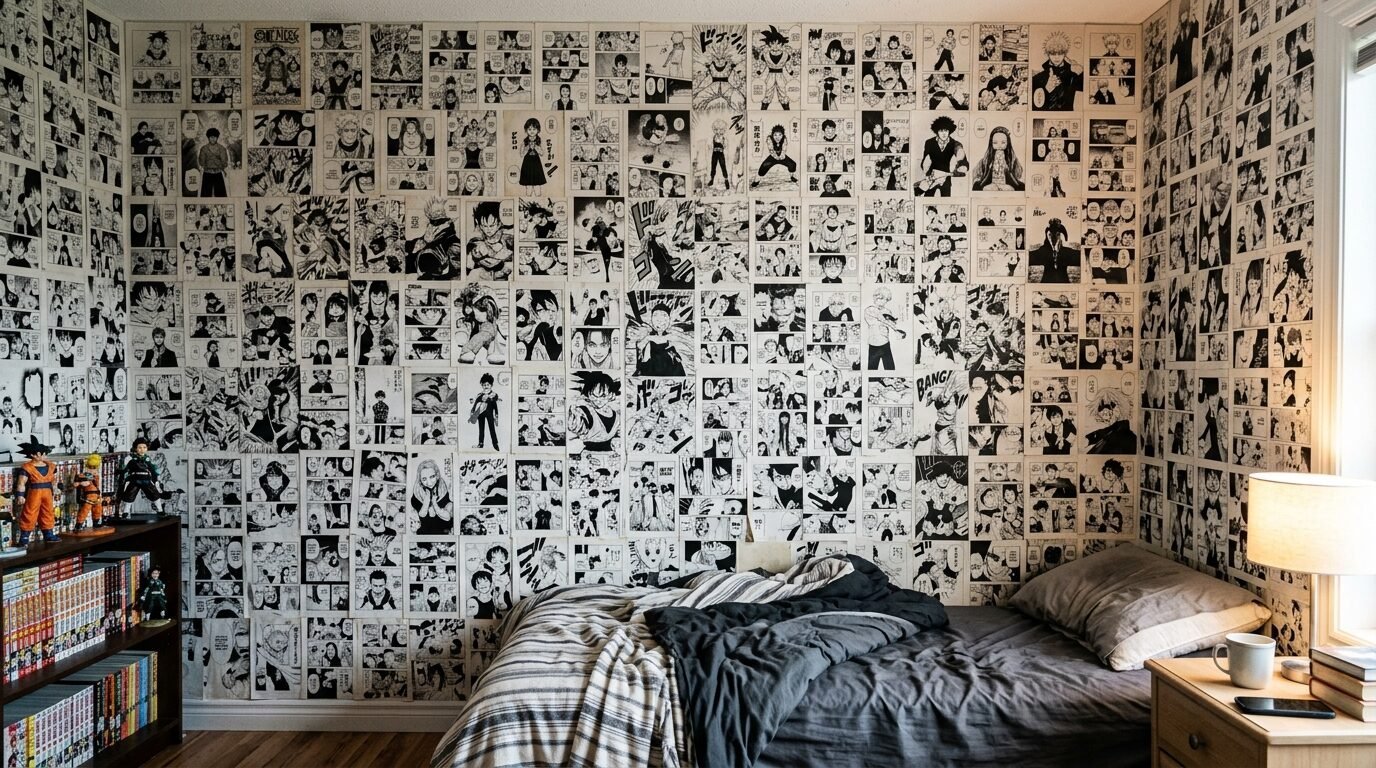
This is a huge trend for teen rooms. Buy a cheap manga book at a used bookstore. Tear out your favorite pages. Cover an entire wall section with them. I recommend using painter’s tape on the wall first. Then glue the pages to the tape. This saves your walls from glue damage. Overlap the edges so no wall shows through. It creates a high-energy focal point. My cousin did this and it completely changed the feel of her room. It looks like a custom mural.
16. Paper Geometric Mountains
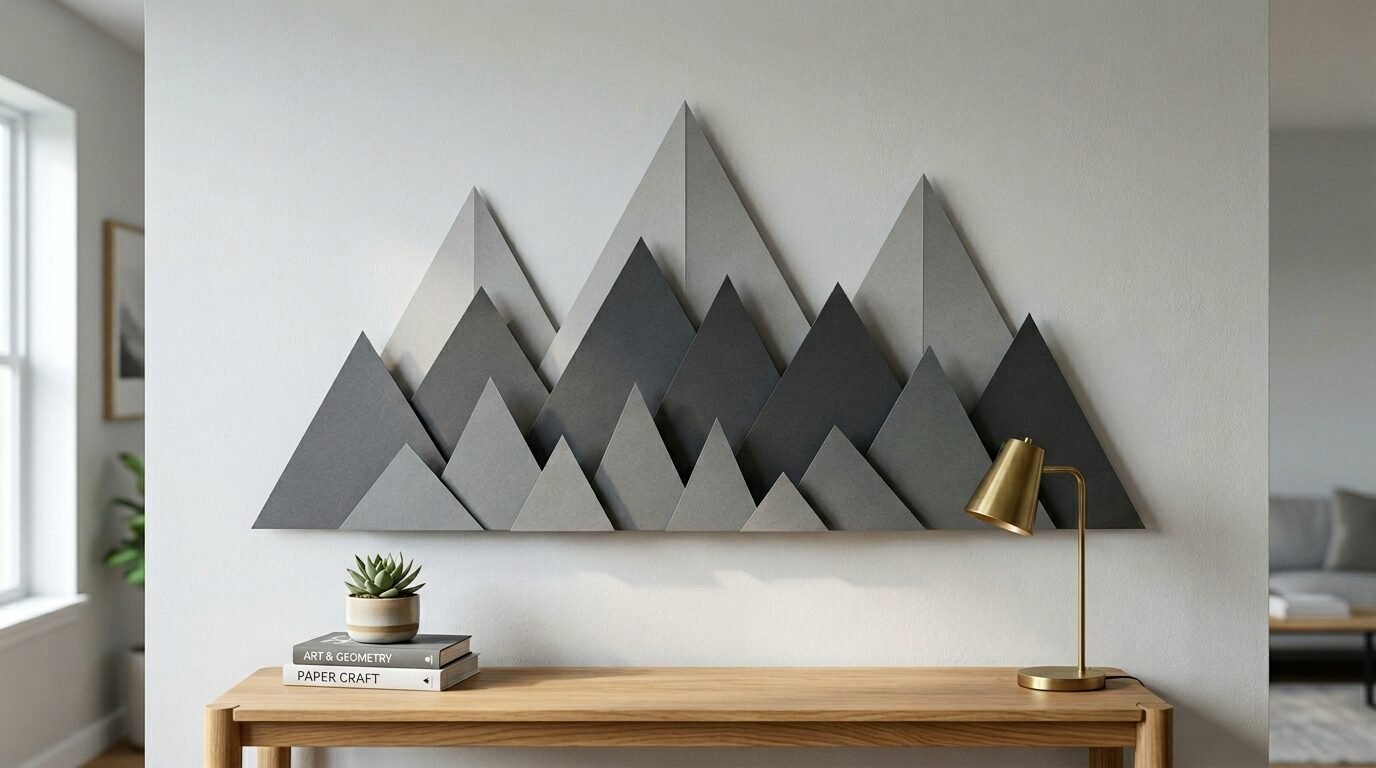
Use three shades of gray cardstock. Cut large triangles. Layer them to look like a mountain range. Place the darkest shade in the front. Use the lightest shade for the peaks in the back. This adds perspective to a flat wall. I like to add a yellow circle for a sun. It is a simple way to create a wall mural without paint. Use a level to make sure the bottom is straight. This looks great over a bed or a couch.
17. Crepe Paper Streamer Backdrop
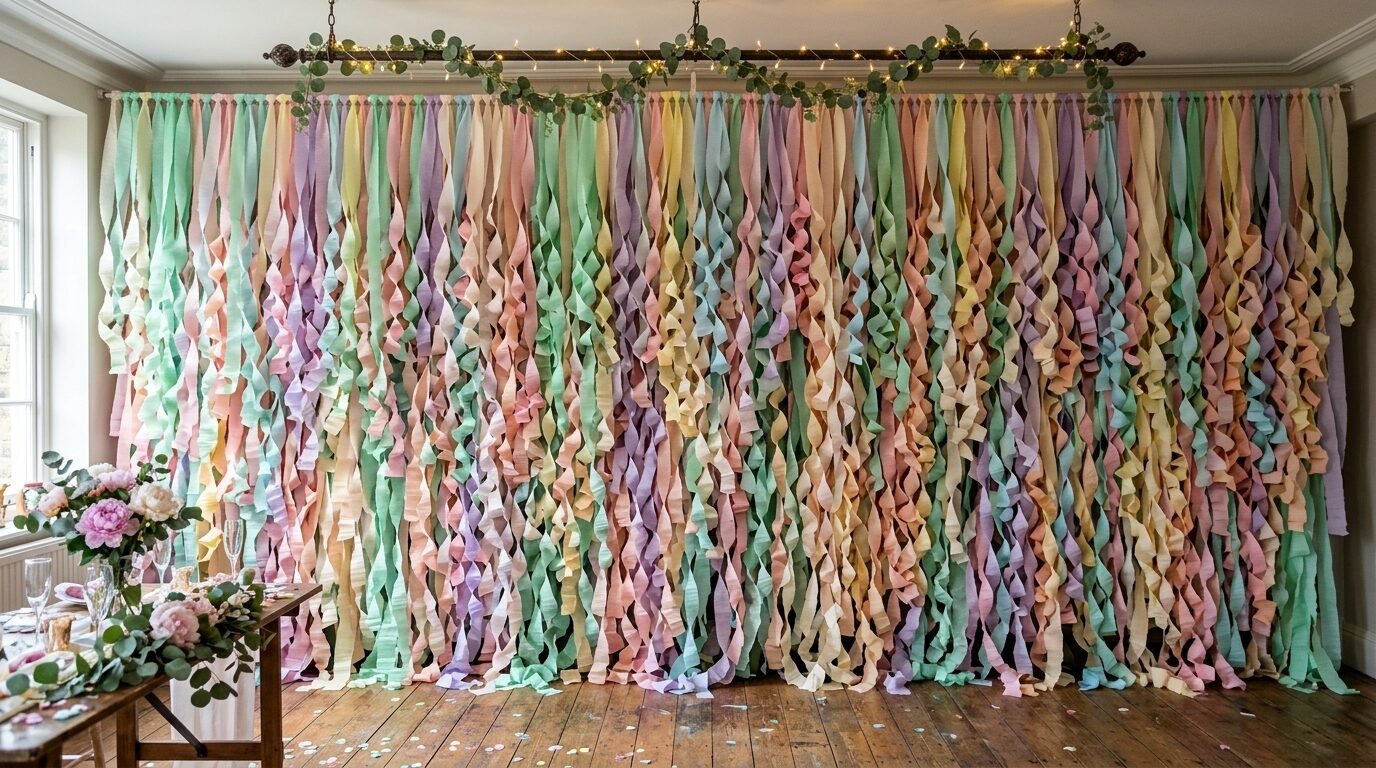
This is perfect for a photo wall. Use high-quality crepe paper. Cut long strips that reach from the ceiling to the floor. Twist them slightly as you hang them. Use a variety of colors. I like using soft pastels for a dreamy look. Use a piece of wood trim to hide the tape at the top. It creates a soft, textured wall. I’ve seen this used at weddings and it works just as well in a bedroom.
18. Layered Paper Topography
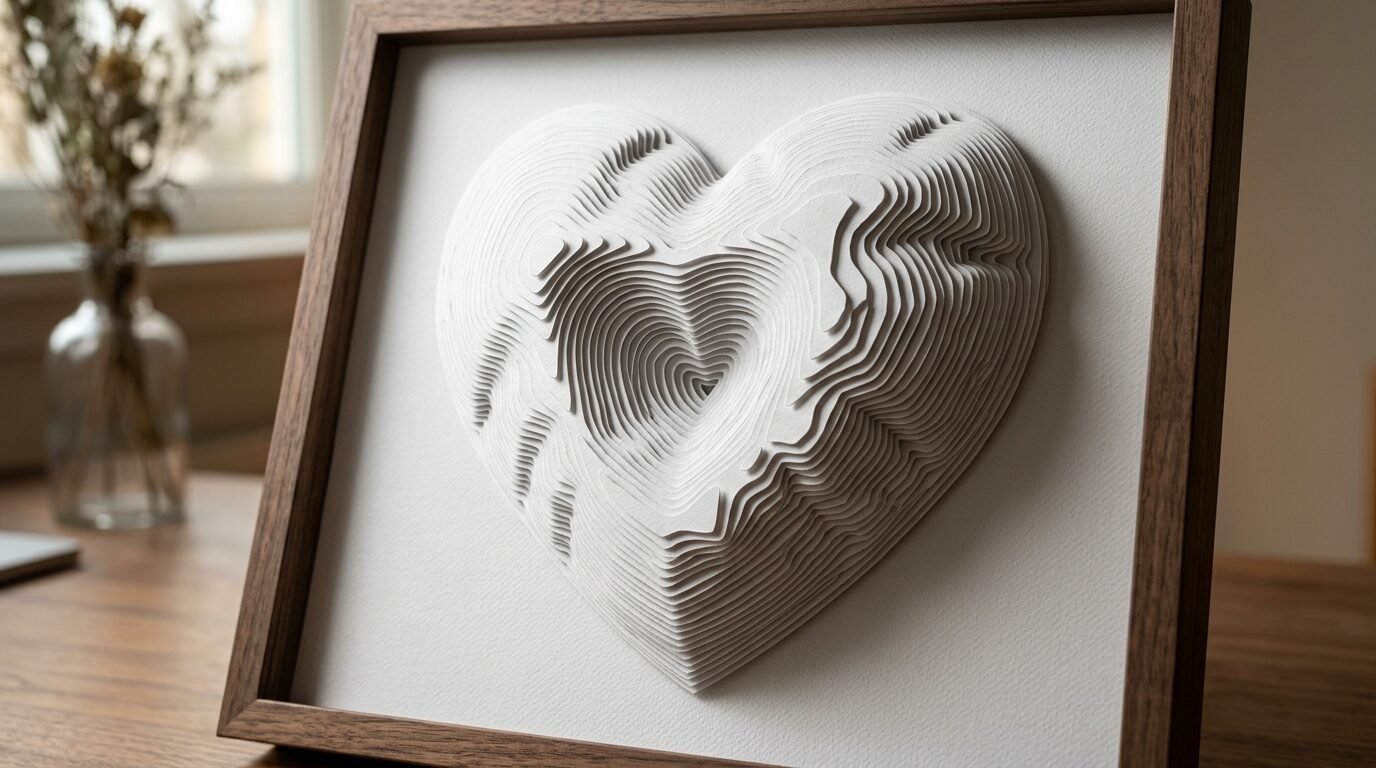
This is more advanced but worth it. Cut several layers of the same shape. Each layer should be slightly smaller than the one below it. Use foam tape between the layers to create depth. This looks like a topographical map. I tried this with a heart shape. It looked like it was popping out of the frame. Use white paper on a white background for a subtle look. The shadows do all the work.
19. Paper Plate Sunbursts
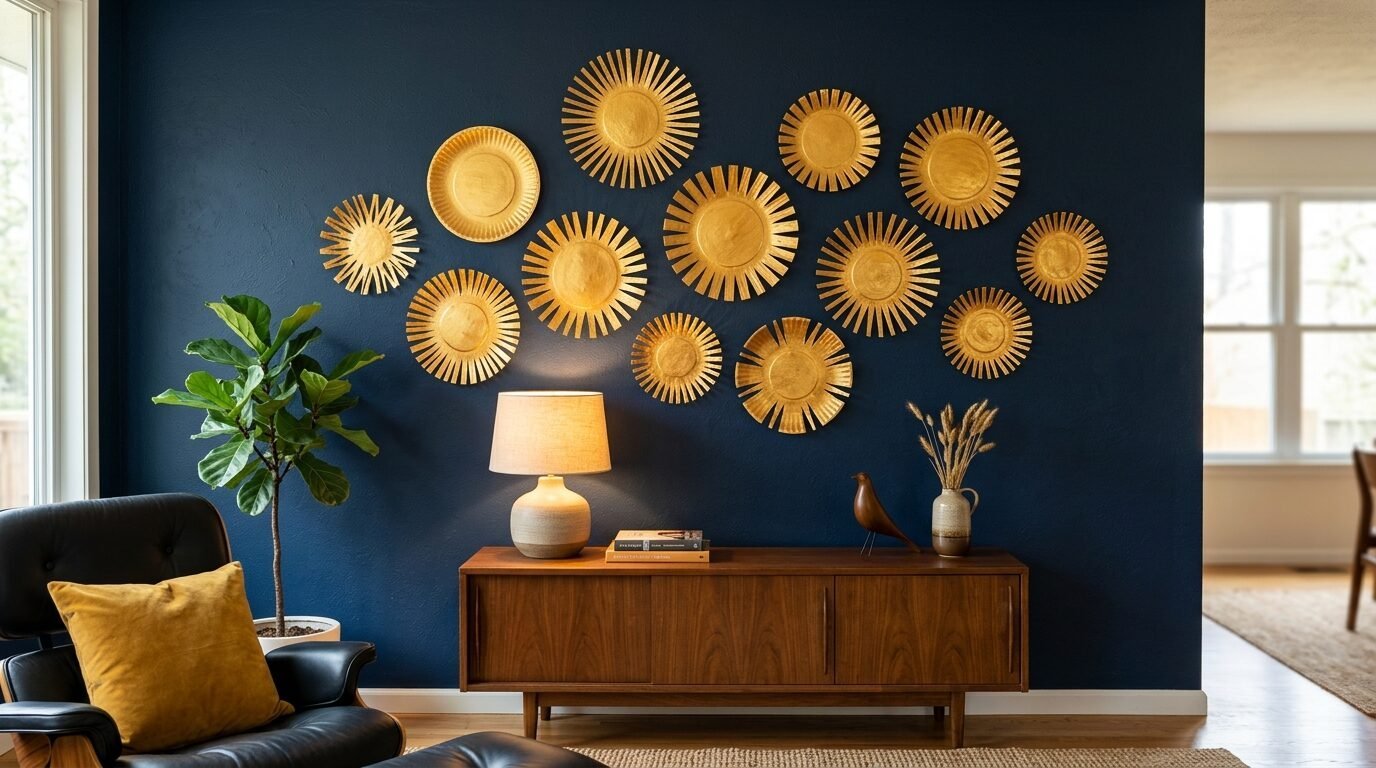
Standard paper plates can become art. Cut the edges of the plate into thin points. Leave the center intact. Paint the whole thing gold or silver. Mount several of these in a group. It looks like mid-century modern metal art. I tried this in my living room and no one knew they were plates. Use a hot glue gun to attach them to the wall. This is a very sturdy project.
20. Tissue Paper Pom-Poms
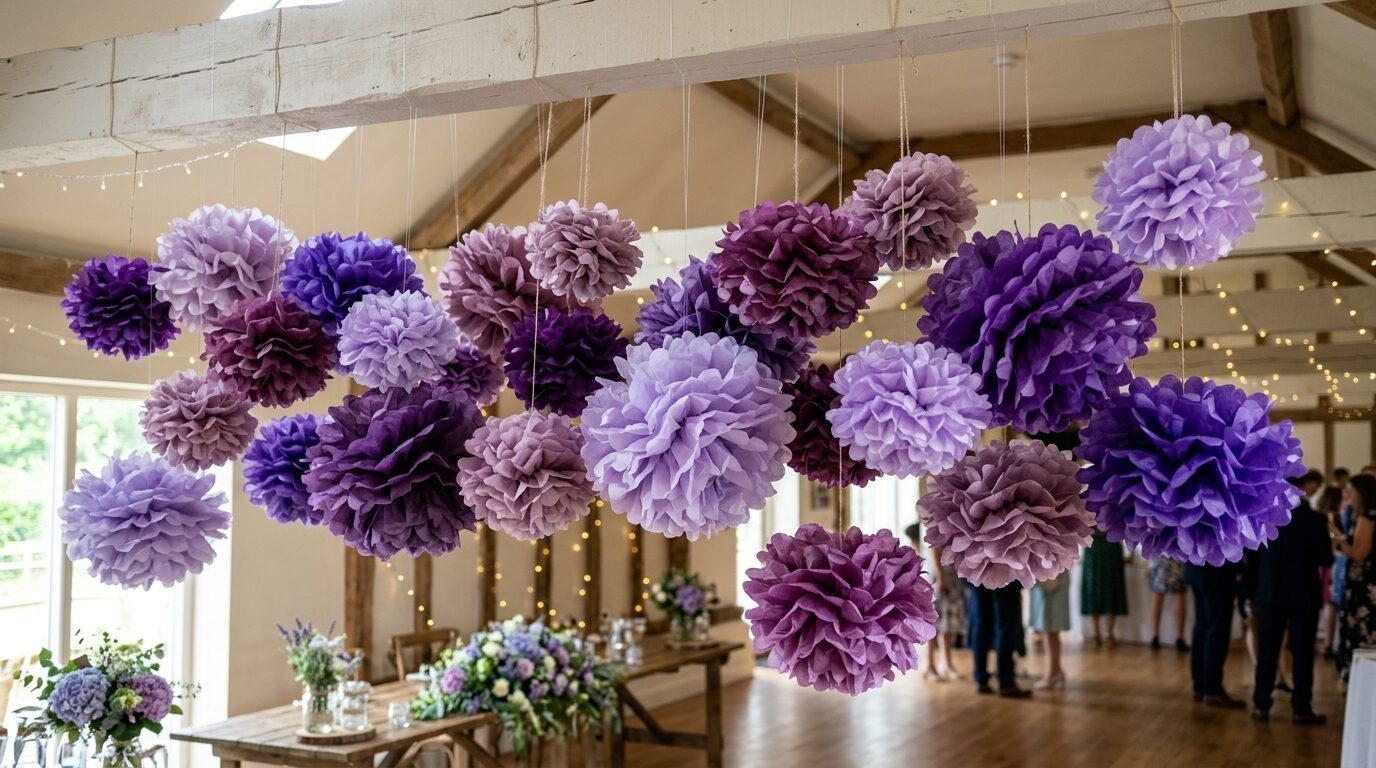
Tissue paper is very forgiving. Stack ten sheets of tissue paper. Fold them like an accordion. Tie a string in the middle. Cut the ends into points. Pull each layer of paper toward the center. It creates a large, fluffy ball. These look great hanging in a corner. I like to use different shades of the same color. It adds a soft, feminine touch. They are very cheap to make.
21. Cardstock Wall Molding
If you want the look of expensive paneling, use paper. Cut long, thin strips of heavy cardstock. Paint them the same color as your wall. Glue them in rectangular shapes to mimic molding. I did this in my dining room. From a distance, you cannot tell it is paper. It adds a traditional, upscale feel. This is a great trick for renters. Use a removable glue stick for easy cleanup.
22. Paper Wreaths
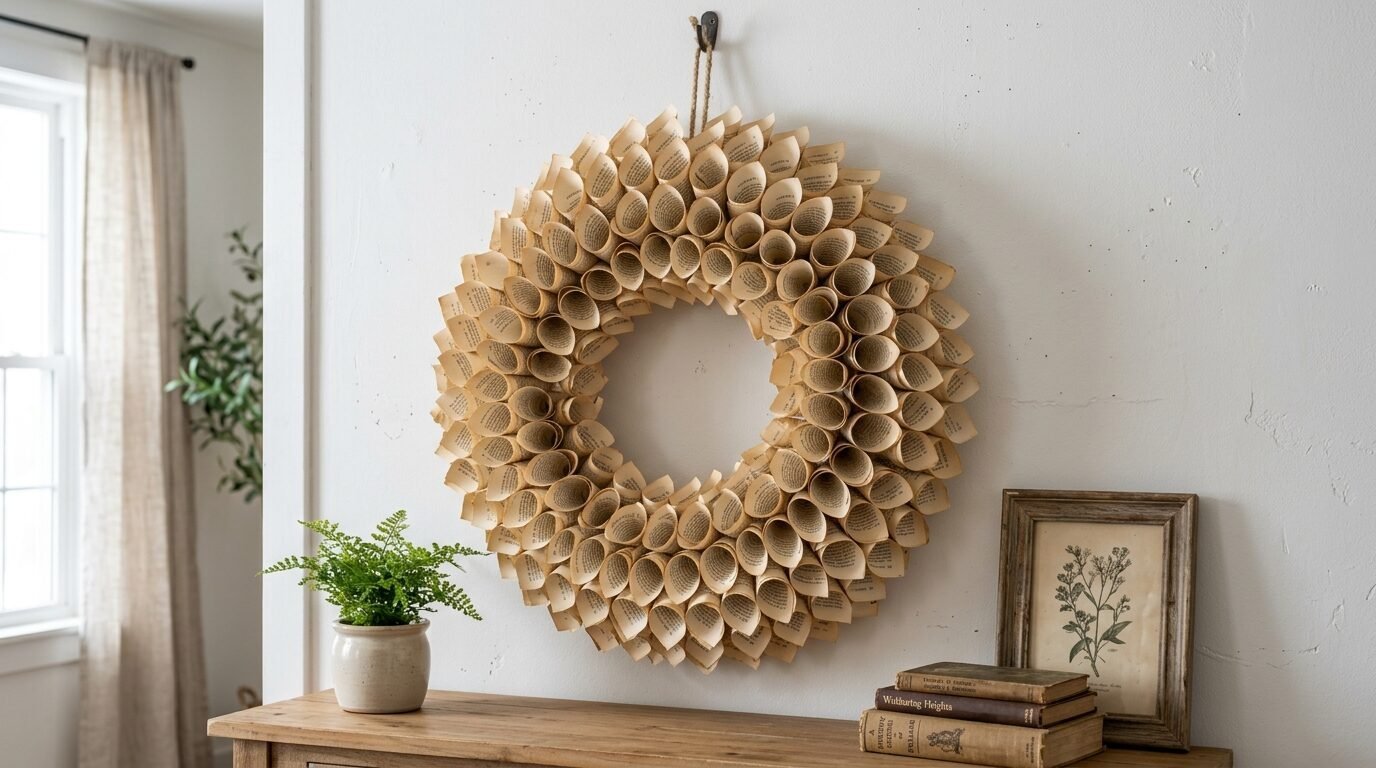
Wreaths are not just for doors. Make a wreath out of book pages. Roll the pages into cones. Glue the cones to a cardboard circle. It creates a starburst effect. I love the way the old text looks. It adds a vintage feel to any room. You can also use colorful cardstock for a modern look. This project takes about an hour. It is very satisfying to finish.
23. Large Paper Sunflowers
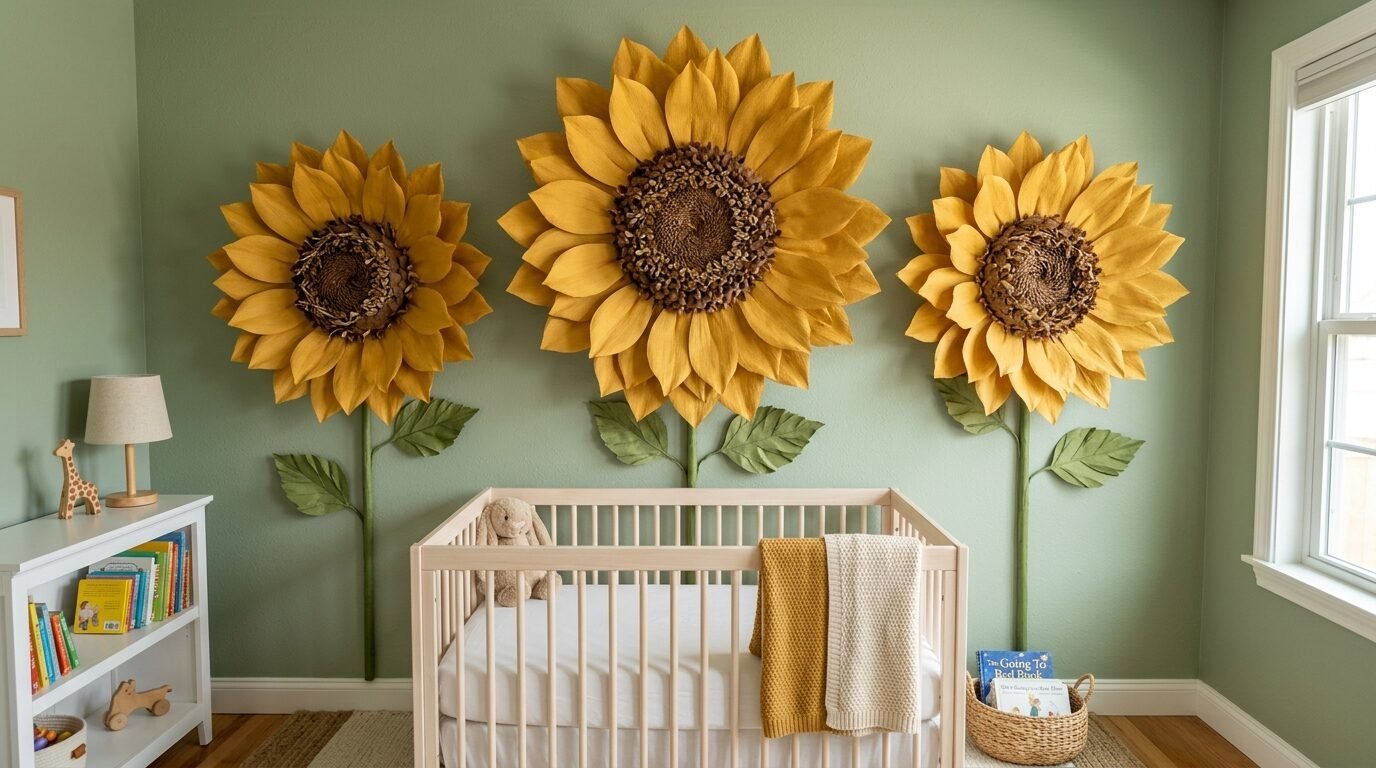
Sunflowers bring joy. You need yellow and brown cardstock. Cut large petals. Curl the edges with a pencil. Glue them in layers around a brown circle. Use a hole punch to create texture in the center. I made three of these for a nursery wall. They are bold and bright. They fill a large space easily. Use a strong adhesive for this as they can get heavy.
Comparison of Paper Types for Wall Decor
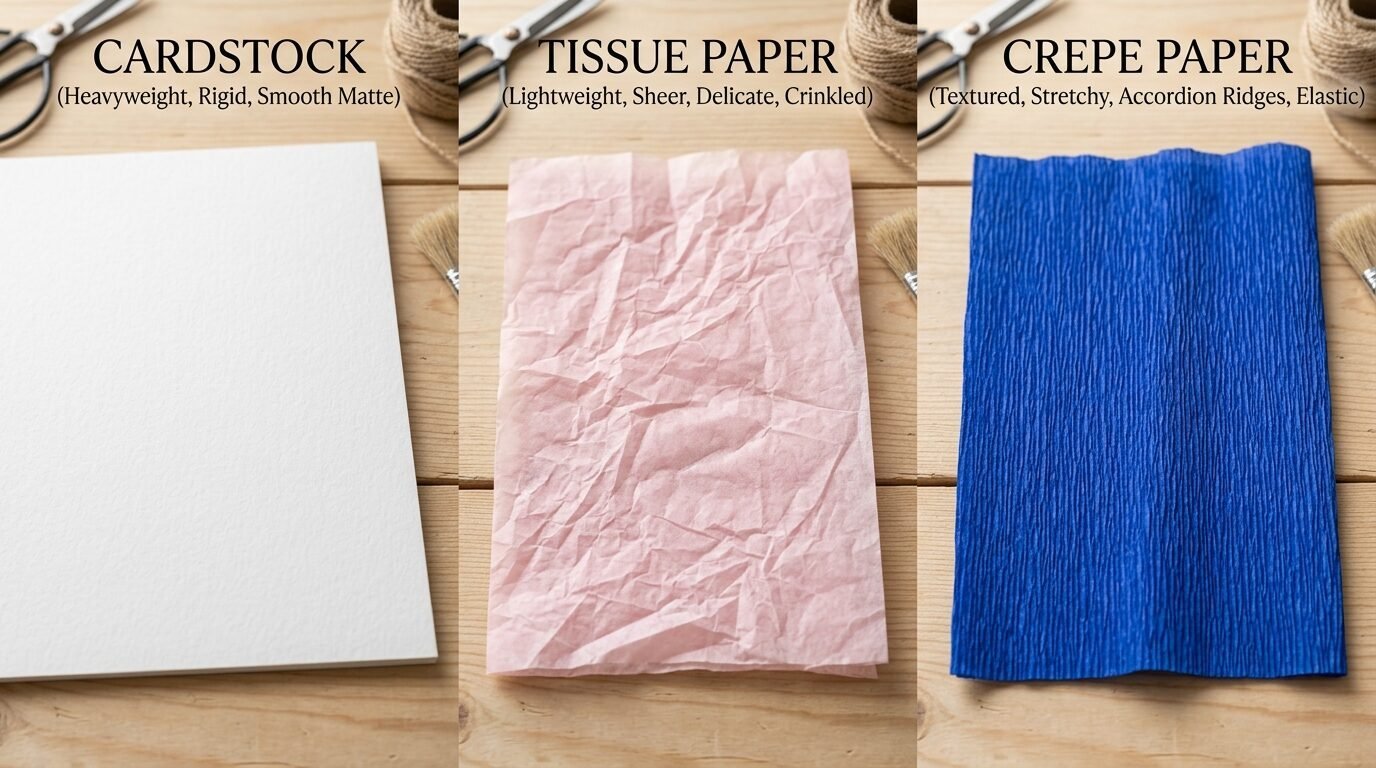
| Paper Type | Best Use | Durability | Price |
| Cardstock (65lb) | 3D shapes, molding | High | Medium |
| Construction Paper | Kid’s crafts, weaving | Medium | Low |
| Tissue Paper | Pom-poms, flowers | Low | Low |
| Crepe Paper | Backdrops, streamers | Medium | Medium |
| Origami Paper | Small tiles, gems | Medium | High |
Frequently Asked Questions
What is the best glue for paper wall decor?
I always recommend blue poster tack or Command Strips. These do not damage the paint. If you are mounting paper to a canvas, use a glue stick or Mod Podge. Avoid hot glue directly on walls as it can peel the paint off. I learned this the hard way in my first dorm room.
How do I prevent paper from curling?
Paper curls when it gets damp or if it is too thin. Use cardstock that is at least 65 lb weight. If you use paint, use a very dry brush. Too much water will warp the paper. I suggest using a matte sealer spray if you live in a humid area.
Can I do these projects if I am not artistic?
Yes. Many of these projects use templates. You can find free shapes online to print and trace. The 3D butterfly swarm is the easiest place to start. It only requires cutting and folding. You do not need to draw anything.
How long do these paper decorations last?
If they are out of direct sunlight, they can last for years. Sunlight will fade the colors over time. I usually refresh my paper decor every six months to keep the room looking new. It is an easy way to change with the seasons.
Is paper decor safe?
Keep paper away from candles, heaters, and light bulbs. Paper is flammable. Use LED lights if you want to illuminate your crafts. I always make sure my wall hangings are at least two feet away from any heat source.
What brands of paper do you recommend?
I love Astrobrights for bright colors. For neutral tones, I look at the Recollections line at Michael’s. If you want high-end texture, Canson Mi-Teintes is excellent. It has a nice honeycomb grain that looks very expensive.
How do I clean paper wall art?
Do not use water. Use a soft, dry microfiber cloth or a feather duster. Gently swipe over the surfaces. If a piece gets very dusty or torn, it is cheap enough to just replace it. That is the beauty of paper.
Can I use recycled paper?
Absolutely. Old books, maps, and even newspaper can look great. I once made a wall of paper fans using old sheet music. It looked incredible and cost zero dollars. Look for paper with interesting fonts or aged colors.
Do I need a cutting machine like a Cricut?
You do not need one, but it helps for intricate designs. I did all these by hand for years. A good pair of Fiskars scissors and a sharp X-Acto knife are enough. If you plan on making 100 butterflies, a machine will save your hands.
Conclusion
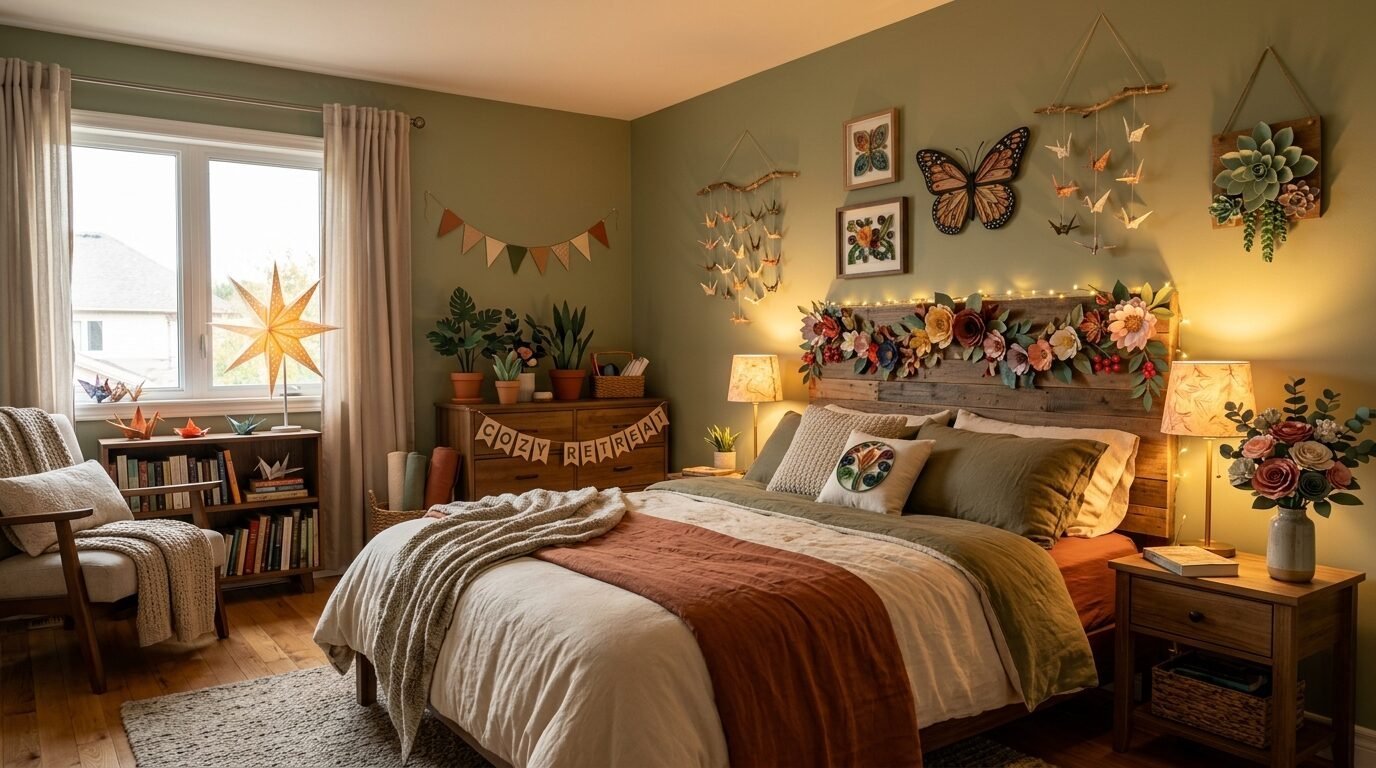
Redecorating your home does not require a huge bank account. These 23 DIY paper wall decor crafts prove that creativity and a few sheets of paper can change everything. I have seen these projects turn cold apartments into warm, stylish homes. Start with one project this weekend. Pick something simple like the butterflies or the paper fans. You will notice a shift in how you feel about your space. It becomes yours. You made it. If you try any of these, I would love to hear how they turned out. Which one fits your style the most?

Anya Castellan is the Founder and Editor-in-Chief of Home Wall Trends. An art history graduate of the Rhode Island School of Design with twelve years of experience writing for leading American design publications, she specializes in composition, gallery wall theory, and the quiet architecture of domestic space. A former contributing editor at Architectural Digest and guest lecturer at Parsons School of Design, Anya personally reads and signs off on every piece before it is published.