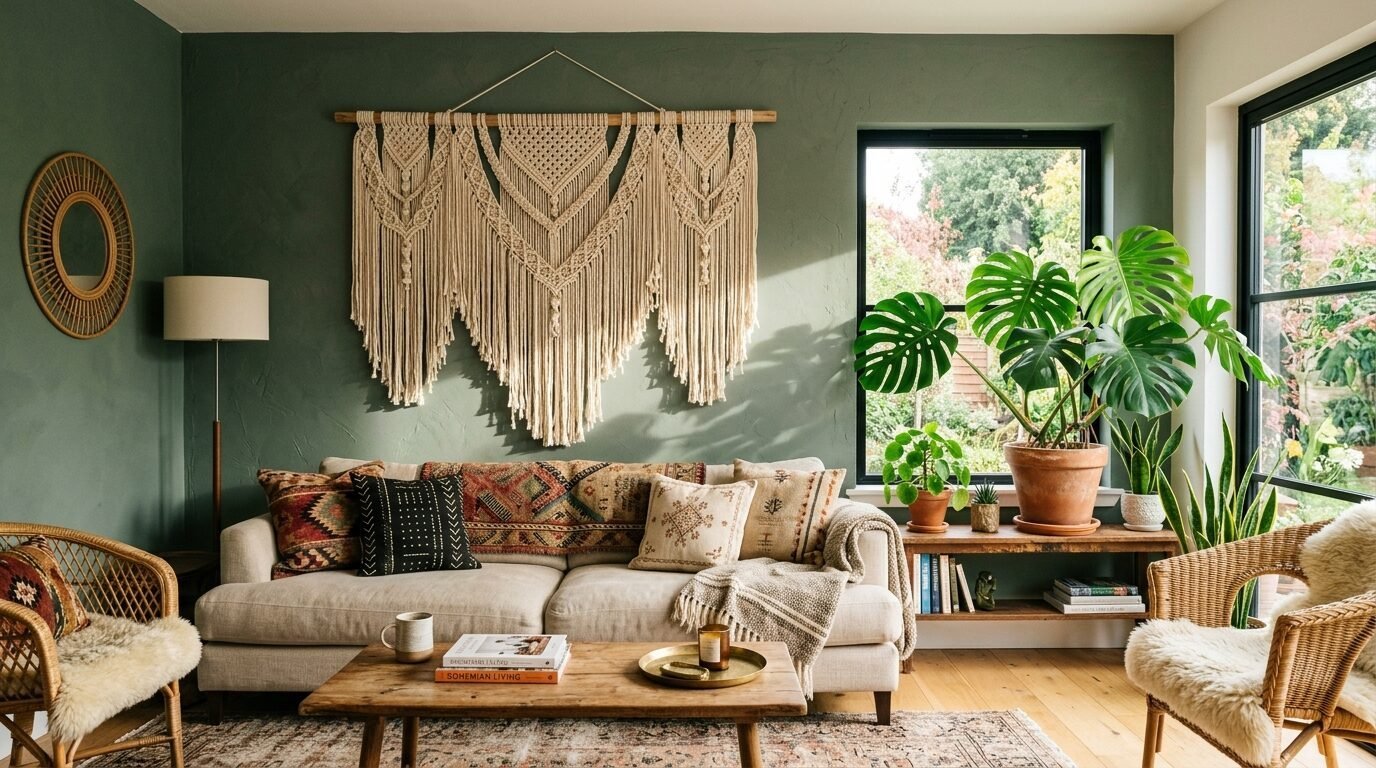
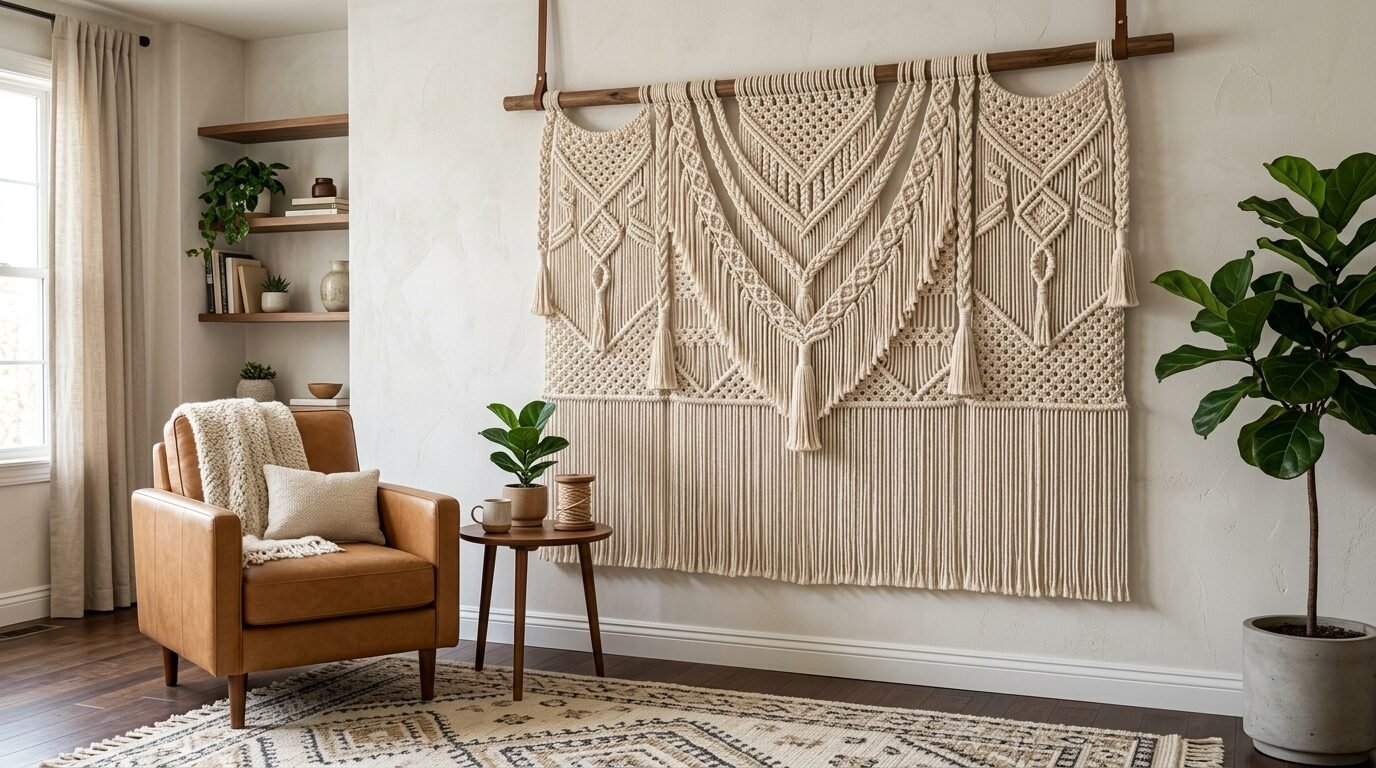
You stand in the aisle of a craft store. Bundles of cream-colored rope surround you. You want that beautiful boho look for your bedroom. You saw it on Pinterest. You want to make it yourself. But the knots look like a confusing puzzle. One wrong pull and the whole thing might fall apart. My first attempt at a diy macrame wall hanging was a mess. I used thin kitchen twine. The knots were so tight I couldn’t undo them. It looked like a tangled fishing net. It was not the Pinterest dream I imagined.
Making your own wall art should not feel like a high-stakes math test. This craft is about rhythm and texture. It is about creating something with your hands that feels soft and organic. Most people quit because they start with a project that is too big. They buy the wrong cord. They get frustrated by complex patterns. You do not need a degree in fiber arts to succeed. You just need to know three basic moves.
I have spent years testing different cotton ropes. I have ruined countless dowels. I have found the exact shortcuts that make easy macrame projects actually easy. This guide will walk you through every loop and pull. You will learn how to turn a simple cord into a stunning piece of home decor. By the end of this afternoon, your bare wall will have a soul. Let’s get your workspace ready and start tying.
What do you need to start your first macrame project?
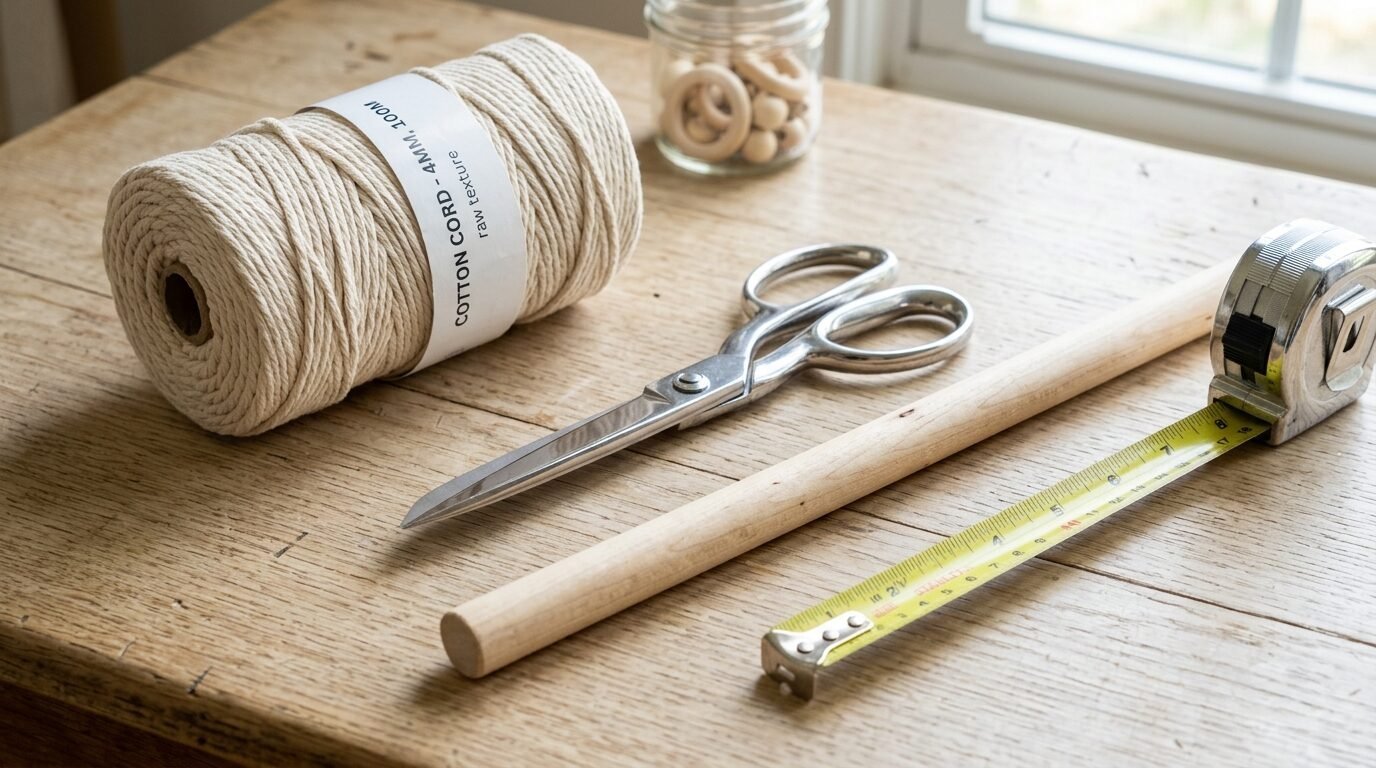
Success in fiber art starts with the right tools. I have seen beginners try to use yarn or plastic rope. This is a mistake. Yarn is too stretchy. Plastic is too slippery. In my experience, 100% cotton cord is the only way to go. It holds its shape. It feels good on your fingers. It gives you those crisp, clean lines that make macrame ideas look professional.
You need a sturdy support for your work. A wooden dowel from Michaels is a classic choice. If you want a more natural look, use a piece of driftwood. I found a great branch at the park last year. I cleaned it and dried it. It became the base for my favorite piece. You also need a pair of very sharp scissors. Fiskars makes a dedicated fabric shear that cuts through 5mm cord like butter. Dull scissors will fray your ends and make your fringe look messy.
Here is a list of the exact items I use for every beginner project.
- Bobbiny 5mm Single Twist Cotton Cord
- 12 inch wooden dowel or branch
- Fiskars fabric scissors
- Amazon Basics metal measuring tape
- Two S-hooks
- A clothing rack or the back of a chair
- A fine-tooth comb for the fringe
| Material | Best Brand | Why It Works | Estimated Cost |
| Cotton Cord | Bobbiny | Soft, easy on hands, many colors | $15 |
| Sharp Scissors | Fiskars | Clean cuts prevent fraying | $12 |
| Wooden Dowel | Michaels | Uniform shape, easy to hang | $2 |
| Measuring Tape | Amazon Basics | Accurate lengths save cord | $5 |
| Metal S-Hooks | Generic | Holds work steady at eye level | $4 |
I recommend setting up a vertical workspace. Do not try to tie knots while the project lies flat on a table. Your tension will be uneven. I use a cheap clothing rack and S-hooks. This allows the cord to hang naturally. It lets you see the pattern as it grows. It also saves your back from leaning over a desk for two hours.
How do you tie a Lark’s Head Knot correctly?
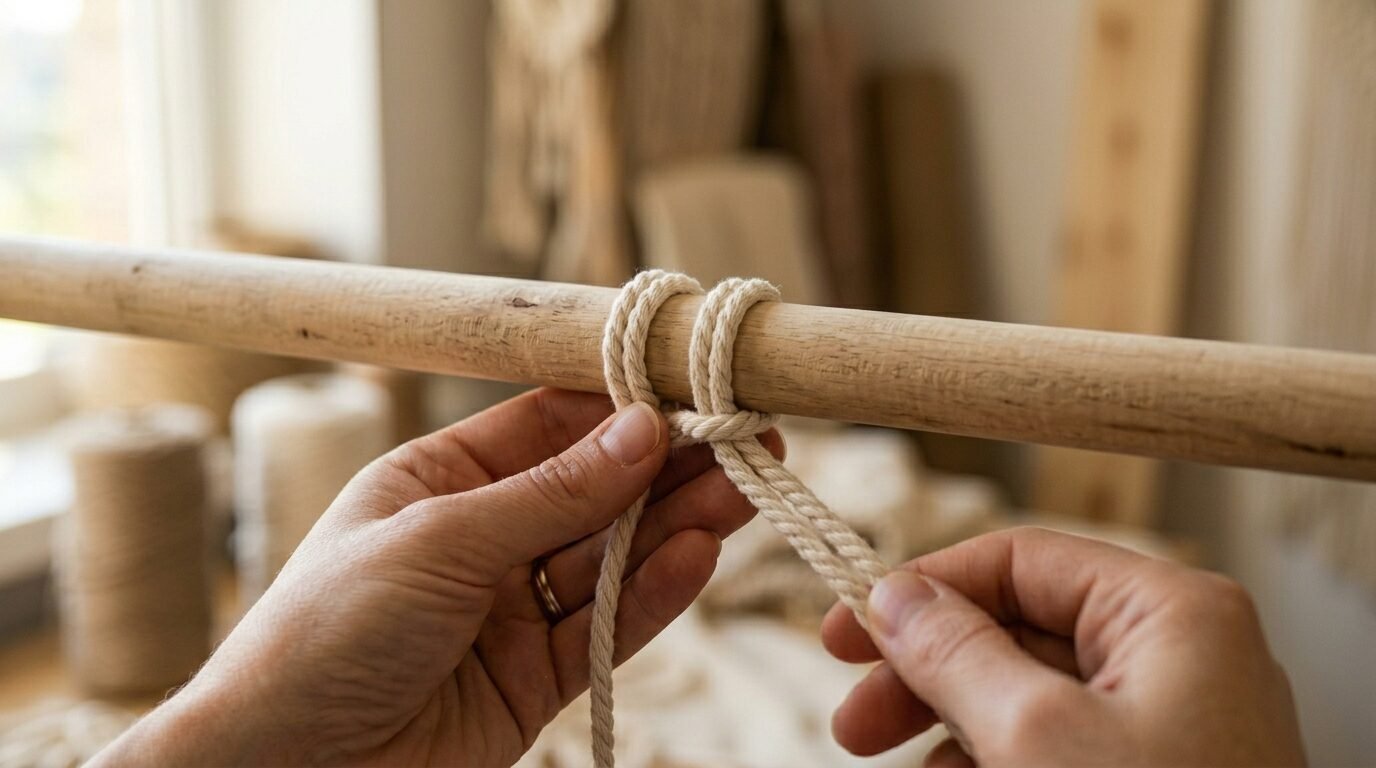
The Lark’s Head Knot is the foundation of every diy macrame wall hanging. It is how you attach your cord to the dowel. If you get this wrong, your whole project will be shaky. I once tied twenty cords upside down. The loops faced the back instead of the front. I had to redo the whole row.
First, cut your cords to the right length. For a beginner project, I suggest 10-foot lengths. This sounds long, but knots eat up cord quickly. Fold one cord exactly in half. You now have a loop at the top and two loose ends at the bottom. Lay the loop over the top of your wooden dowel.
Reach through the loop with your fingers. Grab the two loose ends. Pull them through the loop and over the dowel. Pull the ends down toward the floor. This tightens the knot around the wood. You should see a horizontal bar across the front of the cord. This is the mark of a perfect Lark’s Head Knot. Repeat this with all your cords. Keep them close together for a thick, lush look.
I have noticed that beginners often pull these too tight. If you pull too hard, you might warp the wood. If you leave them too loose, the cords will slide around while you tie other knots. Find a middle ground. The knot should feel snug but still move if you push it with your thumb. This balance is what makes easy macrame projects look neat and tidy.
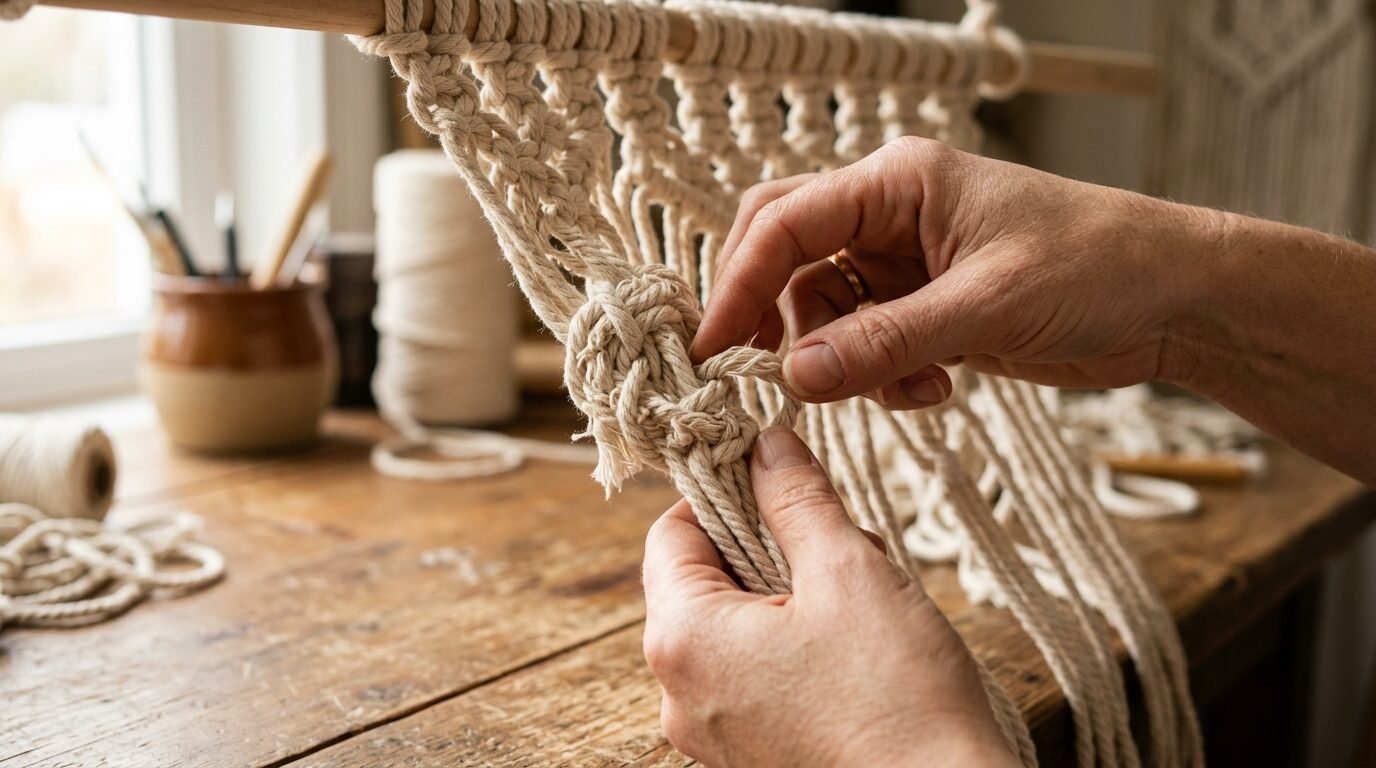
What is the secret to a perfect Square Knot?
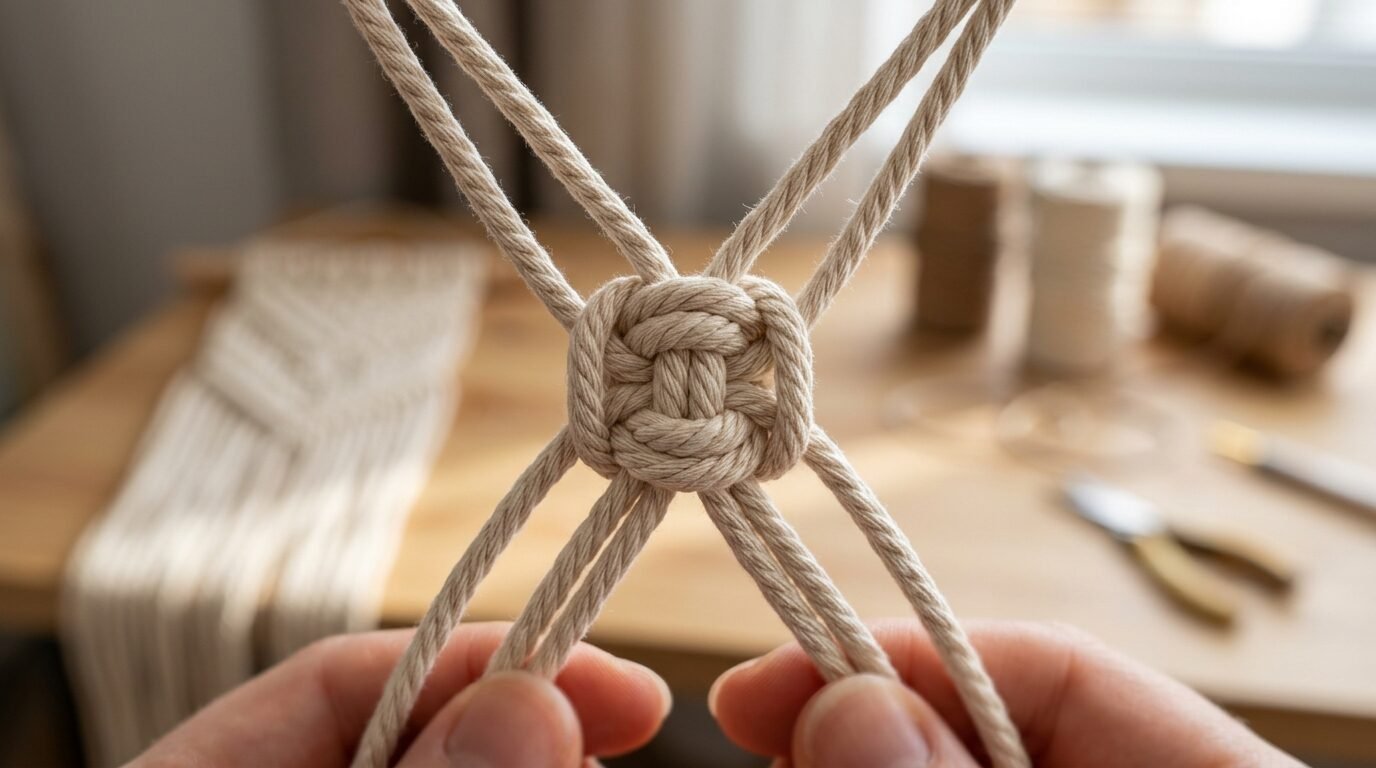
The Square Knot is the most important move in macrame. It creates the mesh pattern you see in those beautiful wall hangings. It uses four cords at a time. The two outer cords do all the work. The two inner cords just stay still. I call these the filler cords.
Start with four cords hanging from your Lark’s Head Knots. Take the cord on the far left. Cross it over the two middle cords to make a shape like the number four. Now take the cord on the far right. Place it over the tail of the left cord. Thread it behind the two middle cords. Bring it out through the loop of the “four” on the left side. Pull both outer cords to tighten. This is a half square knot.
To finish the knot, you must do the same move in reverse. Take the cord on the far right. Cross it over the middle cords to make a backwards four. Take the left cord. Place it over the right cord tail. Thread it behind the middle cords. Bring it through the loop on the right. Pull tight. You now have one complete Square Knot.
In my experience, the biggest failure point is forgetting which side you started on. If you always start on the left, your work will twist. It becomes a spiral knot. I’ve seen this happen to many students. They think they are making a mistake, but they are just making a different knot. To keep it flat, you must alternate sides. A good tip is to look for the small vertical “bump” on the side of the knot. That bump tells you which cord to move next.
How do you create a classic V-shape pattern?
The V-shape is the hallmark of professional macrame ideas. It draws the eye downward. It makes a small piece look grand. You create this by using alternating square knots. This means you take cords from two different knots and join them together.
Start with a row of four square knots. In the next row, leave the first two cords on the left alone. Take the next four cords. Tie a square knot. Continue across the row. You will have two cords left over on the right. This shifts the pattern over by half a knot. For the third row, leave four cords alone. For the fourth row, leave six. This creates a diagonal line that forms a point in the center.
I remember making a large piece for a friend’s wedding. I got halfway through the V-shape and realized I had skipped a cord. The whole geometry was off. I had to unpick three rows of work. It was frustrating, but it taught me a valuable lesson. Always count your cords after each row. Use a piece of painters tape to mark the center cord. This keeps your V-shape symmetrical.
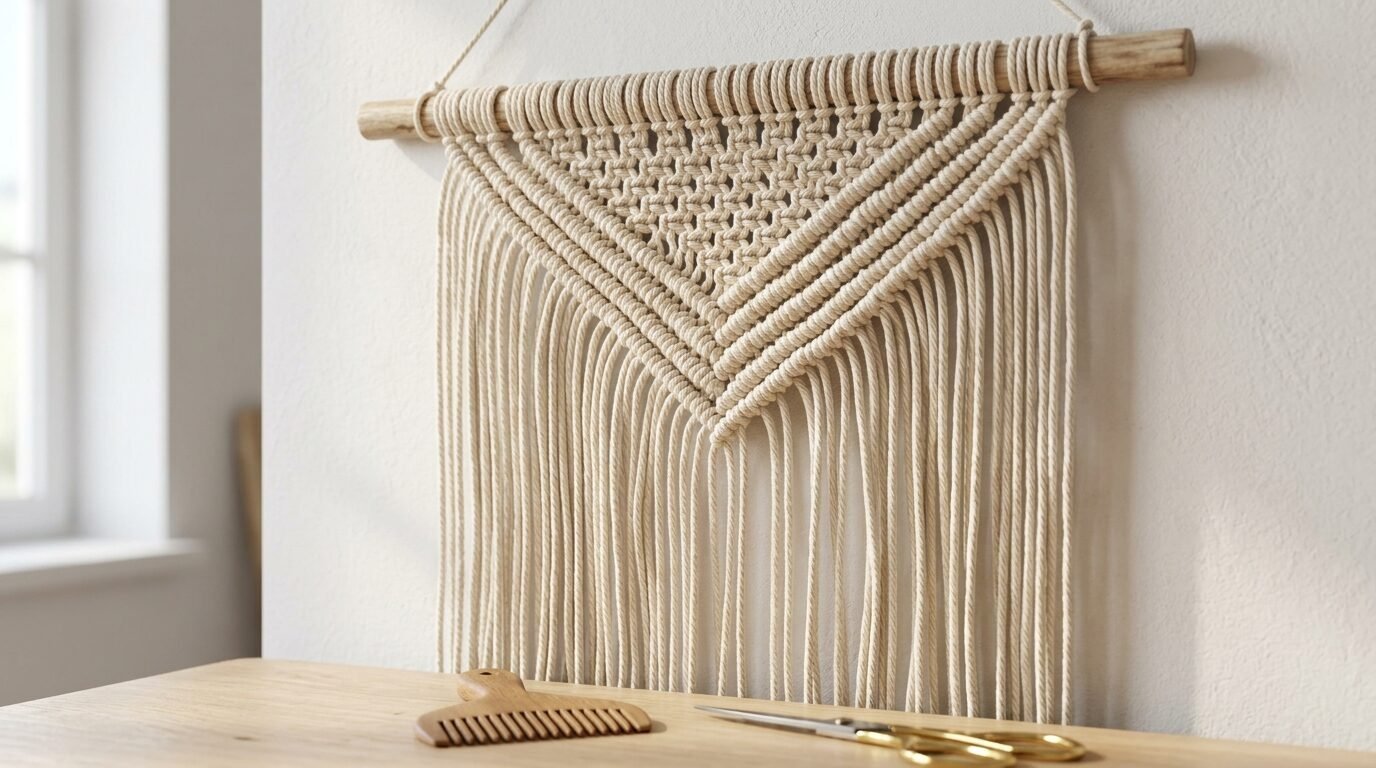
When you finish the V-shape, you can leave the remaining cord as long fringe. This adds a sense of movement to your wall decor. I like to brush the fringe out with a comb. This gives the cotton a fluffy, cloud-like texture. It is a simple way to add luxury to home decor craft ideas without spending more money.
What is the best way to trim macrame fringe?

Trimming the fringe is the most nerve-wracking part of the process. One wrong snip and your piece is ruined. I have seen beautiful projects end up lopsided because the artist was in a rush. I have tried many methods. The “freehand” method usually ends in disaster for beginners.
The most reliable way to get a straight line is to use masking tape. Lay your macrame flat on a table. Use a long piece of tape to mark where you want to cut. The tape acts as a straight edge. It also holds the cords still so they don’t slide under your scissors. Use your sharpest shears. Cut slowly along the bottom edge of the tape.
If you want a pointed or V-shaped bottom, use two pieces of tape. Angle them toward the center point. I once tried to cut a curve into my fringe. It was much harder than I thought. I ended up with a jagged mess. Now, I always stick to straight lines or sharp points.
After you cut, hang the piece back up. Gravity will pull the cords down. Some might look longer than others now that they are hanging. Do a final “dusting” with your scissors to even out the stray fibers. This attention to detail is what separates a DIY project from a piece of professional wall art. It makes your work look like it came from a high-end boutique.
How can you fix common macrame mistakes?
Every beginner makes mistakes. It is part of the learning curve. The most common issue is uneven tension. One knot looks fat and loose. The next one is tiny and tight. This happens when you get tired or distracted. If you notice a row looking wonky, stop immediately.
Unpicking knots is easier than you think. Use the tip of your scissors or a knitting needle to loosen the cord. Do not pull on the ends. Just gently wiggle the loops until they slide apart. I have noticed that people often try to “hide” mistakes by tying the next row tighter. This never works. It just makes the fabric warp.
Another frequent failure is running out of cord. You estimated ten feet, but your knots are tight, and now you have two inches left. You can’t tie a knot with two inches of cord. In this situation, I have tried “splicing” in a new piece of rope. You can use a tiny bit of fabric glue to join a new cord to the old one. Hide the join inside a knot. It isn’t perfect, but it saves the project.
If your work starts to twist and you don’t want it to, check your square knots. You are likely repeating the same side. Take a breath. Unwind the last few knots. Start again with the correct left-right-left rhythm. Macrame is very forgiving. The cotton cord wants to be shaped. You are the boss of the rope.
Where should you display your new macrame piece?

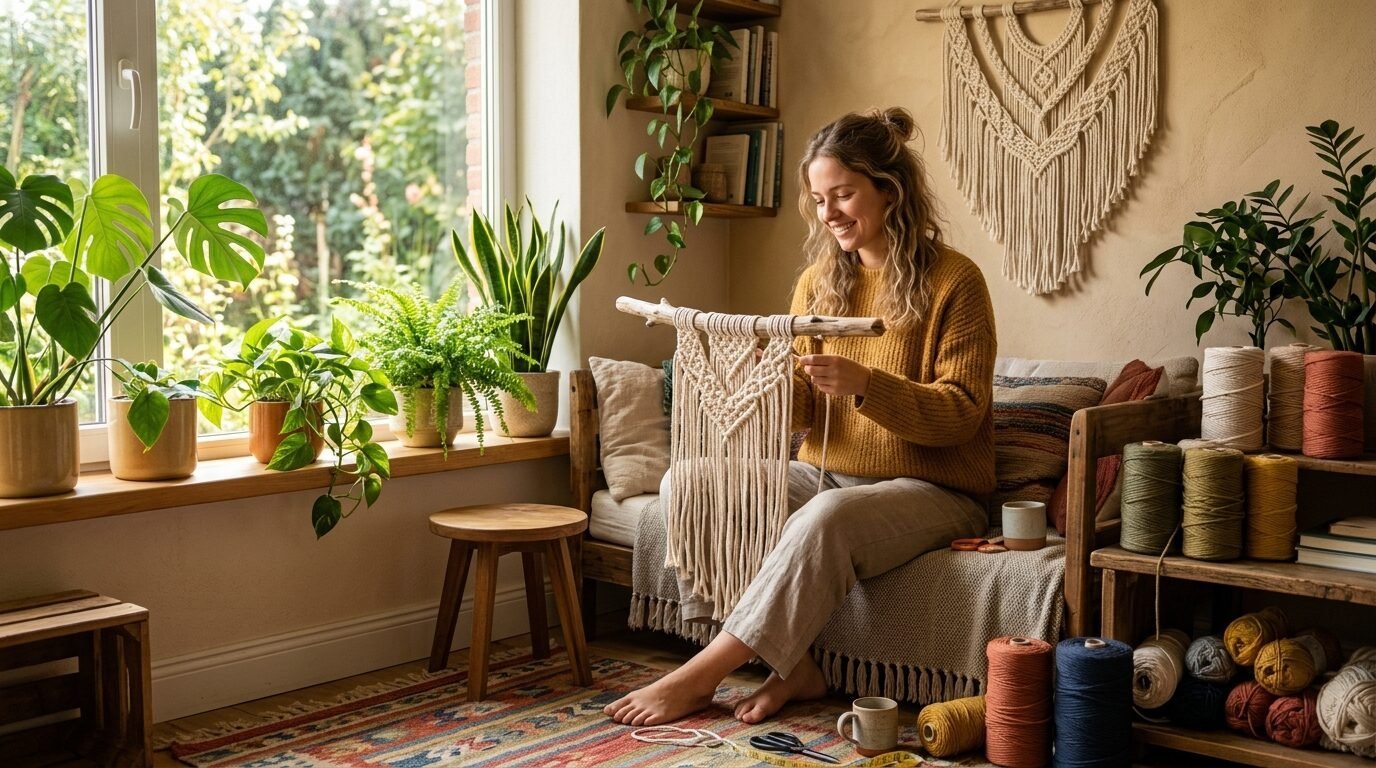
Once your piece is finished, it needs the right home. Macrame ideas work best in rooms with natural light and plants. The soft texture of the cotton balances the hard lines of furniture. I love hanging my projects in the bedroom. It adds a layer of coziness that a framed print cannot match.
Consider the wall color. A cream-colored wall hanging looks sophisticated on a dark green or navy wall. If your walls are white, try using a colored cord like sage green or terracotta. I’ve seen this work wonders in small apartments. It adds visual interest without cluttering the space.
Don’t just stick to the bedroom. A small wall hanging looks great in a hallway or even a bathroom. I have a piece hanging near my desk. It softens the “office” feel and makes me feel more creative. Just avoid hanging macrame too close to a stove or a fireplace. The fibers can trap smells and dust very easily.
If you are giving your piece as a gift, include a small note about how to care for it. I tell my friends to give it a gentle shake every few weeks to remove dust. If the fringe gets messy, a quick brush with a comb will fix it. Home decor craft ideas are more than just items. They are stories you hang on your wall.
Why is macrame the perfect hobby for 2026?
We spend so much time on screens. Our hands are always tapping on glass. Macrame brings us back to the physical world. It is a slow craft. You cannot rush a thousand knots. This slow pace is a form of meditation. I have noticed that my stress levels drop the moment I pick up my cord.
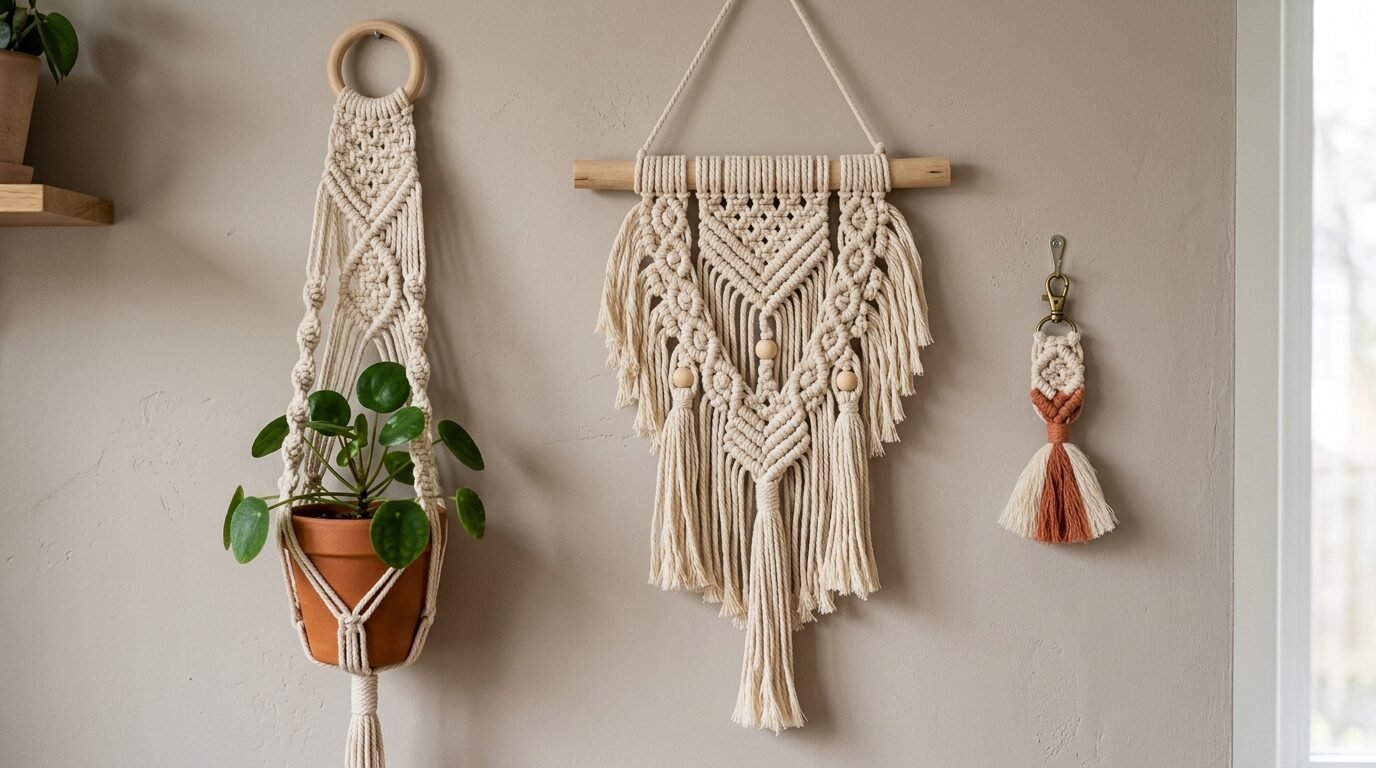
It is also an affordable way to stay on trend. High-end textile art can cost hundreds of dollars. You can make a large wall hanging for under thirty dollars. You are not just saving money. You are building a skill. Once you master the basic knots, you can make plant hangers, pillows, and even curtains.
The community around diy macrame wall hanging is huge. There are thousands of people sharing patterns and tips online. I have learned so much just by looking at how others handle their fringe or color choices. It is a hobby that grows with you. My pieces today look nothing like my first tangled mess. They have character. They have my history tied into them.
Start small. Buy one spool of cord. Find a nice branch in your yard. Dedicate two hours to yourself. You might find that the act of tying knots unties the knots in your mind. It is a beautiful way to spend an afternoon.
Frequently Asked Questions
What cord size is best for beginners?
In my experience, 5mm single twist cotton cord is the best starting point. It is thick enough to see your progress quickly. It is soft enough that it won’t hurt your fingers after an hour of work. 3mm cord is better for smaller, detailed items like jewelry. 7mm cord can be very heavy and hard to pull tight. Stick with 5mm for your first wall hanging.
How much cord do I need for a standard wall hanging?
A good rule of thumb is to cut your cords four to six times the length of your finished project. If you want a 2-foot tall piece, cut your cords to 10 or 12 feet. It is always better to have too much cord than too little. You can always trim the excess into fringe. You cannot easily add more cord once you are halfway down the piece.
Can I use regular yarn for macrame?
You can, but I do not recommend it for your first project. Yarn is designed to be soft and stretchy. Macrame depends on structural integrity. When you tie a knot in yarn, it often stretches out of shape. The resulting wall hanging will look limp and thin. Cotton cord has a “grip” that keeps the knots crisp and geometric.
How do I keep my knots even?
Consistency comes with practice. Try to pull every knot with the same amount of force. I’ve seen beginners get tighter as they get more confident. This makes the bottom of the project narrower than the top. Every few rows, take a step back. Look at the whole piece from a distance. If one side looks higher than the other, adjust your tension.
Is macrame hard to learn?
No. There are only a handful of knots you need to know. Once you master the Square Knot and the Lark’s Head, you can create 90% of the patterns you see online. The hardest part is having the patience to finish the repetitive rows. It is a skill that relies on muscle memory. After the first hour, your hands will start to move on their own.
How do I clean a macrame wall hanging?
Do not put it in the washing machine. This will ruin the knots and turn the fringe into a matted mess. The best way to clean it is to take it outside and give it a gentle shake. For stubborn dust, you can use a lint roller or a hair dryer on a cool setting. If you get a stain on it, spot clean with a damp cloth and a tiny bit of mild soap.
Can I do macrame if I have arthritis?
Macrame can be taxing on the hands. However, using soft cotton cord like Bobbiny makes a big difference. Synthetic cords are much harder and require more grip strength. I suggest taking frequent breaks. Work for twenty minutes, then stretch your fingers. Using a vertical stand also helps keep your wrists in a more natural position.
What wood is best for the top?
Wooden dowels are the easiest to work with because they are perfectly straight. This keeps your knots uniform. However, driftwood or natural branches add a unique, organic feel. If you use a branch from outside, make sure to sand it down. Any rough spots can snag your cotton cord and cause pilling.
How do I prevent my cord from fraying while I work?
If you are using a single-twist cord, the ends can start to unravel as you handle them. I’ve seen people use tape on the ends of every cord. This works but takes a long time. A better way is to tie a simple “overhand” knot at the very bottom of each cord. This keeps the twist tight until you are ready to comb it out at the end.
Where can I find macrame patterns?
Pinterest is the best place to start. Look for “easy macrame projects” or “beginner macrame patterns.” You can also find great video tutorials on YouTube. I recommend following artists like Niroma Studio. They often share close-up shots of their knot work. This helps you understand the “path” the cord takes through each loop.
Can I dye my own macrame cord?
Yes. Cotton takes dye very well. You can use RIT dye or even natural dyes like coffee or turmeric. I prefer to buy pre-dyed cord because it is more consistent. If you do dye your own, make sure the cord is completely dry before you start tying. Wet cord is heavier and stretches more, which will ruin your tension.
Conclusion
Cotton takes dye very well. You can use RIT dye or even natural dyes like coffee or turmeric. I prefer to buy pre-dyed cord because it is more consistent. If you do dye your own, make sure the cord is completely dry before you start tying. Wet cord is heavier and stretches more, which will ruin your tension.

Anya Castellan is the Founder and Editor-in-Chief of Home Wall Trends. An art history graduate of the Rhode Island School of Design with twelve years of experience writing for leading American design publications, she specializes in composition, gallery wall theory, and the quiet architecture of domestic space. A former contributing editor at Architectural Digest and guest lecturer at Parsons School of Design, Anya personally reads and signs off on every piece before it is published.