
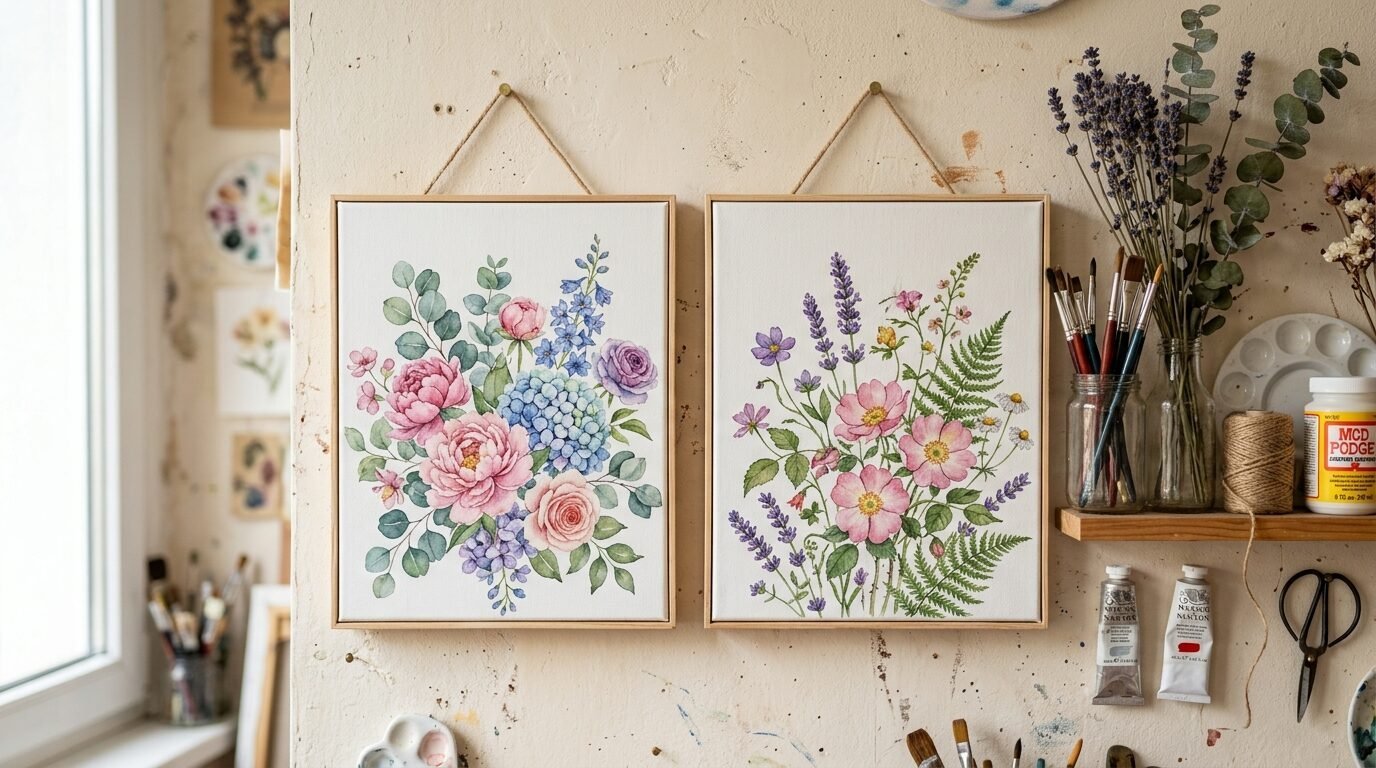
Blank walls feel cold and lonely. I remember staring at my first apartment walls and feeling defeated. My bank account held exactly forty dollars. Rent was paid but my home looked like a sterile hospital room. I walked into a local dollar store with a ten dollar bill and a dream. That afternoon changed how I viewed home styling. You do not need a massive inheritance to create a beautiful space. You just need a hot glue gun and a bit of patience. These ideas turn basic plastic and wood into high end art. I have tested these myself. Some failed miserably but these twenty one ideas actually work. They stay on the wall and look expensive from across the room.
Executive Summary
Decorating a home often feels like a luxury reserved for the wealthy. This guide proves that theory wrong. We focus on twenty one specific projects using items from stores like Dollar Tree or Family Dollar. You will see how to turn pizza pans into mirrors and paper into art. Most projects here cost under five dollars in materials. We cover everything from teen bedroom styles to modern living room accents. I include personal stories of my own craft room disasters so you can avoid them. We look at specific tools like E6000 adhesive and why it beats standard glue. You will find a full cost breakdown and time estimates for every single project. This is about making your space reflect your soul without draining your savings.
1. The Pizza Pan High End Mirror

I once saw a round metal mirror at a boutique for eighty dollars. It was just a circle of glass with a black rim. I went to the kitchen aisle of the dollar store instead. I bought a circular pizza pan and a small round locker mirror. I spray painted the pan matte black. In my experience, two thin coats of paint are better than one thick coat. Thick paint drips and creates bubbles. I used E6000 glue to center the mirror on the pan. The result looked identical to the boutique version. I hung it using a command strip. It has stayed on my wall for two years now. This project costs about three dollars. It takes twenty minutes of active work. People always ask where I bought it.
2. Diy Clock Wall Creative
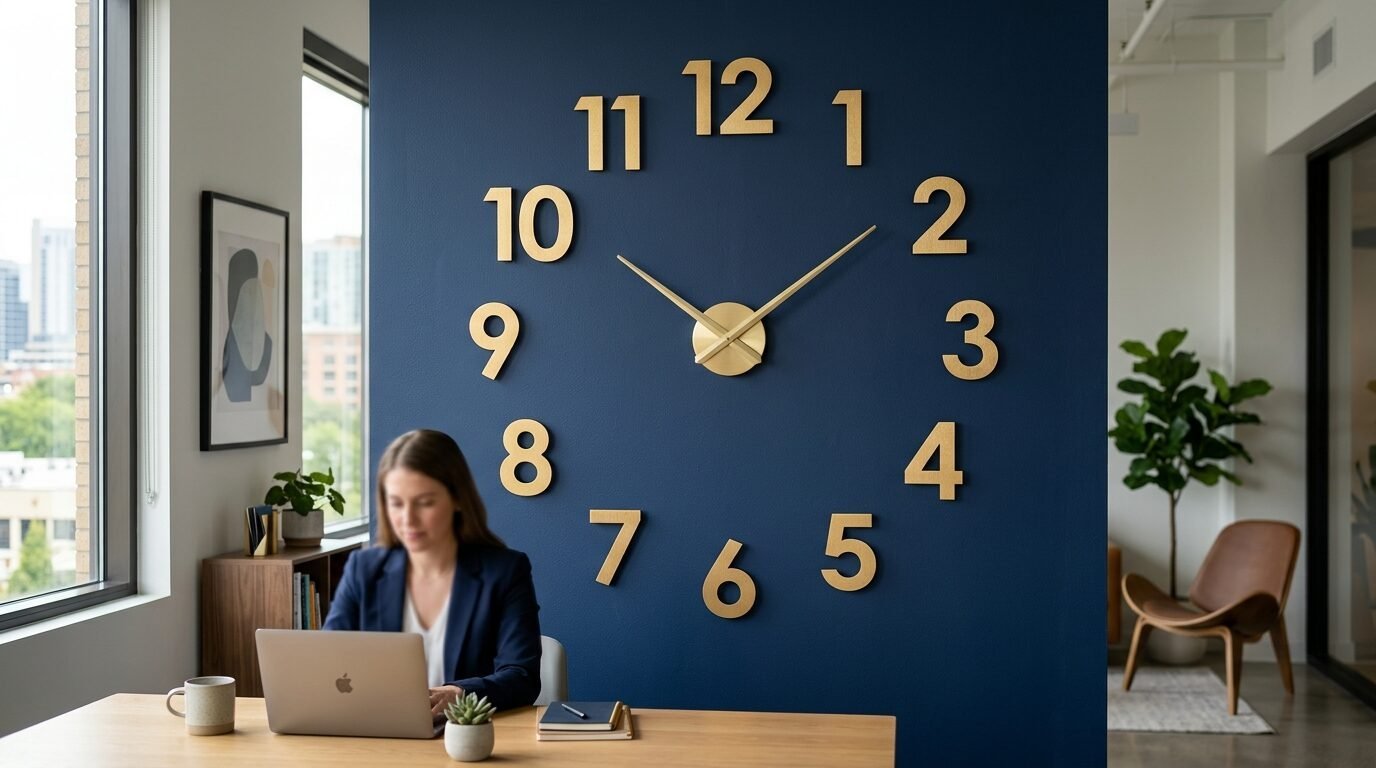
Most cheap clocks look like they belong in a classroom. You can change that by using a basic clock kit and some imagination. I used a set of wooden numbers from the craft section. I glued them directly to my wall in a large circle. I placed the clock motor in the center. I found that measuring twice is vital here. My first attempt was lopsided and looked messy. I used a level and a string to get a perfect circle. You can paint the numbers to match your trim. I chose a metallic gold. This creates a massive statement piece for under five dollars. It fills a large empty wall beautifully.
3. Wall Hanging Diy Paper Easy
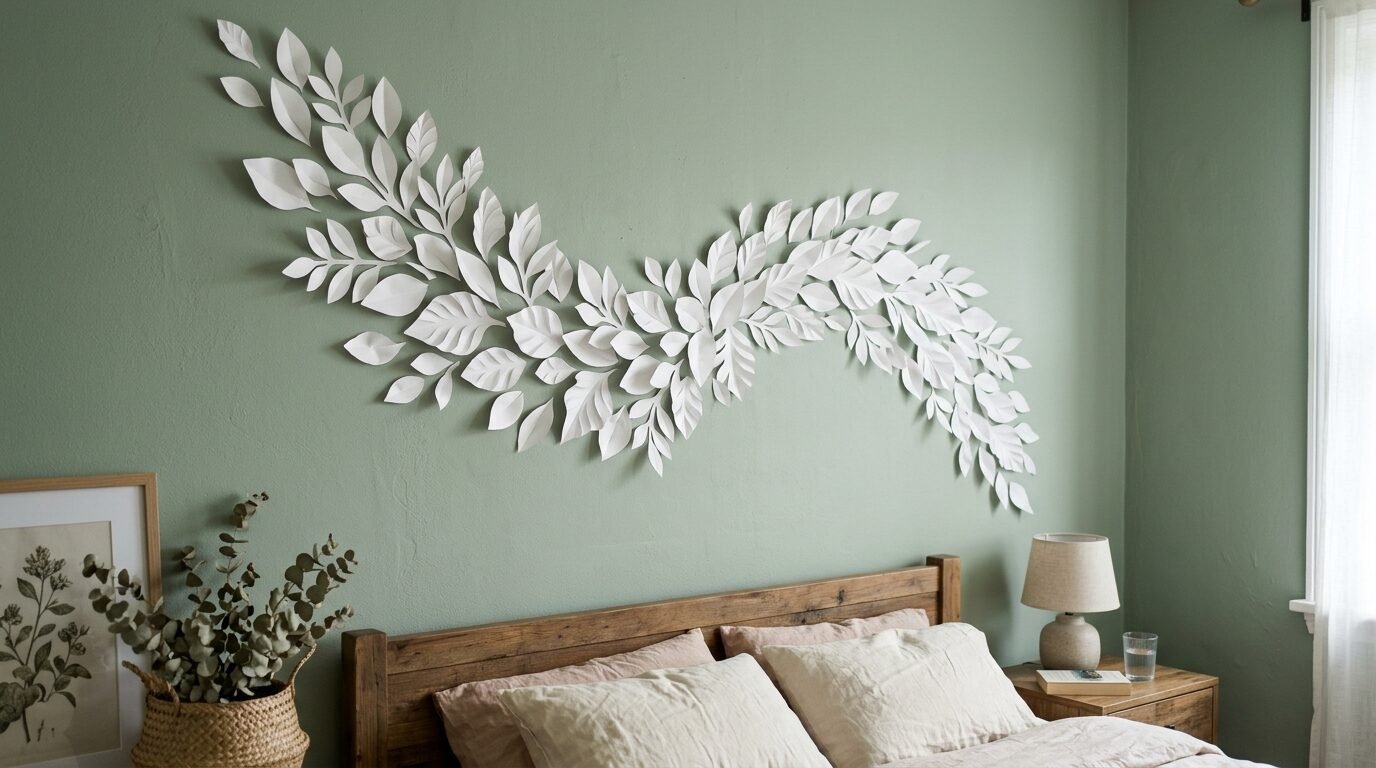
Paper is the most underrated decor material. I started making 3D wall art using heavy cardstock. I cut out simple leaf shapes and folded them down the middle. I glued these in a cascading pattern above my bed. I noticed that using different shades of the same color adds depth. It looks like a professional installation. Avoid thin printer paper for this project. It wilts and looks cheap. Spend the extra dollar on the thicker poster board or cardstock. I used double sided tape to attach them. It is easy to remove if you rent your home. This is a perfect project for a rainy afternoon.
4. Easy Diy Room Decor For Teens
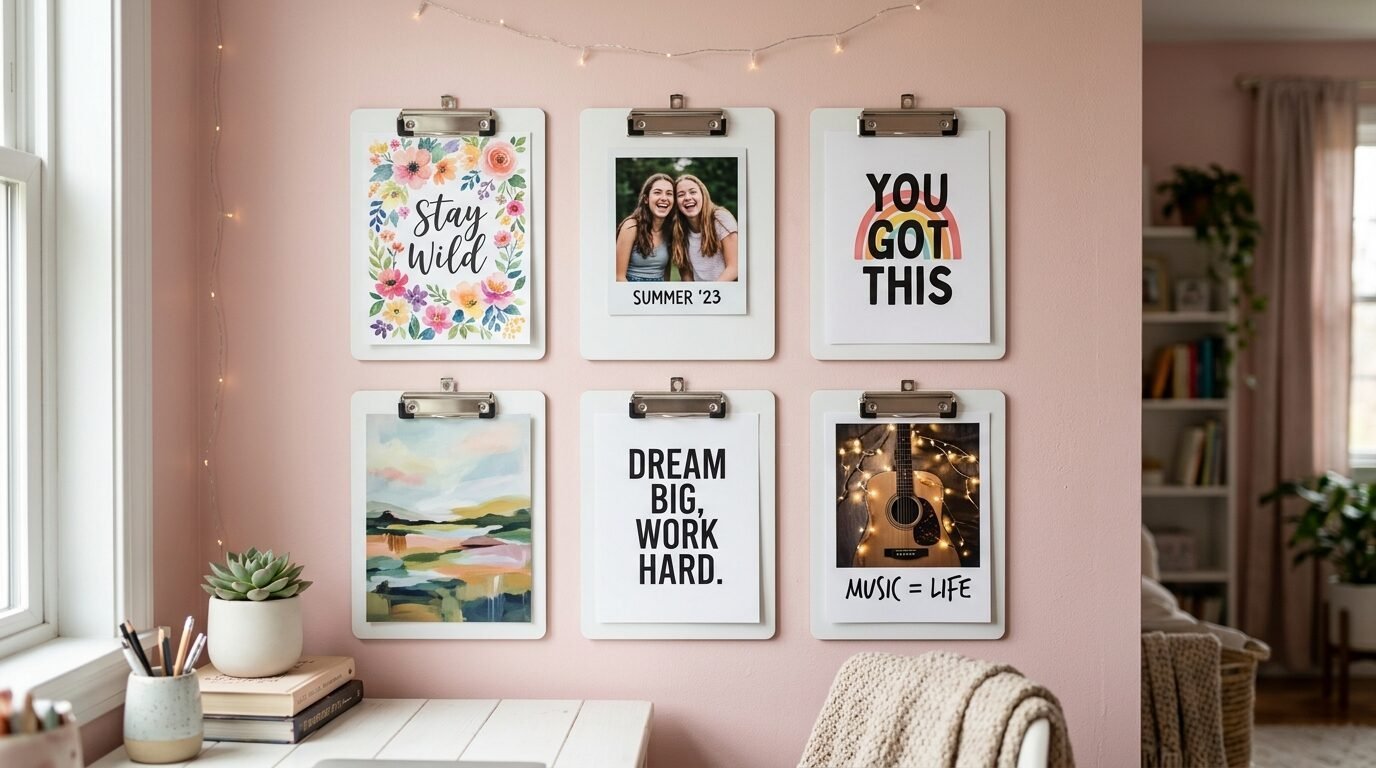
Teens want style but they change their minds often. I found that using dollar store clipboards is the best solution. I bought six plastic clipboards and spray painted them white. I lined them up in two rows of three. This creates an adjustable gallery wall. My niece uses hers to hold concert tickets and printed photos. When she finds a new favorite artist she just swaps the papers. It prevents tape marks on the walls. I suggest using the clear plastic versions if you want a modern look. It keeps the room organized and stylish at the same time.
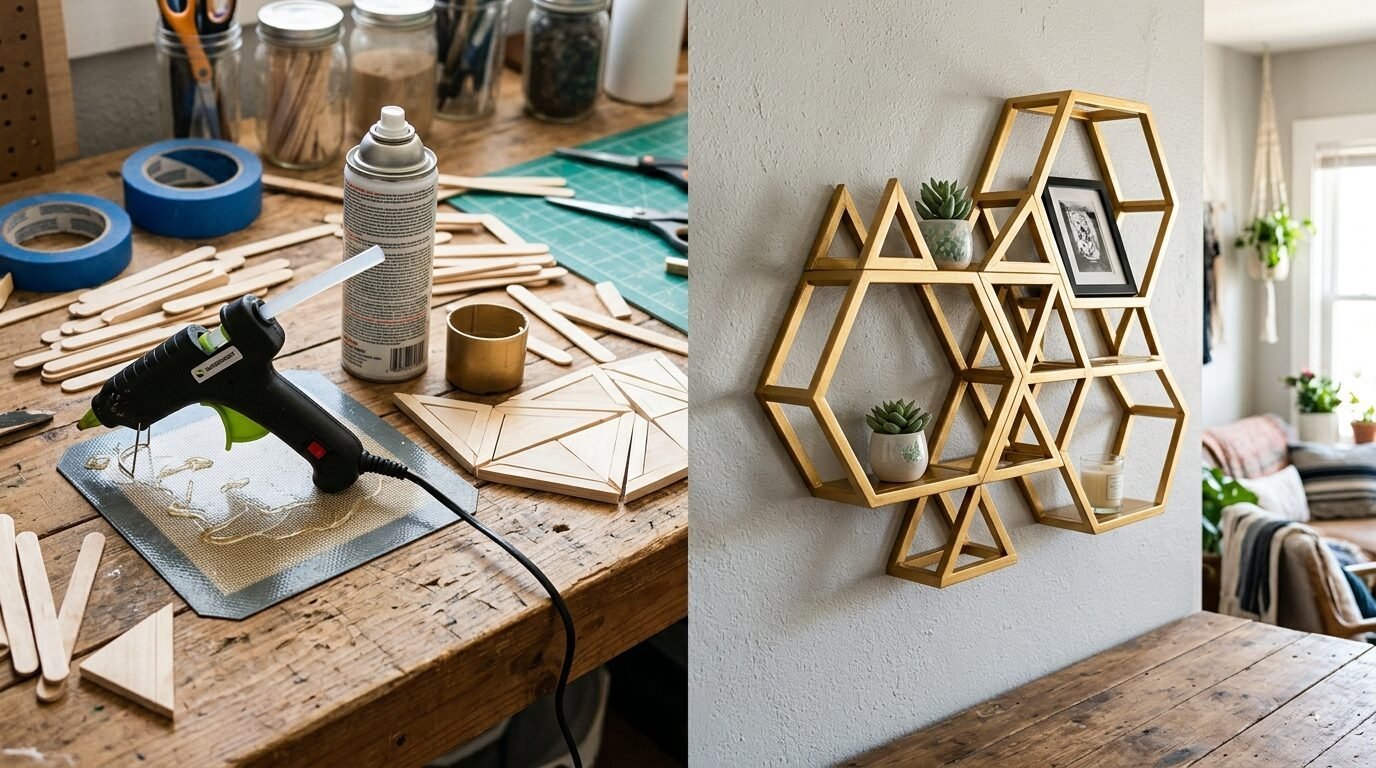
5. Craft With Ice Cream Sticks Ideas
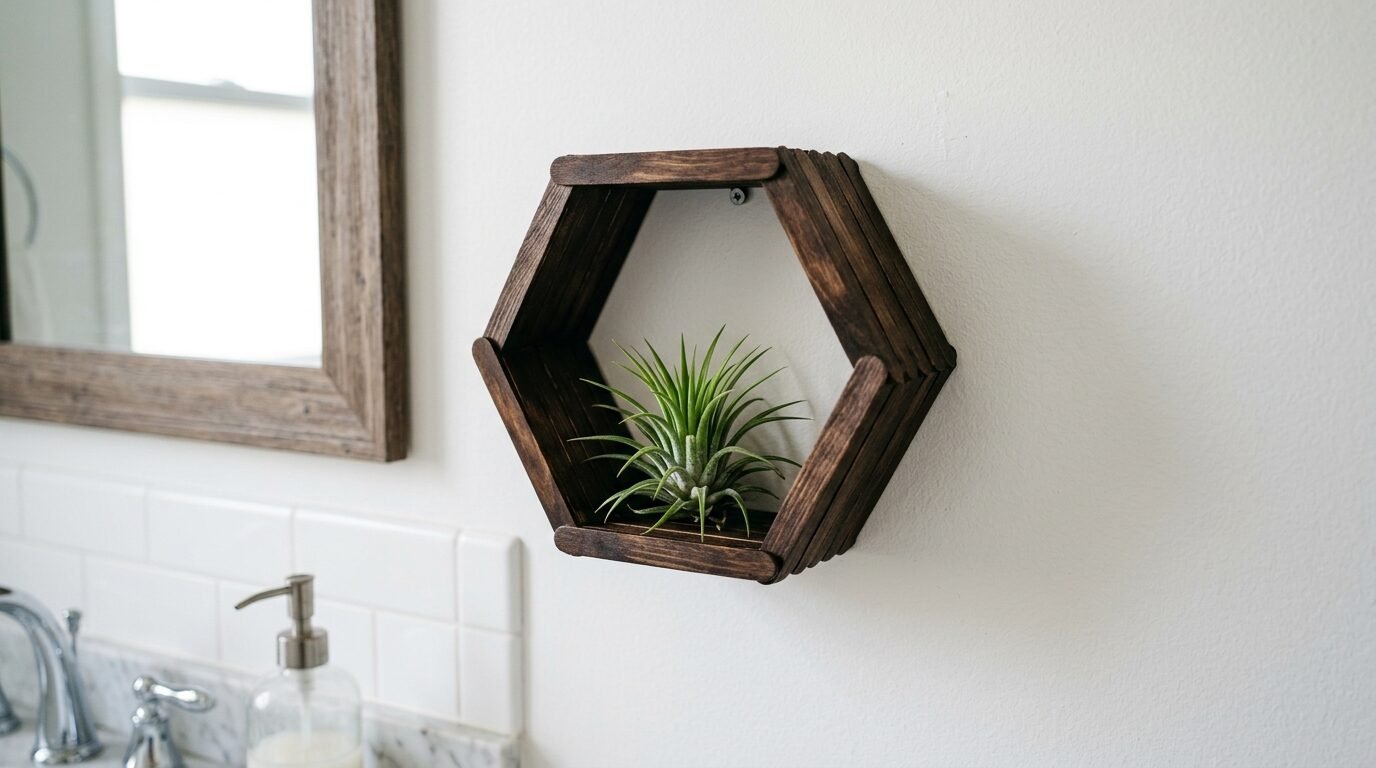
Ice cream sticks are not just for kids. I used them to create a geometric honeycomb shelf. You glue the sticks together in hexagon shapes. I layered them three sticks deep for stability. I used wood stain from the hardware store to give them a dark oak finish. I’ve seen this work in small bathrooms for holding light items like air fresheners. Do not put heavy glass jars on these. They are decorative rather than structural. I learned that lesson when my first shelf collapsed under a heavy candle. Keep the items light and the glue strong. It looks like a custom wood carving once it is on the wall.
6. Easy Room Decor Ideas Diy For Teens
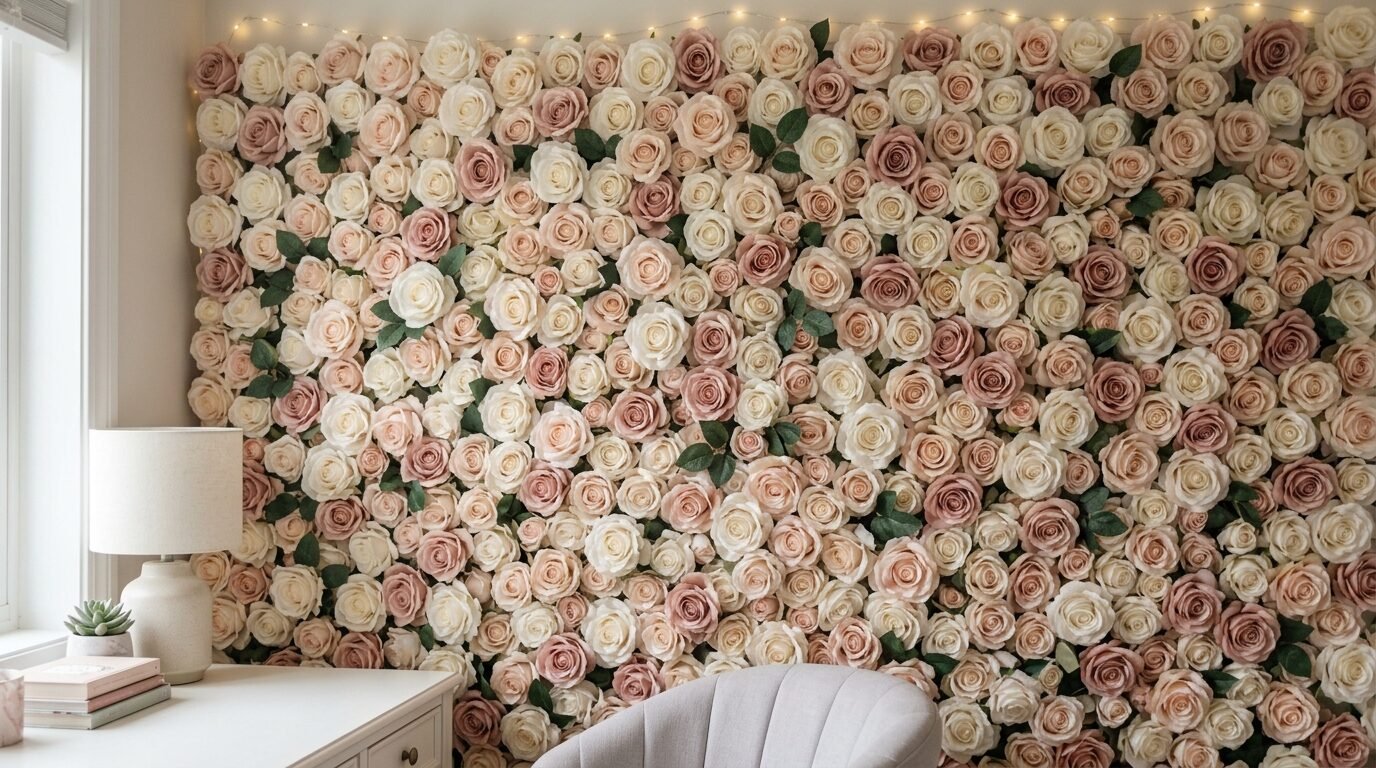
Flower walls are a massive trend on social media. Buying a pre-made floral grid costs a fortune. I bought twenty bunches of silk roses from the dollar store. I popped the heads off the plastic stems. I used a large piece of foam board as the base. I glued the flowers close together until no foam was visible. I hung this behind a desk. It creates a perfect backdrop for video calls. I’ve tried using tape for this but glue is the only way to go. It makes the room feel soft and personal. It takes about an hour to finish.
7. The Framed Kitchen Towel Art
I found a beautiful linen towel with a lemon print. It looked like a watercolor painting. I bought a large plastic frame and removed the glass. I wrapped the towel around the cardboard backing. I taped it tight on the back side. I put the frame back together. This creates a large piece of textile art for two dollars. It adds texture to a dining room wall. I noticed that ironing the towel first is a requirement. Any wrinkle will show up once it is under the light. It looks much more expensive than a basic paper print.
8. Plastic Animal Gold Shelves
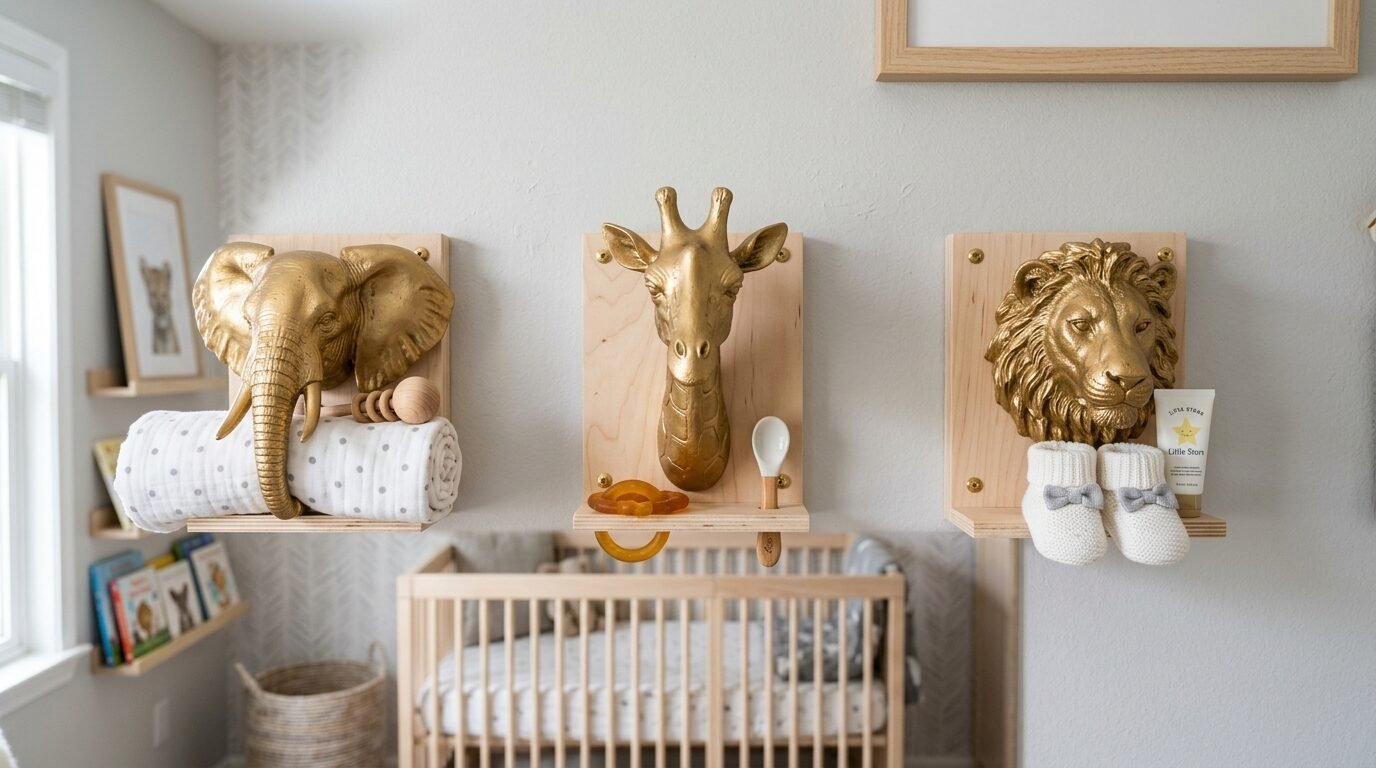
This sounds strange but it looks incredible in a nursery. I bought plastic toy elephants and giraffes. I cut them in half using a small saw. I glued the front half to a small piece of wood. I painted the whole thing bright gold. These act as small hooks or ledges for light items. I saw this in a high end baby store for forty dollars each. I made four of them for six dollars total. In my experience, the spray paint sticks better if you lightly sand the plastic first. It gives the paint something to grip.
9. The Magnetic Cookie Sheet Board
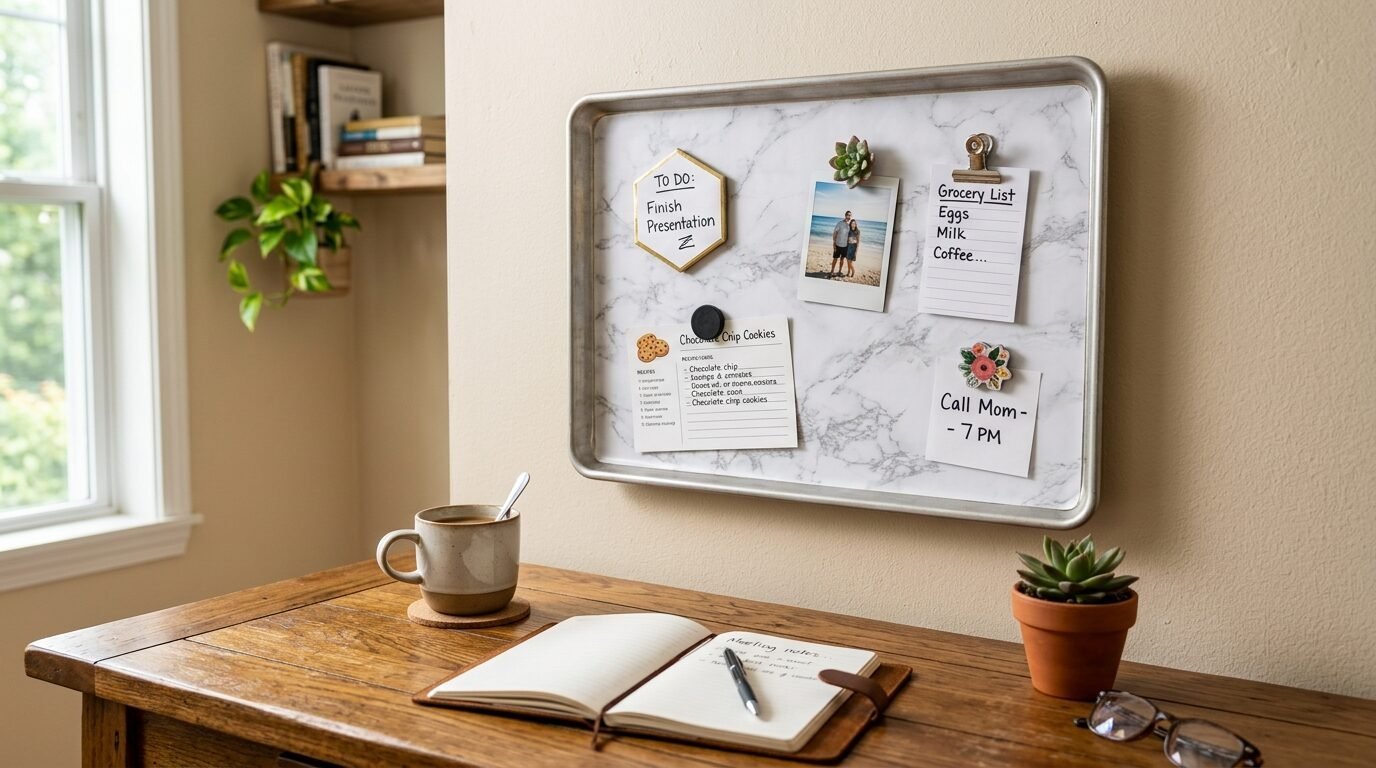
Cookie sheets are perfect for home offices. I bought a silver baking sheet and some colorful contact paper. I covered the front of the sheet with the paper. I screwed it into the wall above my desk. It works as a magnetic command center. I use it for my grocery lists and calendars. I found that the heavy duty sheets work best. The thin ones tend to warp when you try to hang them. It keeps the clutter off my desk. You can change the paper whenever you want a new look.
10. Foam Board Wall Molding
Real wood molding is expensive and hard to install. I bought strips of foam board and cut them into thin rectangles. I glued them to my wall in a picture frame pattern. I painted the wall and the foam the same color. From a distance it looks like expensive custom woodwork. I’ve tried this in my hallway and it holds up well. Do not use this in high traffic areas where people might bump it. Foam dents easily. It is a great way to add architectural detail to a plain room.
11. Bamboo Skewer Starburst Art
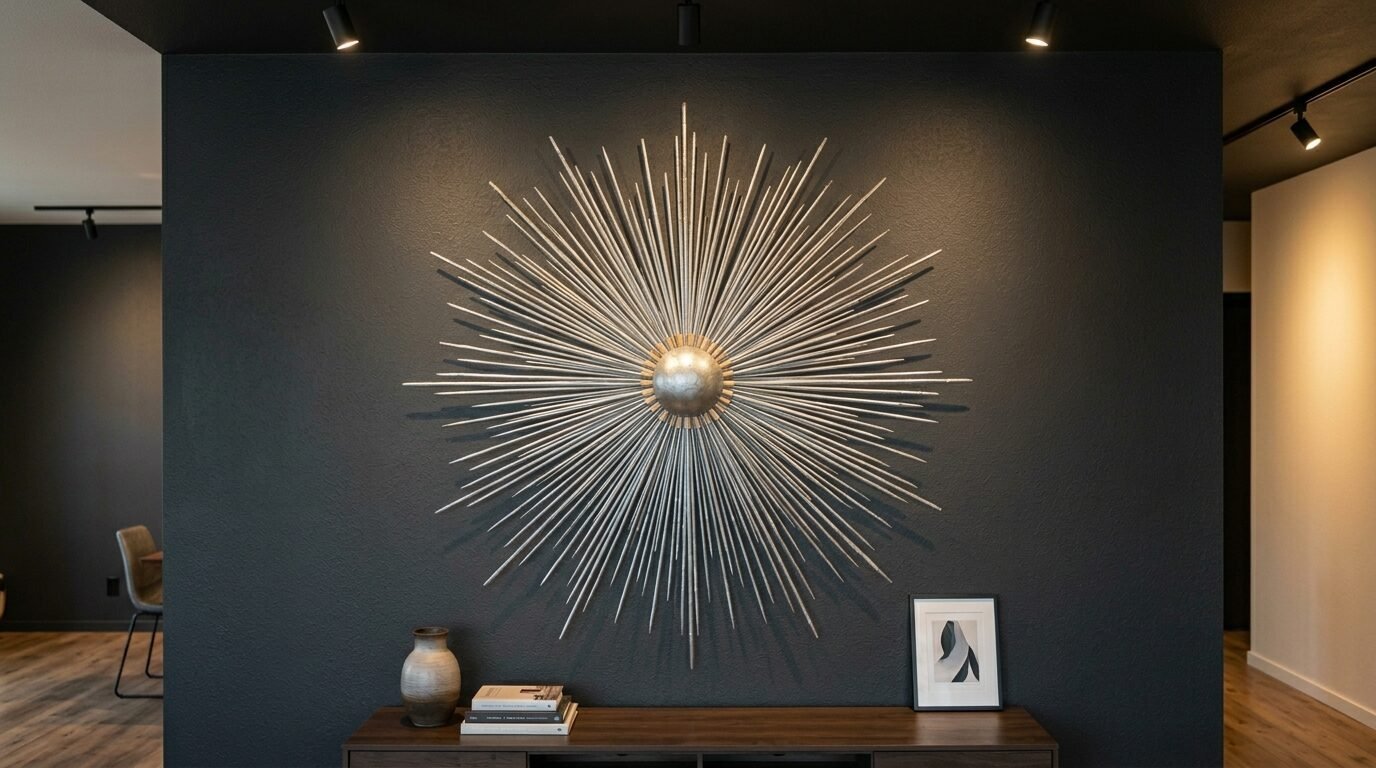
I bought a pack of bamboo skewers and a small smooth foam ball. I cut the skewers into different lengths. I poked them into the foam ball until it looked like a star. I spray painted the entire thing silver. This creates a mid century modern wall sculpture. I used a small piece of wire to hang it. I’ve seen these sold in home stores for fifty dollars. My version cost two dollars. It adds a sharp and modern edge to a gallery wall. Be careful with the points while you work.
12. Plastic Basket Wall Gallery
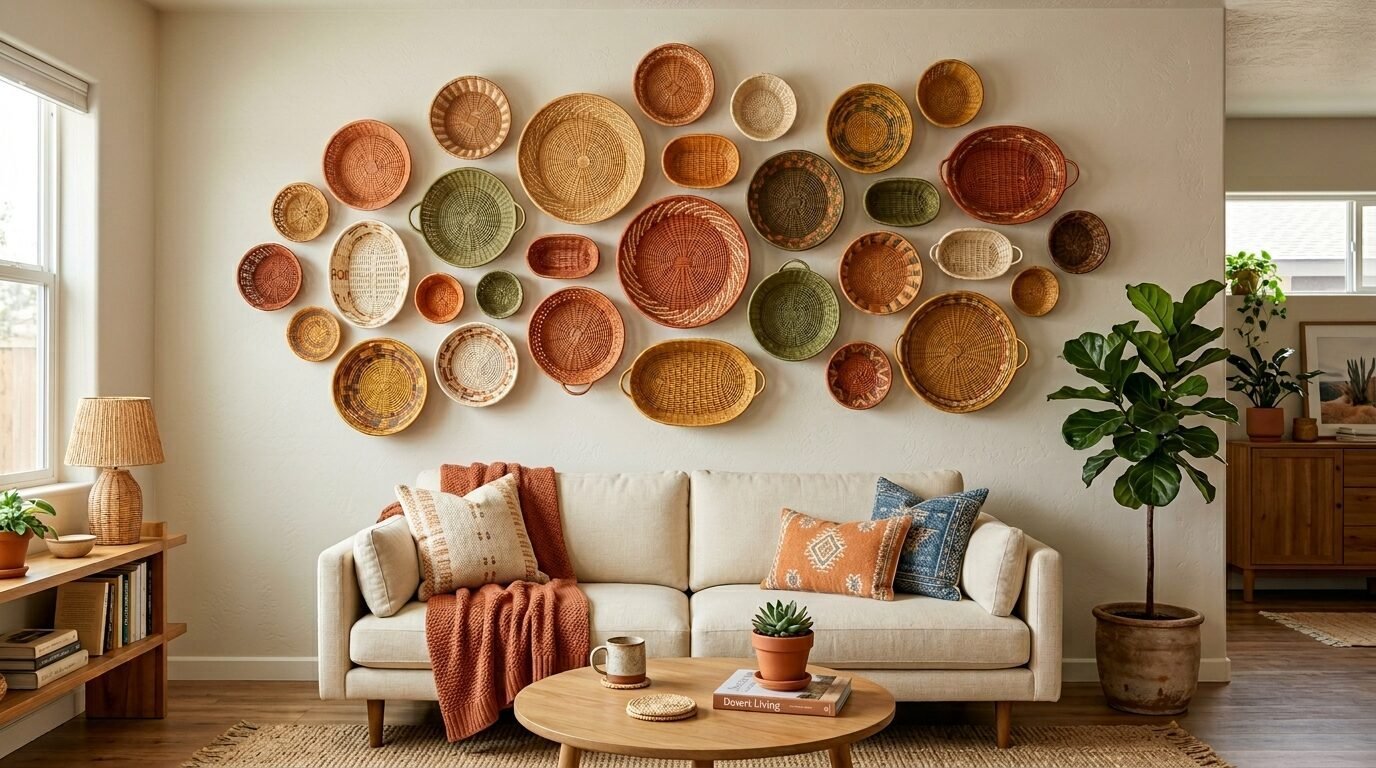
I found a set of woven plastic baskets in the storage aisle. They had a nice texture but looked cheap in bright blue. I painted them in earth tones like tan and terracotta. I hung them in a cluster on my living room wall. It mimics the look of expensive African woven baskets. I noticed that using a matte paint makes the plastic look like real fiber. This fills a large wall for very little money. It is lightweight so you only need small nails. It adds a boho vibe to any space.
13. The Hula Hoop Floral Wreath
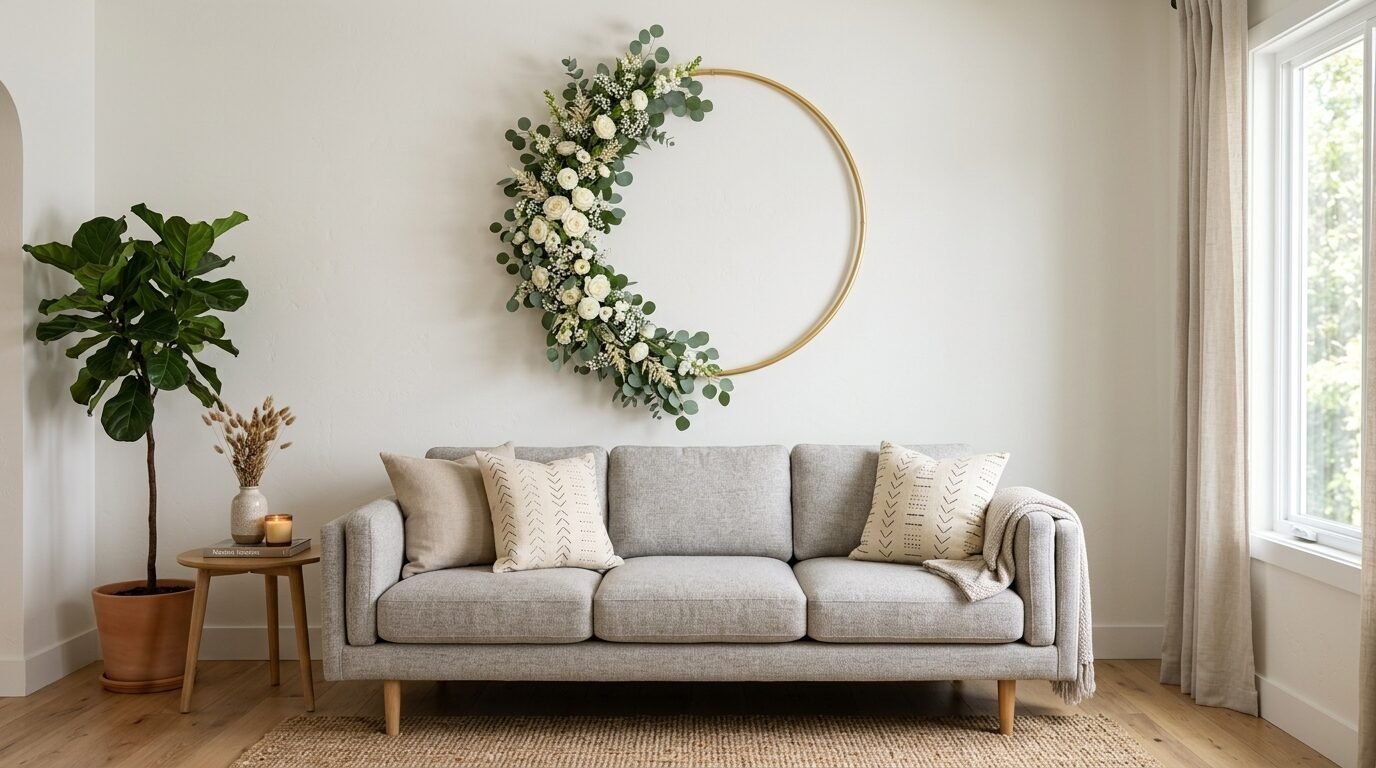
A large hula hoop is the perfect base for a massive wall wreath. I spray painted the hoop gold. I glued silk greenery and flowers to one side. I left the other side bare for a modern look. I hung it above my sofa. It acts as a giant piece of circular art. I learned to use floral wire instead of just glue for the heavy branches. It keeps everything secure. This project is huge but costs less than ten dollars. It makes a bold statement in a large room.
14. Glass Jar Wall Sconces
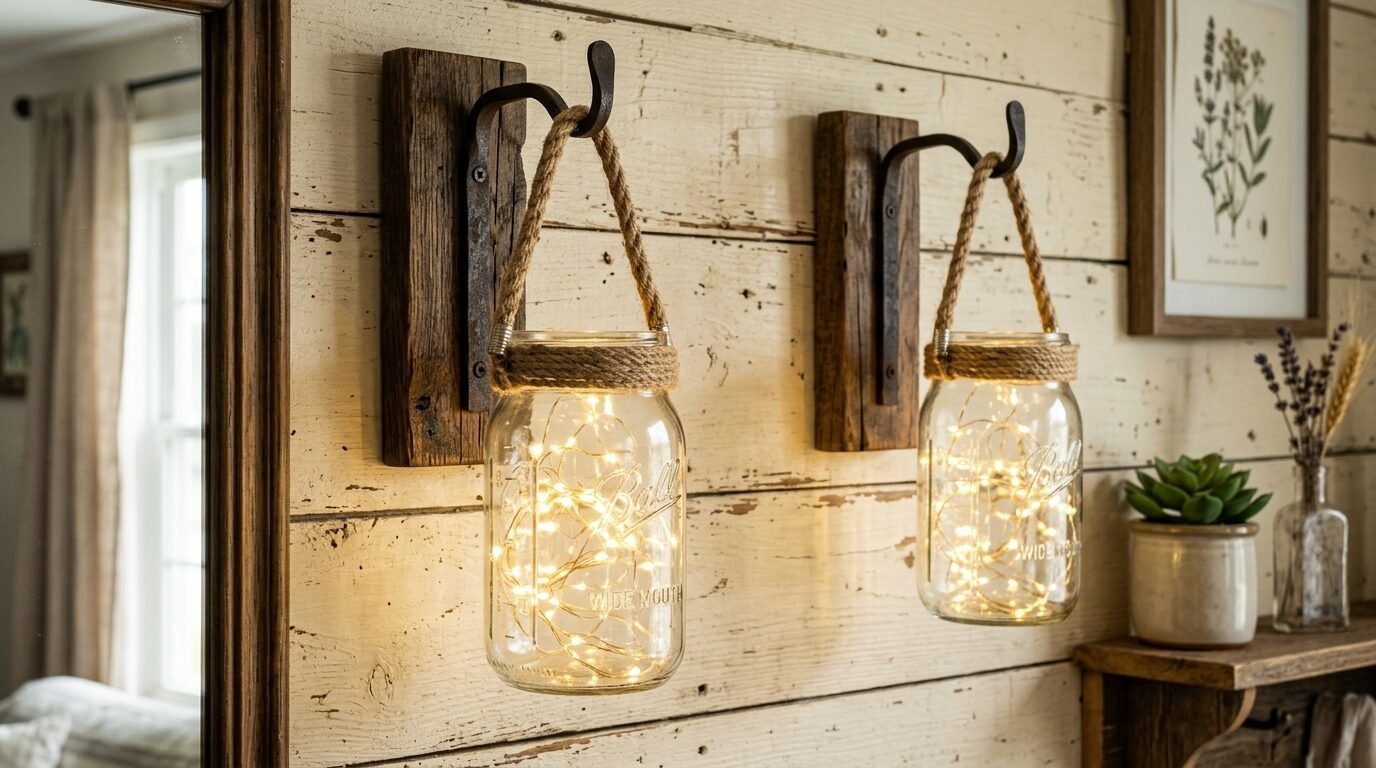
I bought two glass jars and some wire. I wrapped the wire around the neck of the jars to create a handle. I hung them from wooden shelf brackets I found at the dollar store. I put battery operated tea lights inside. This creates a cozy glow in the evenings. I’ve tried using real candles but the jars get too hot. Stick to the LED versions for safety. It looks like farmhouse decor from a magazine. It adds a warm light to dark corners.
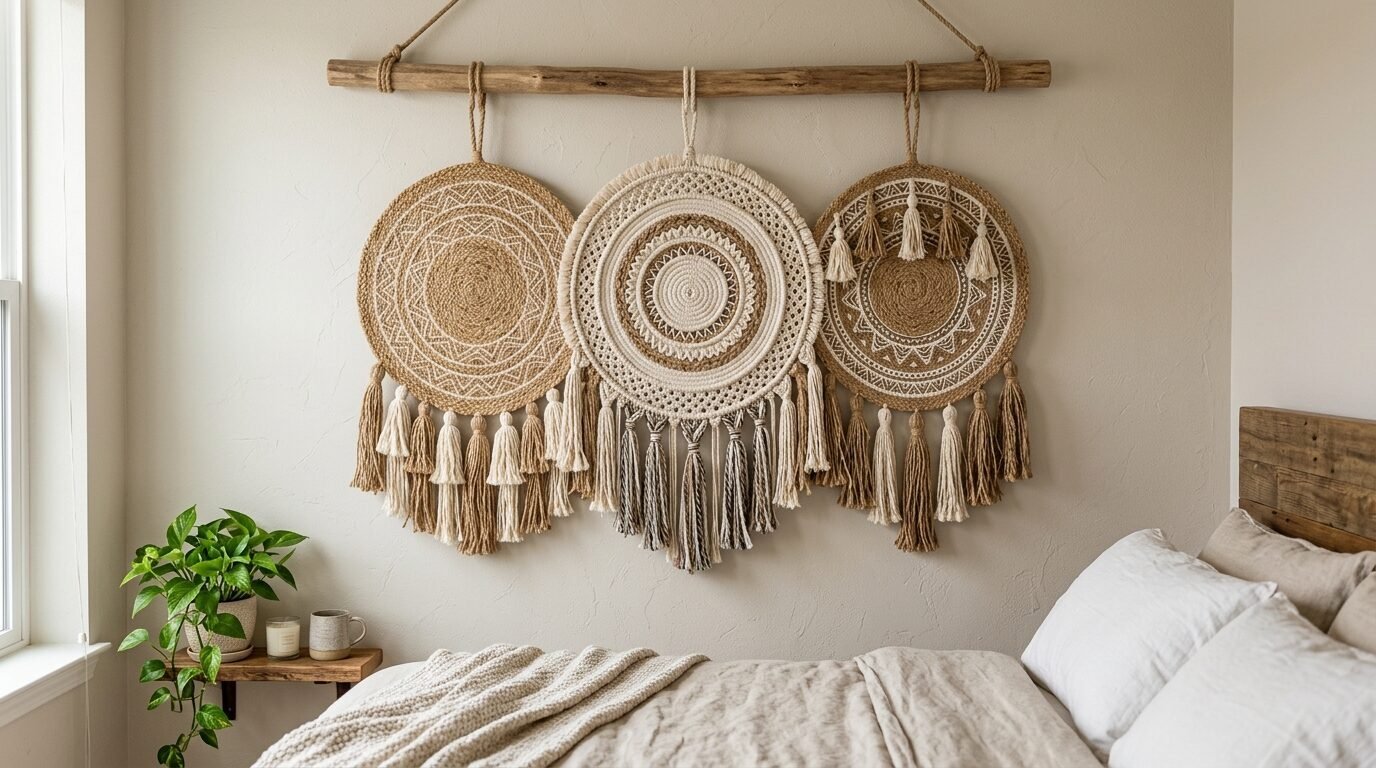
15. The Rope Mirror Frame
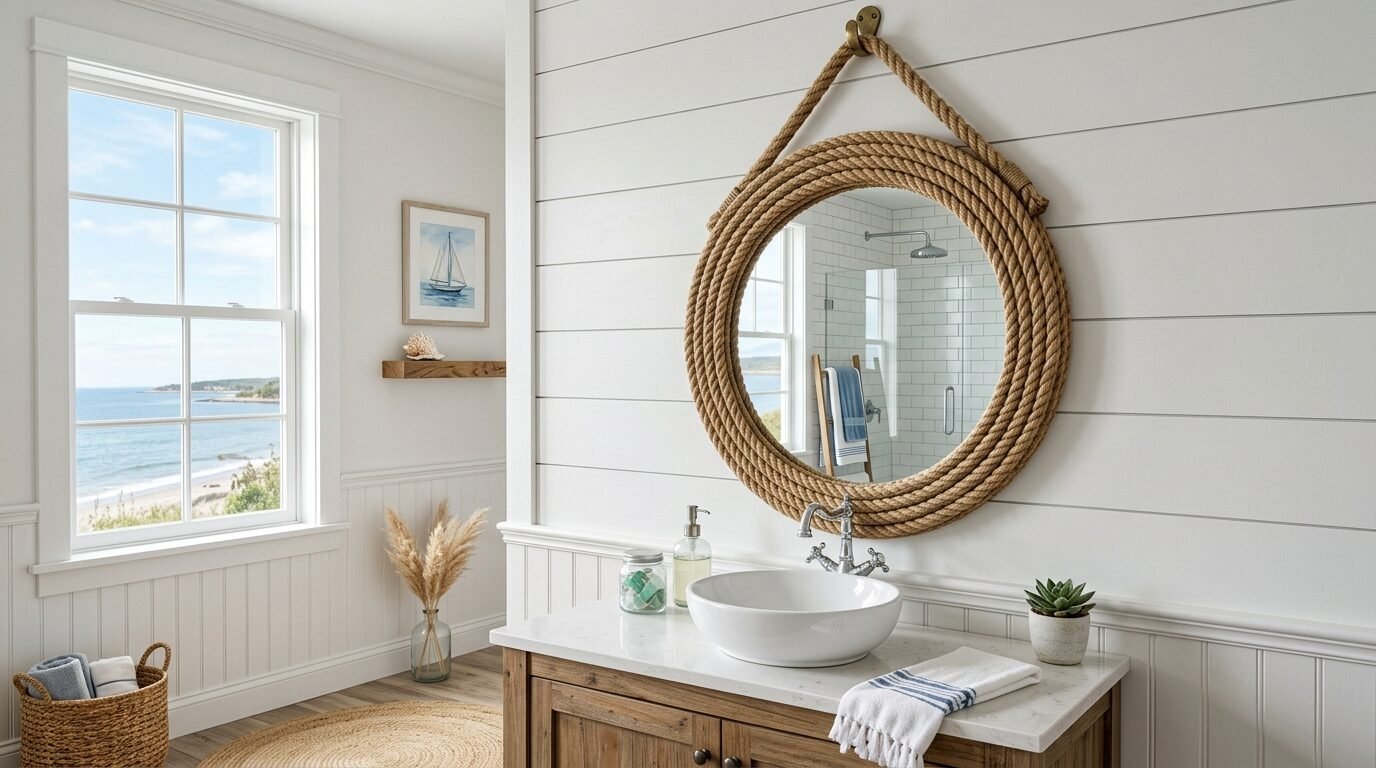
I bought a plain round mirror and a length of cotton rope. I coiled the rope around the edge of the mirror using hot glue. I did three rows of rope. This creates a nautical or rustic look. I noticed that tucking the ends of the rope behind the mirror makes it look professional. It covers the cheap plastic edges of the original mirror. This is one of the easiest hacks in this list. It takes ten minutes to finish. It looks great in a bathroom or entryway.
16. Thumbtack Metallic Canvas
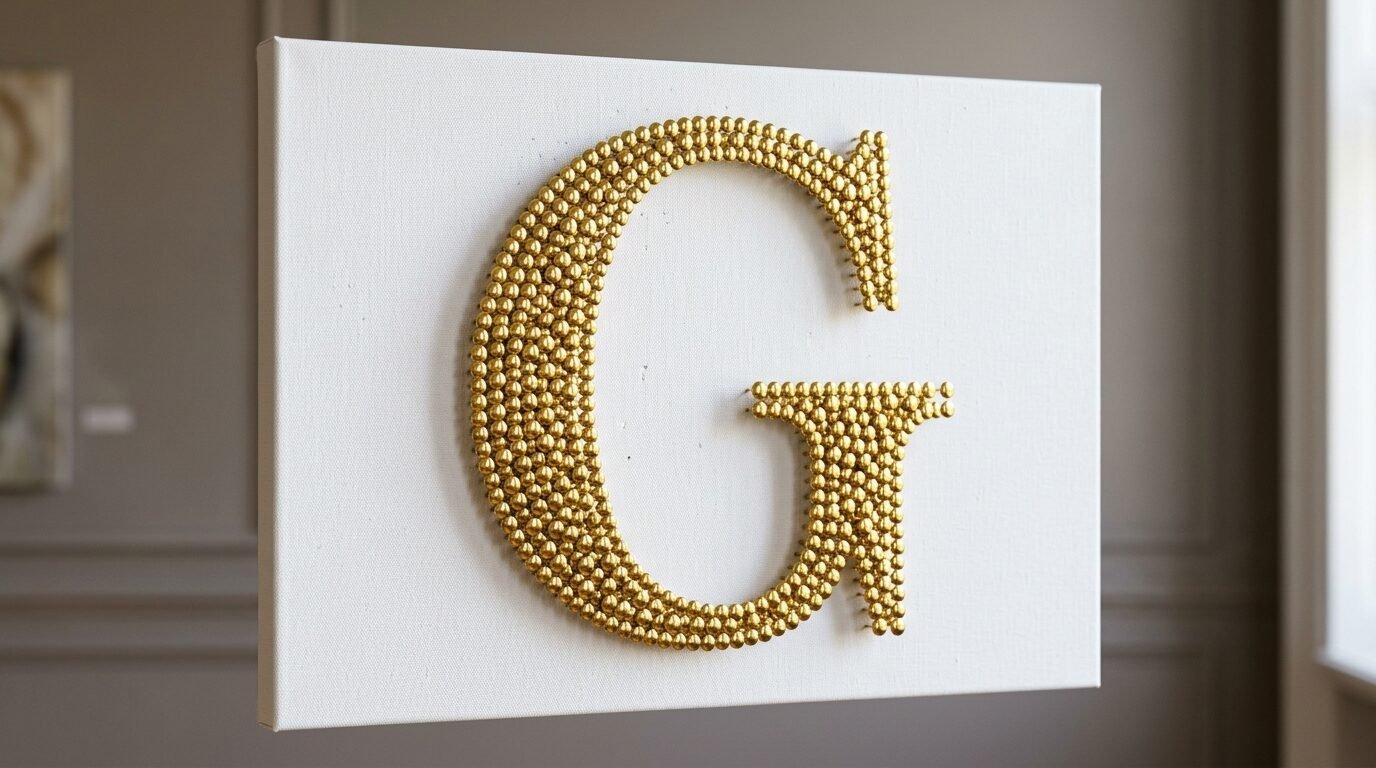
I bought a plain white canvas and a box of gold thumbtacks. I pushed the tacks into the canvas in a dense pattern. I made a large initial for my last name. The tacks look like hammered metal from a distance. I found that drawing the design with a pencil first is helpful. It ensures the lines stay straight. This adds a bit of shine to a bookshelf or wall. It is a tedious process but the result is very high end.
17. The Placemat Wall Hanging
The dollar store often has beautiful woven placemats. I bought three with a fringe edge. I glued them to a wooden dowel. I used some twine to hang them up. This creates a set of small wall tapestries. I’ve seen this work well in bedrooms to add softness. I suggest choosing placemats with neutral colors. They look more like expensive textiles. It is a great way to add texture without spending much.
18. Mirror Grid Feature Wall
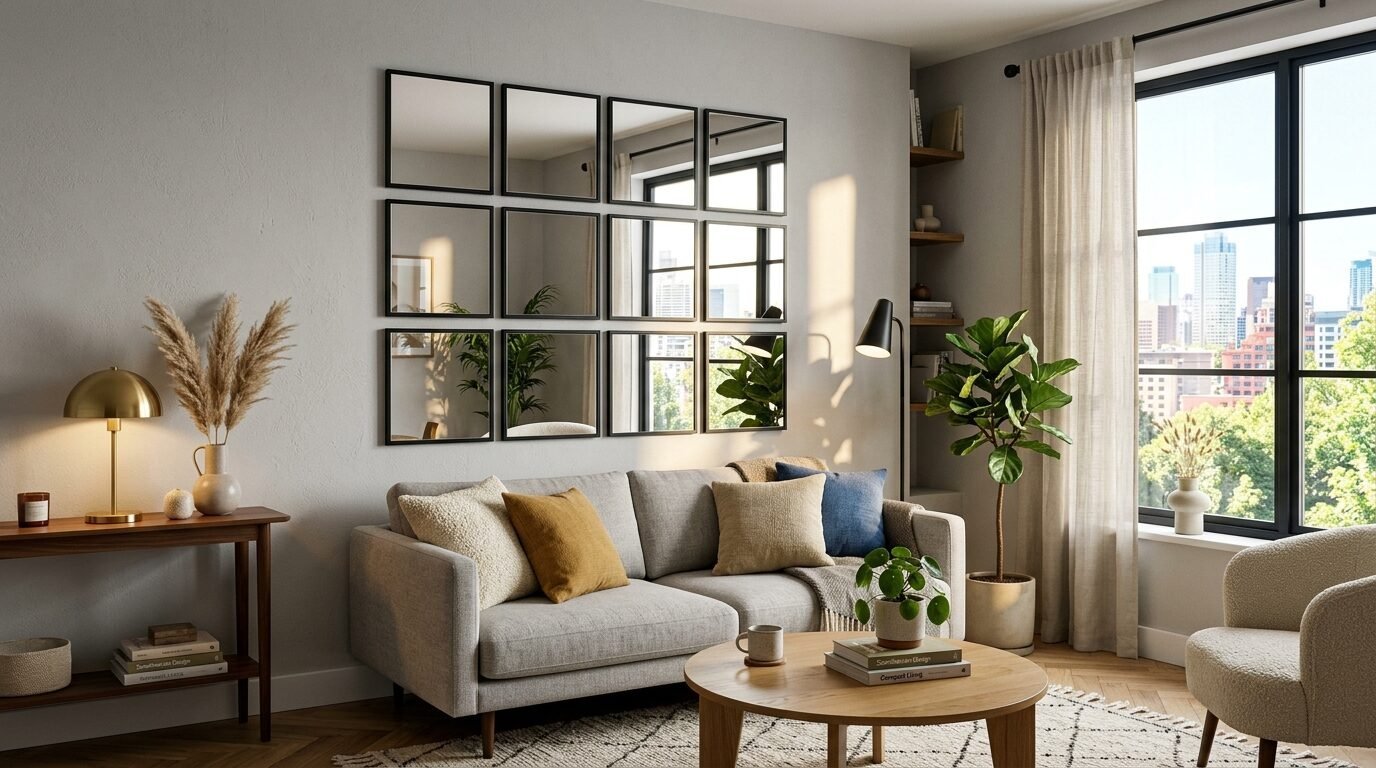
I bought twelve small square mirrors. I used mounting tape to stick them to my wall in a perfect grid. I left one inch of space between each mirror. This makes a small room feel twice as large. I noticed that cleaning the wall with alcohol first helps the tape stick better. My first mirror fell off because the wall was dusty. Take your time with the alignment. A crooked grid looks messy. This creates a custom glass feature for twelve dollars.
19. Washi Tape Picture Frames
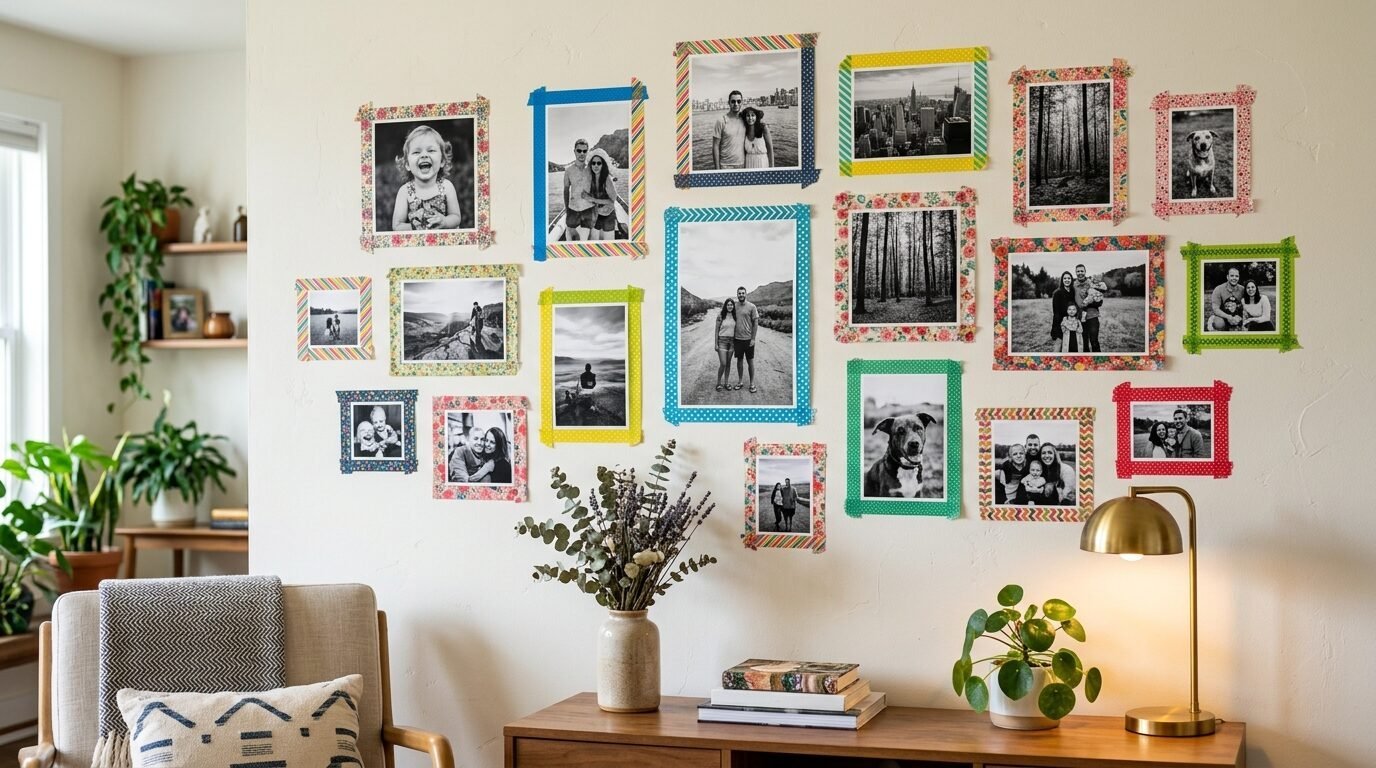
If you cannot afford frames use washi tape. I printed my favorite photos and taped them to the wall. I then used colorful tape to create a “frame” around each one. I’ve seen this work for students or renters. It does not damage the paint. I used a black tape for a gallery look. It looks intentional and modern. You can change the shapes and colors whenever you want. It is the cheapest way to display art.
20. The Shower Curtain Canvas
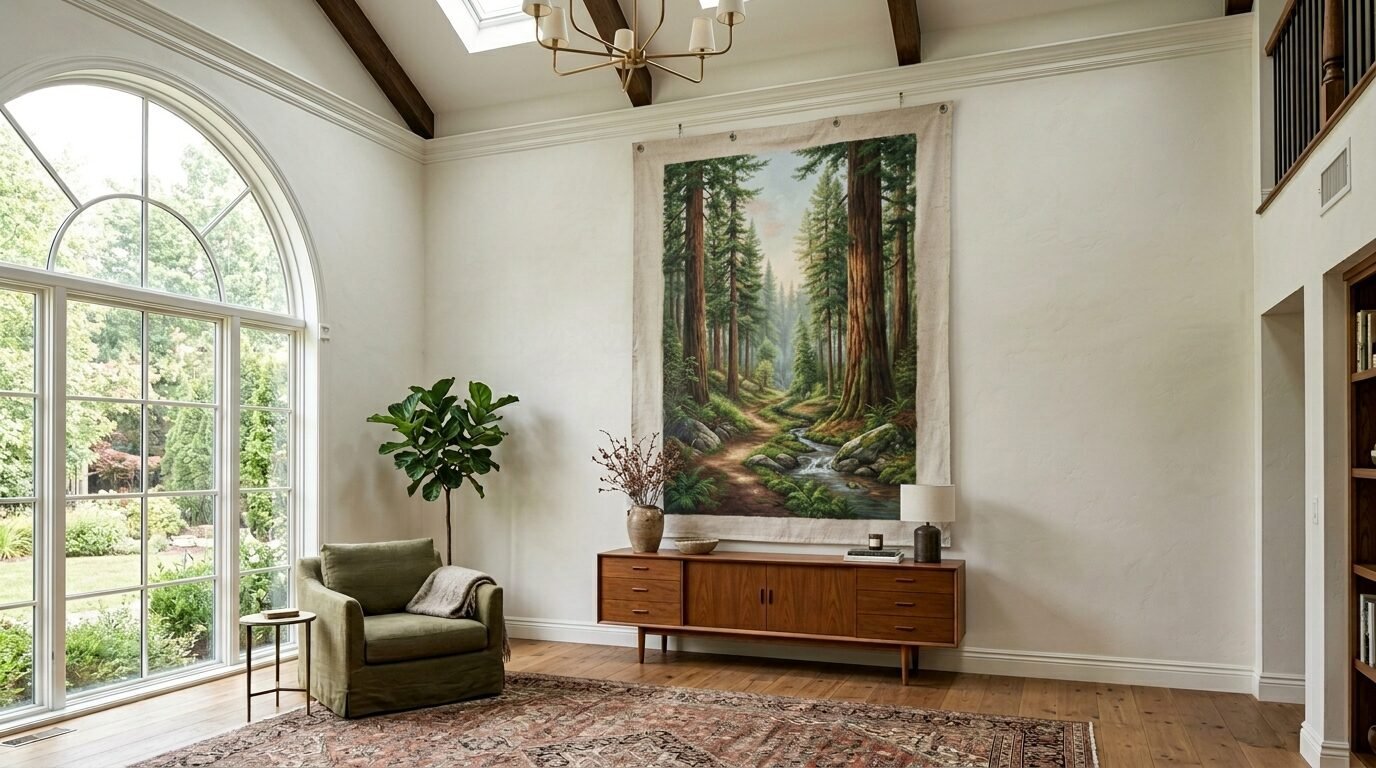
Large art is expensive. I bought a fabric shower curtain with a forest print. I built a simple wooden frame out of 1×2 boards. I stretched the shower curtain over the frame and stapled it. This created a six foot tall piece of art for fifteen dollars. I’ve done this in my living room and guests think it is a painted canvas. Iron the fabric before you staple it. It makes a massive difference in the final look.
21. Napkin Decoupage Canvas
I found paper napkins with a beautiful floral print. I used Mod Podge to glue the top layer of the napkin onto a canvas. I smoothed out the bubbles with a credit card. It looks like a hand painted piece of art once it dries. I’ve tried this with many different patterns. It is a simple way to get complex designs on your wall. It is very beginner friendly.
Project Comparison Table
| Project Name | Estimated Cost | Time Required | Difficulty Level |
| Pizza Pan Mirror | $3.00 | 20 Minutes | Low |
| Diy Clock Wall | $5.00 | 45 Minutes | Medium |
| Paper Wall Hanging | $2.00 | 60 Minutes | Low |
| Ice Cream Stick Shelf | $4.00 | 90 Minutes | Medium |
| Hula Hoop Wreath | $8.00 | 30 Minutes | Low |
| Shower Curtain Art | $15.00 | 40 Minutes | High |
Frequently Asked Questions
Which glue is best for dollar store DIY projects?
In my experience, hot glue is good for temporary fixes but E6000 is better for permanent decor. Hot glue can melt in the sun if your art is near a window. E6000 takes twenty four hours to dry but it creates a bond that lasts years. I always keep both in my craft kit.
Will these projects damage my walls?
Most of these are lightweight. I suggest using Command Strips for anything under five pounds. They peel off without taking the paint with them. For heavier items like the shower curtain art you will need a nail. Always check your rental agreement before putting holes in the wall.
How do I make dollar store items look expensive?
The secret is paint. Cheap plastic looks like plastic because of the shine. Use a matte or satin spray paint to hide the material. Colors like black, white, gold, and sage green always look high end. Avoid neon colors if you want a sophisticated look.
Can I find all these items at one store?
Most dollar stores carry these basic items. You might need to visit a hardware store for specific spray paint or wood stain. The mirrors, pans, baskets, and paper are usually in stock year round. I’ve noticed that stock varies by location so keep an eye out.
Is DIY wall decor safe for a nursery?
Yes, but you must ensure everything is glued tightly. Avoid using small beads or thumbtacks where a child can reach them. I suggest the paper wall art or the floral wall for a nursery. They are light and pose no risk if they happen to fall.
How long do these DIY projects last?
I have some pieces that are three years old and still look new. The key is using quality adhesive and protecting them from direct moisture. If you use paper decor in a bathroom it might wilt from the steam. Keep textile and paper art in dry rooms like the bedroom or living room.
What happens if I make a mistake?
Mistakes happen to everyone. I once glued a mirror off center and had to scrape it off. If you use hot glue you can often reheat it with a hair dryer to move the piece. For spray paint mistakes you can usually sand it down and try again. Don’t be afraid to start over.
Can teens do these projects alone?
Most of these are very safe. I suggest adult supervision for anything involving a saw or strong chemical glues like E6000. The paper and washi tape projects are perfect for teens to do independently. It is a great way for them to express their creativity.
Do I need power tools?
Most of these projects only require a pair of scissors and a glue gun. The shower curtain art is the only one that might need a staple gun or a small saw. These are designed for beginners with very few tools. It is about being creative with what you have.
Where can I find inspiration for more hacks?
Pinterest and TikTok are great places to see these projects in action. I often look at high end furniture catalogs and then try to recreate the look using dollar store items. It is a fun challenge to see how much money you can save.
Final Thoughts on Budget Decorating
Decorating your home should bring you joy rather than stress. I have learned that a small budget does not limit your style. It actually forces you to be more creative. My most complimented pieces are the ones I made with my own hands for a few dollars. These twenty one hacks are just the beginning. Start with one small project this weekend. See how it changes the feeling of your room. You might find that you enjoy the process of creating as much as the final result. What is the one wall in your home that needs a little love today?

Anya Castellan is the Founder and Editor-in-Chief of Home Wall Trends. An art history graduate of the Rhode Island School of Design with twelve years of experience writing for leading American design publications, she specializes in composition, gallery wall theory, and the quiet architecture of domestic space. A former contributing editor at Architectural Digest and guest lecturer at Parsons School of Design, Anya personally reads and signs off on every piece before it is published.