
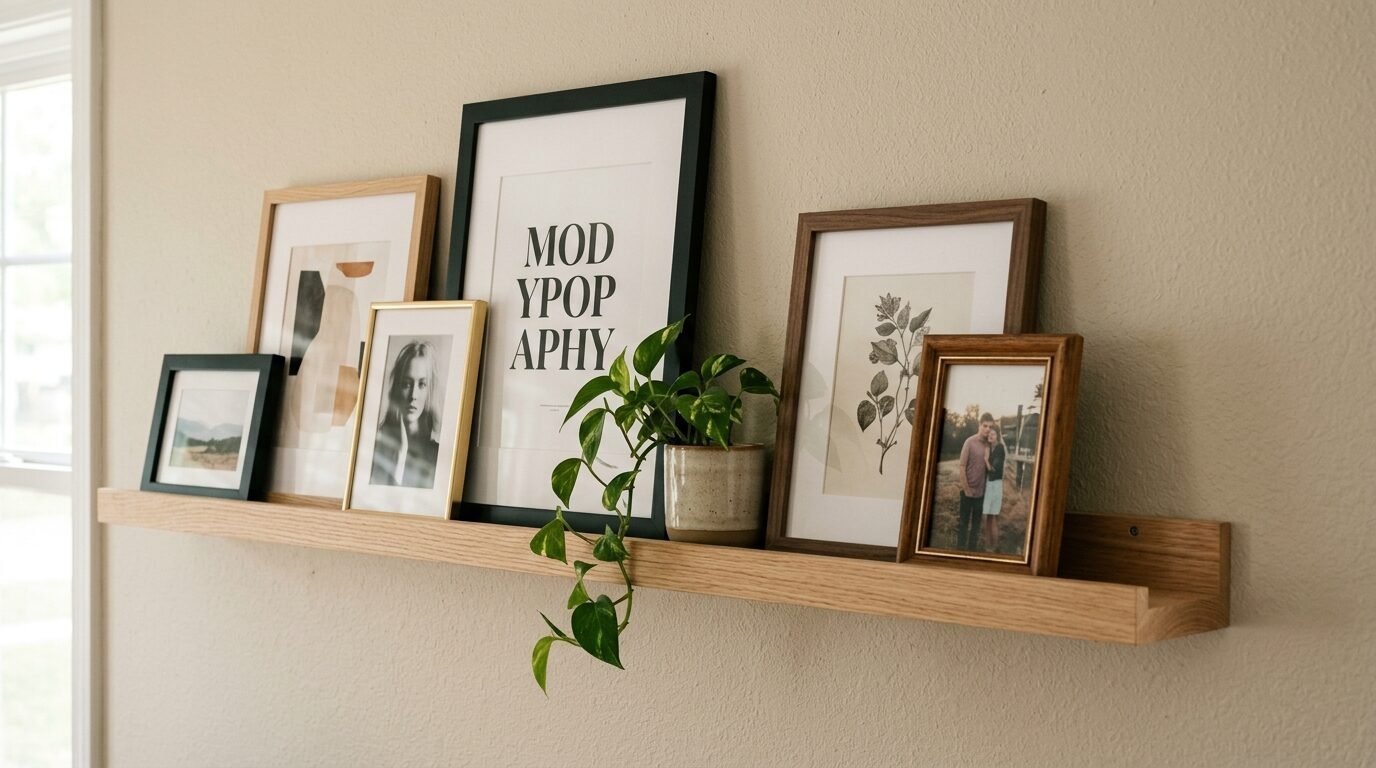
Blank walls feel cold. You want to display your favorite memories but the thought of measuring twenty different holes for a gallery wall feels heavy. I spent years staring at a box of baby photo frames because I was afraid of ruining my drywall. That frustration led me to the simplest solution in home styling. A picture ledge offers the flexibility of a gallery wall with only two or three actual holes. You can swap art, move photos, and update your decor in seconds. This guide shows you how to build a professional grade photo ledge in one hour. I have built these for my nursery, my hallway, and even my kitchen. Every time I finish one, I wonder why I waited so long.
Executive Summary
This project transforms basic hardware store pine into a high end display system. You will learn the exact measurements for a sleek profile that holds thick canvas prints or delicate baby photo frames. We cover wood selection, assembly techniques, and the secret to a perfectly level installation. By the end of this hour, you will have a custom photo ledge tailored to your specific wall length. We also examine the best picture ledge layout options for different room sizes. Whether you are a total beginner or a seasoned builder, these steps ensure a sturdy result. Expect to spend about fifteen dollars on materials and forty five minutes on labor. My own first attempt took fifty minutes and I am not naturally handy.
Why is a picture ledge better than a gallery wall?
Standard gallery walls require precise math. If you move one frame, you often have to move them all to keep the balance. In my experience, this leads to decor paralysis. You leave the frames in a box because the task feels too big. A picture ledge changes the rules. It creates a permanent stage for your art. You can lean a large print against the wall and overlap it with smaller baby photo frames. This depth creates a sophisticated look that flat frames cannot match.
Ledges also solve the problem of rental restrictions. Instead of twelve nails, you use two sturdy anchors. If you enjoy changing your decor for seasons or holidays, the ledge is your best friend. I have seen this work wonders in home offices where visual inspiration needs to change frequently. You simply slide one piece out and slide a new one in. No hammer is required. I personally love swapping my family photos every spring without touching a single tool.
Flexible styling for every room
I have used these ledges in narrow hallways where a traditional table would block the path. The slim profile keeps the floor clear while adding personality to the space. In a nursery, a low picture ledge serves as a book display. It allows toddlers to see the covers and pick their own stories. This accessibility encourages reading early on. I noticed my nephew started grabbing books more often once we moved them from a high shelf to a reachable ledge.
Saving your drywall from damage
Every time you hammer a nail, you risk hitting a pipe or creating a large hole. A picture ledge uses long screws that go directly into the wall studs. This is a much more secure way to hang heavy items. You can put several pounds of glass and wood on a single ledge without worrying about it pulling out. I once tried to hang a heavy mirror with just a nail and it took a chunk of plaster with it. Now I trust the structural integrity of a well mounted ledge.
What wood should you buy for a sturdy ledge?
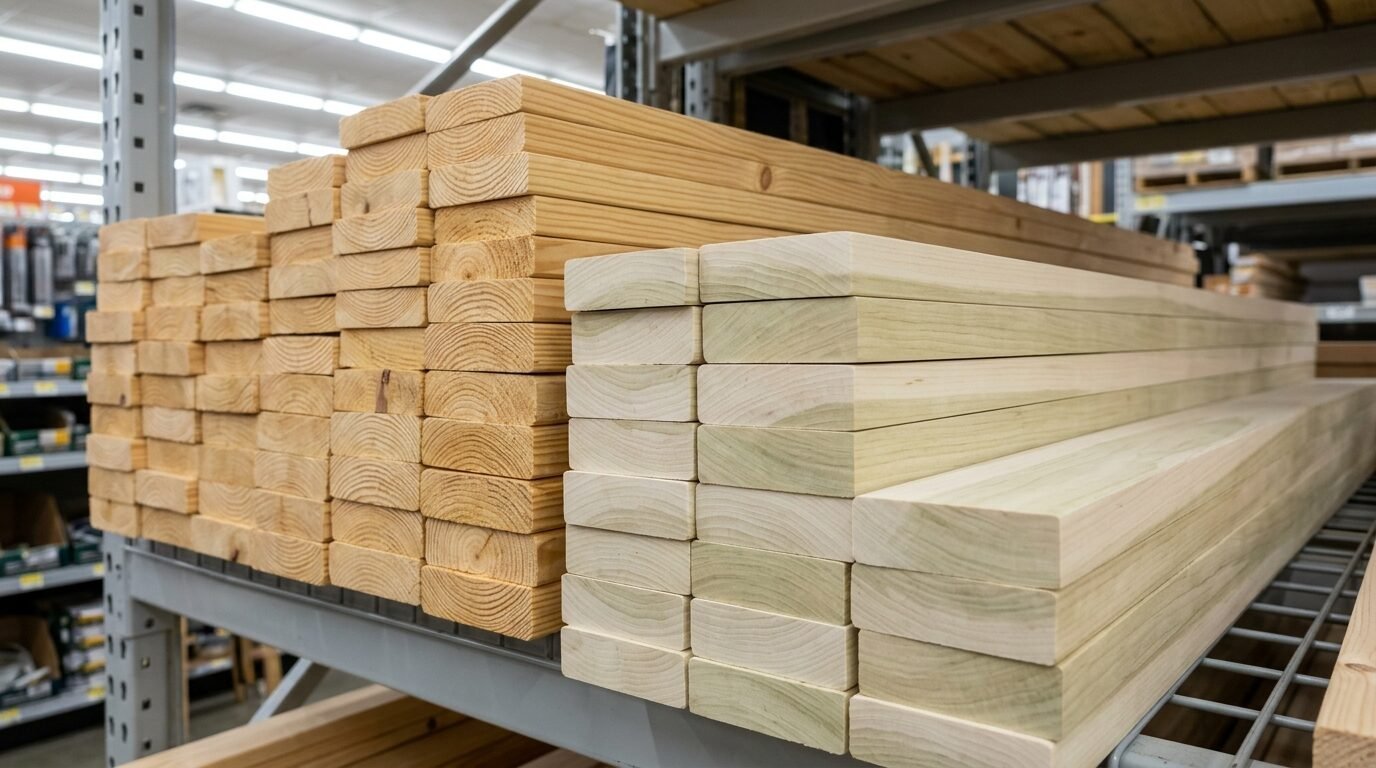
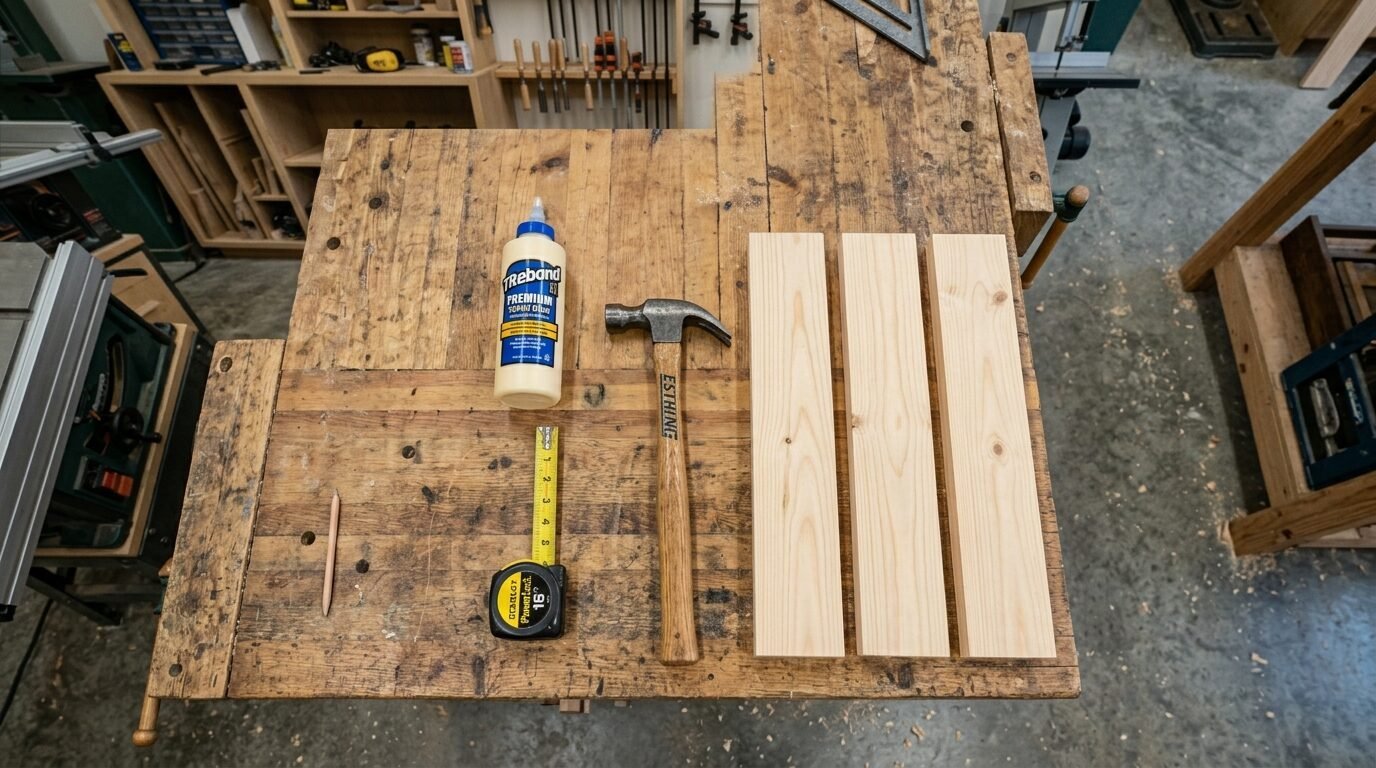
Quality results start with the right wood. For a standard 4 foot ledge, you need three pieces of lumber. I prefer using 1×2 and 1×3 pine boards. Pine is lightweight and affordable. It takes stain beautifully. You will need one 1×3 board for the base where the frames sit. You need one 1×2 board for the back that attaches to the wall. Finally, you need one 1×2 board for the front lip that keeps the frames from sliding off.
I buy my lumber at the local hardware store. They usually have a scrap bin where you can find these small pieces for very little money. You will also need a bottle of wood glue. I have tried generic brands but the professional strength yellow glue holds the best. A small box of 1.25 inch finish nails and a hammer are essential. Do not forget 220 grit sandpaper for a smooth finish.
Choosing between pine and poplar
If you plan to paint your ledge, poplar is a great choice. It has a tighter grain than pine. This means you will not see as many knots or wood patterns through the paint. Pine is better if you want a rustic or natural look. I used oak for a ledge in my living room once. It was much heavier and more expensive. For your first project, stick with pine. It is forgiving and easy to sand if you make a mistake.
Checking for straight boards
This is the most important part of the shopping trip. I have seen people grab the first boards they see and end up with a warped ledge. Lay each board on the flat floor of the store. If it wobbles or has a gap, put it back. Look down the length of the board like you are aiming a bow. If it curves to the left or right, it will be impossible to mount flat against the wall. I spent twenty minutes picking out perfectly straight boards for my last project and it made the assembly so much easier.
How do you build a picture ledge in three steps?
Preparation is the secret to a fast build. Cut your boards to your desired length first. Ensure the ends are perfectly square. If you do not own a saw, most hardware stores will cut the wood for you for free. Once your pieces are ready, follow this assembly sequence.
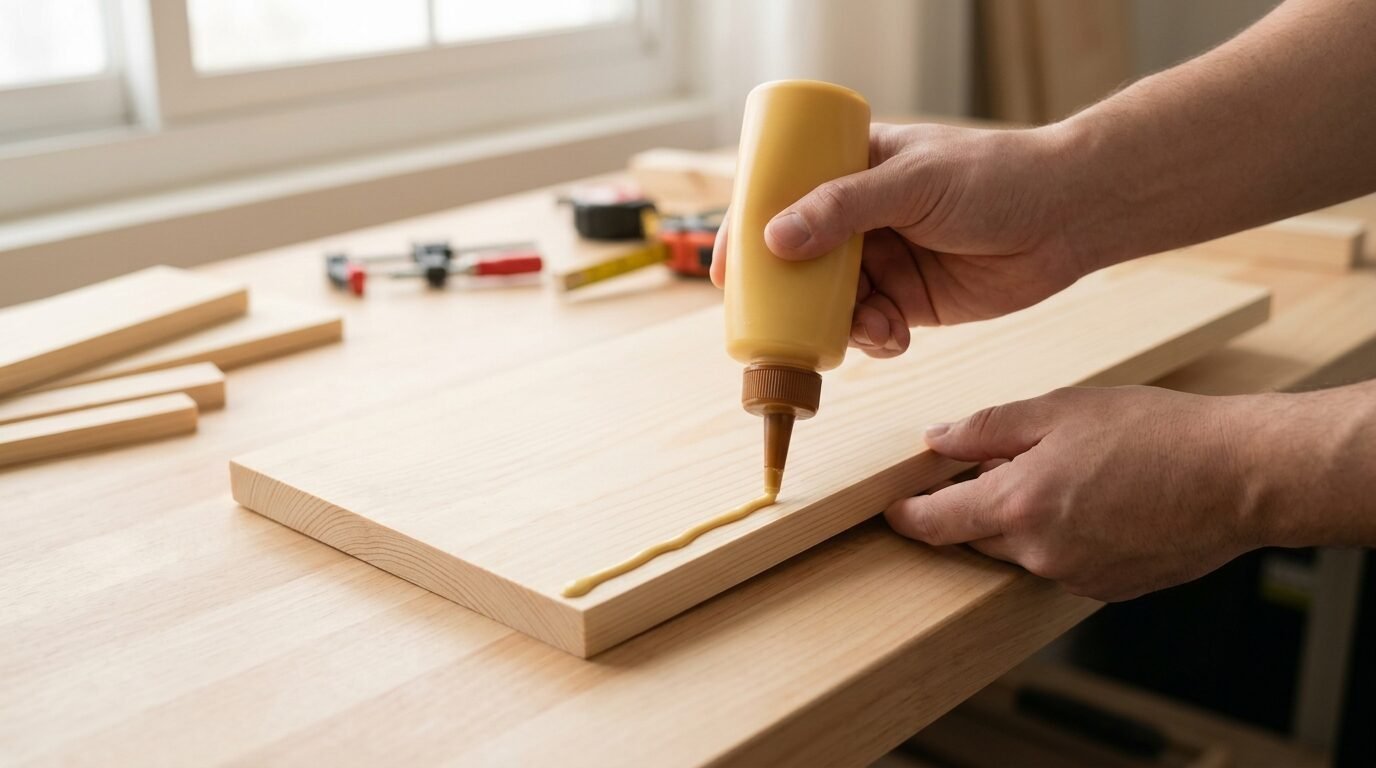
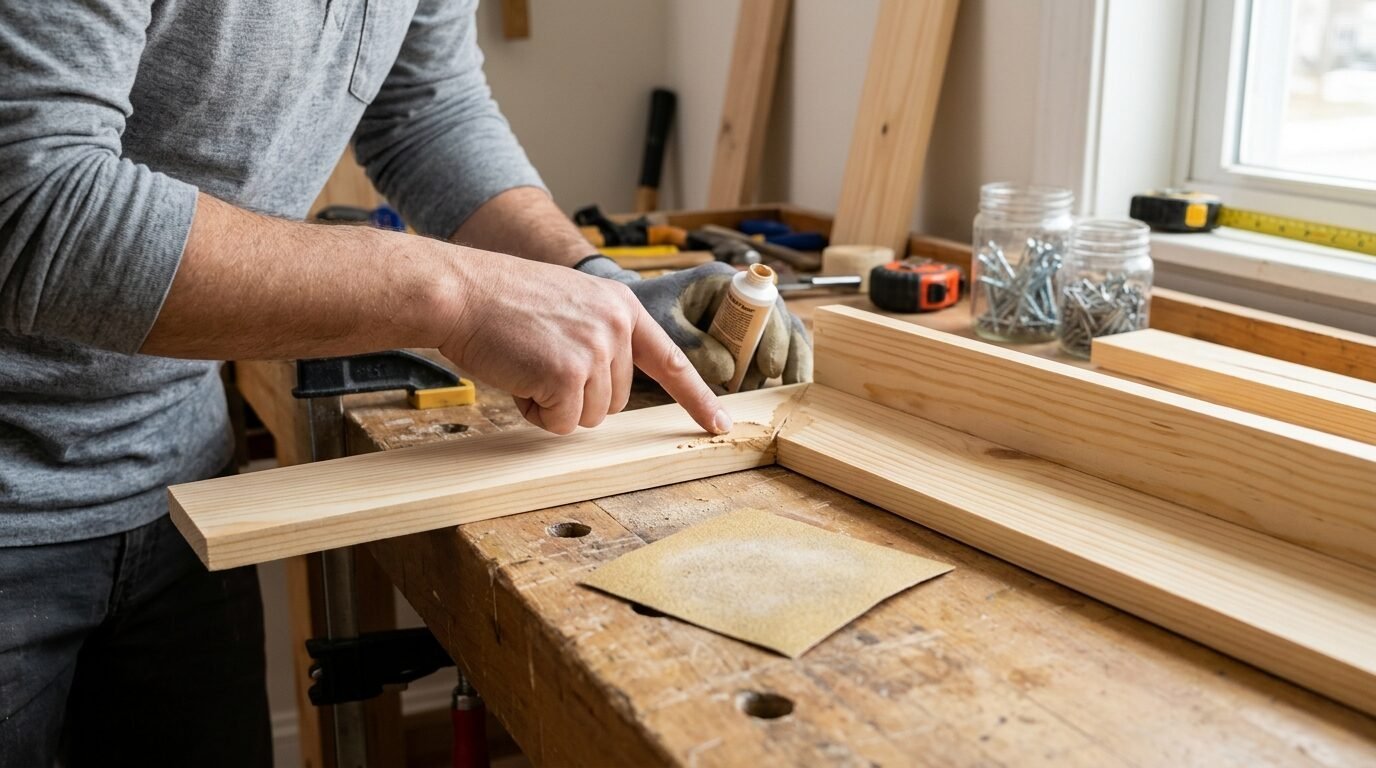
Step 1 Connect the base to the back
Apply a thin bead of wood glue along the edge of your 1×3 base board. Press the 1×2 back board against the glued edge. The back board should sit on top of the base. This creates an L shape. Drive finish nails every 6 inches to hold them together while the glue dries. I always wipe away the glue that squeezes out with a damp cloth immediately. If you let it dry, it will block the stain from soaking in.
Step 2 Secure the front lip
Flip the assembly over. Apply glue to the front edge of the 1×3 base. Press the second 1×2 board against this edge. This creates the U shape or trough. This lip prevents your baby photo frames from vibrating off the shelf. Nail this piece into place just like the back board. I like to use a nail set to push the nail heads just below the surface of the wood. This allows me to hide the holes with a little bit of wood filler later.
Step 3 Finish and sand
Once the glue sets for twenty minutes, sand every surface. Focus on the joints to make them look like one solid piece of wood. I noticed that spending an extra ten minutes on 220 grit sandpaper makes a massive difference. The wood feels soft like velvet. Apply your favorite wood stain or paint. Let it dry completely before mounting. I used a dark walnut stain on my last project and it looked like a high end boutique find.
Where are the best places to hang a photo ledge?

Deciding on the location is just as important as the build itself. You want the ledge to be a focal point without interfering with the flow of the room. I have experimented with several spots in my home. Some worked perfectly while others felt cramped.
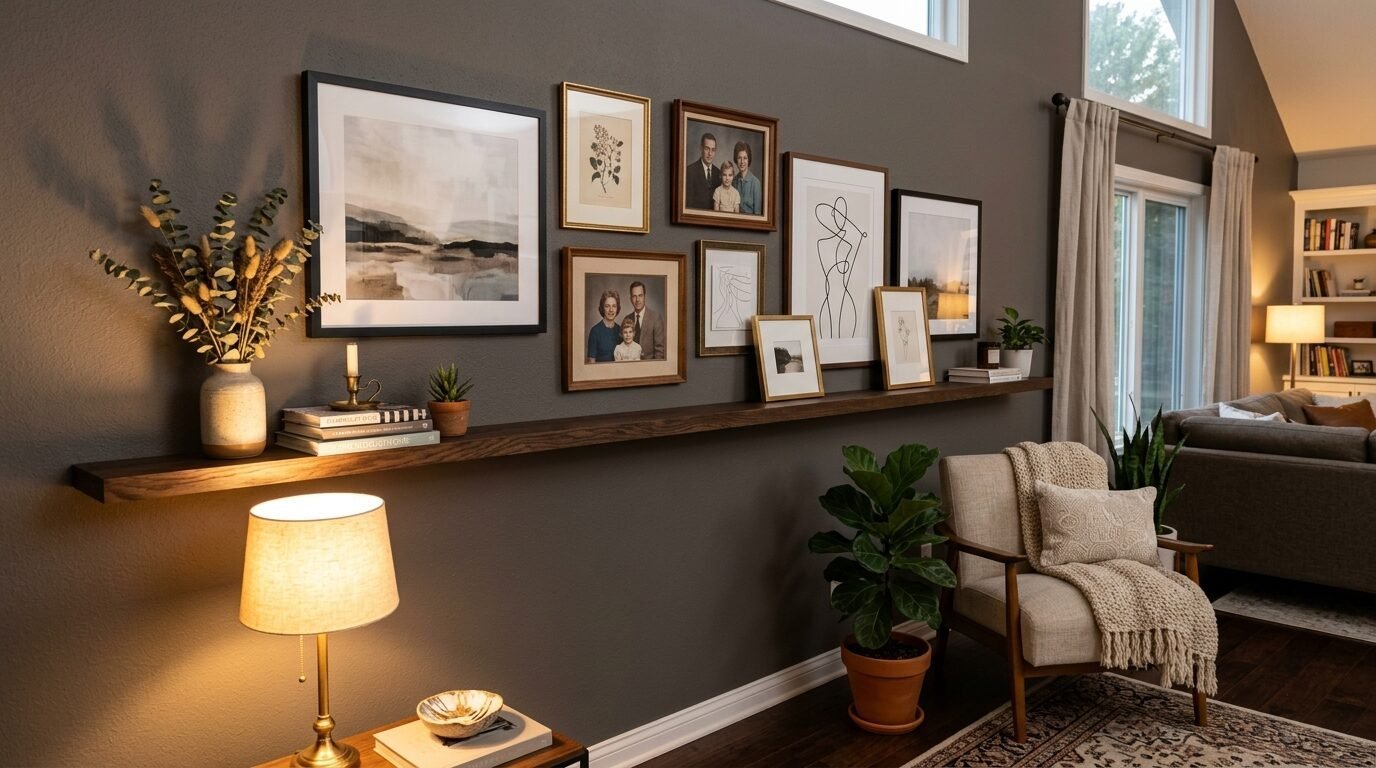
The living room focal wall
A long picture ledge above a sofa is a classic move. It draws the eye up and makes the ceiling feel higher. I suggest hanging it about 10 inches above the top of the sofa. This leaves enough room for people to lean back without hitting the ledge. You can use this space for large family portraits mixed with smaller travel photos. I noticed that a 6 foot ledge works best for most standard three seater sofas.
The long hallway transition
Hallways are often boring and wasted space. A picture ledge turns a walk between rooms into a gallery experience. Since hallways are usually narrow, a 1×3 base is perfect because it does not stick out too far. I mounted a series of three ledges in my hallway. I filled them with black and white photos of my parents and grandparents. It creates a beautiful timeline that guests love to look at.
The nursery or kids room
Safety is the priority here. I mounted a ledge at shoulder height in my daughter’s nursery. This kept the baby photo frames out of reach while she was in her crib. As she got older, I moved the ledge down so she could reach her favorite board books. Using a picture ledge for books saves a lot of floor space compared to a bulky bookshelf. I used poplar wood for this one because it paints so smoothly in pastel colors.
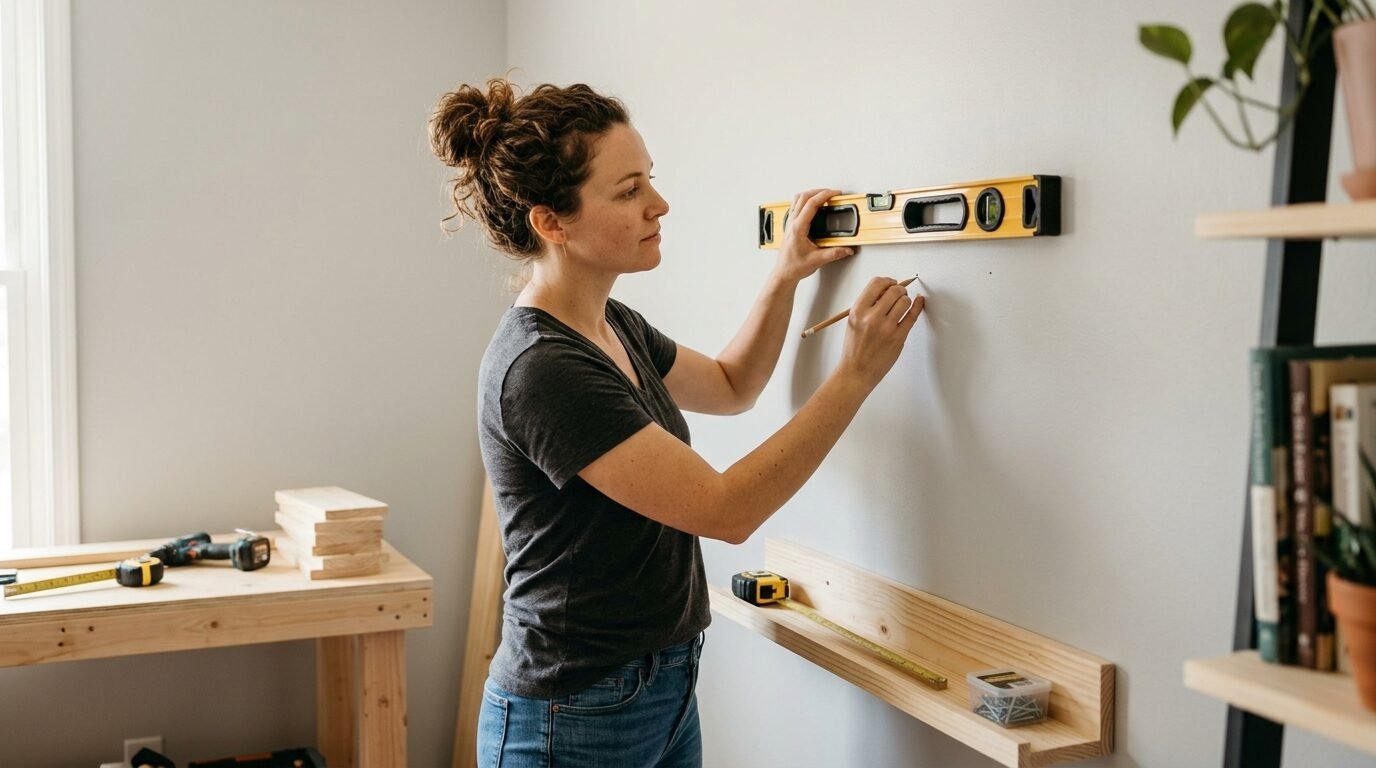
How do you mount the ledge securely?
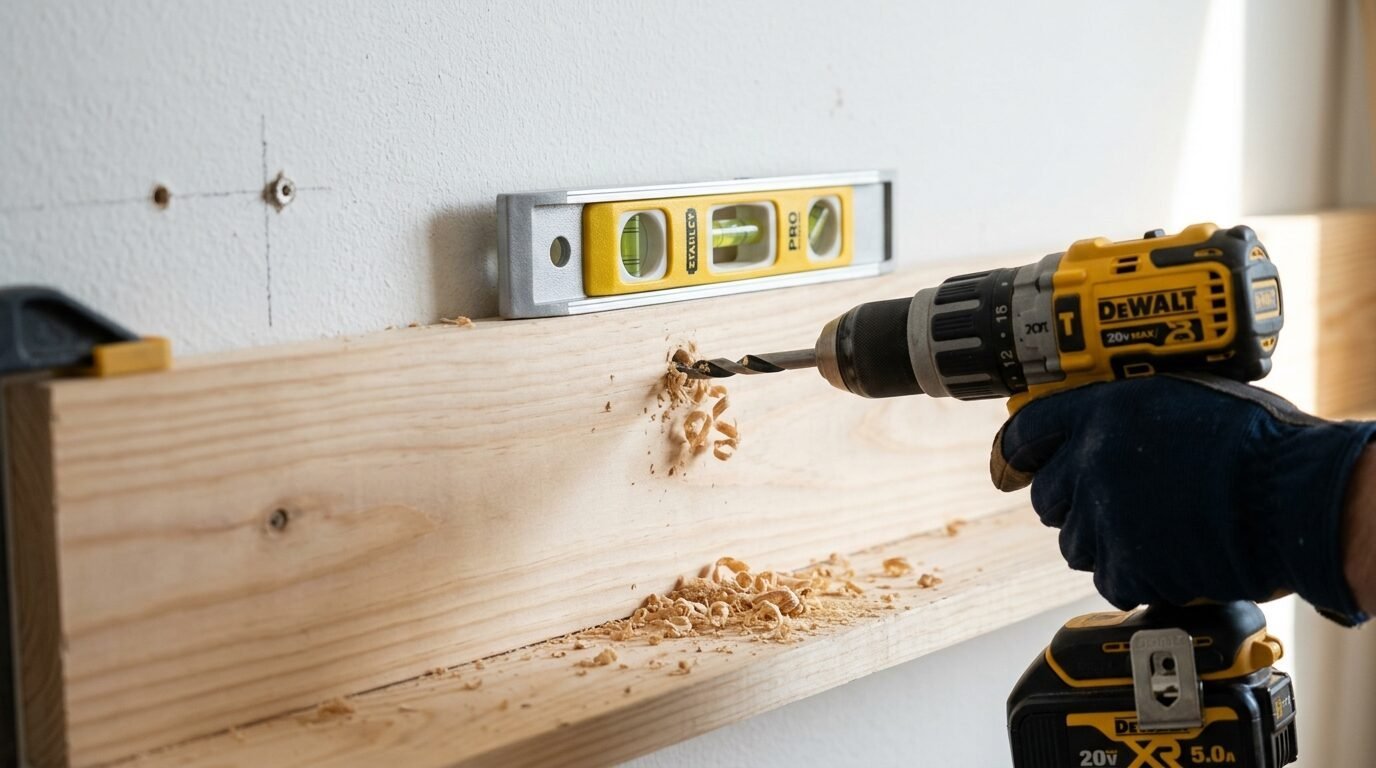
Installation is where many people get nervous. A falling shelf can ruin expensive baby photo frames or damage your floors. To avoid this, you must find the wall studs. Use a stud finder to mark the vertical wood beams behind your drywall. If your ledge is 4 feet long, you should be able to hit at least two studs.
Using the right hardware
If studs are not in the right spot, use heavy duty toggle bolts. These expand behind the wall for a rock solid grip. I have seen plastic screw in anchors fail under the weight of glass frames. Avoid them for this project. Hold the ledge against the wall and place your level on the base. Mark the mounting holes through the back board. Drill pilot holes to prevent the wood from splitting. Drive your screws directly into the studs or anchors. Your ledge is now ready for styling.
The importance of pilot holes
I once skipped the pilot holes and split my back board in half. Do not make that mistake. A pilot hole is a small hole you drill before putting in the screw. It removes some of the wood so the screw does not force the fibers apart. Use a drill bit that is slightly smaller than the shank of your screw. This ensures the threads still have plenty of wood to grab onto. It only takes an extra two minutes but saves you from starting the whole project over.
How do you style baby photo frames for a cohesive look?
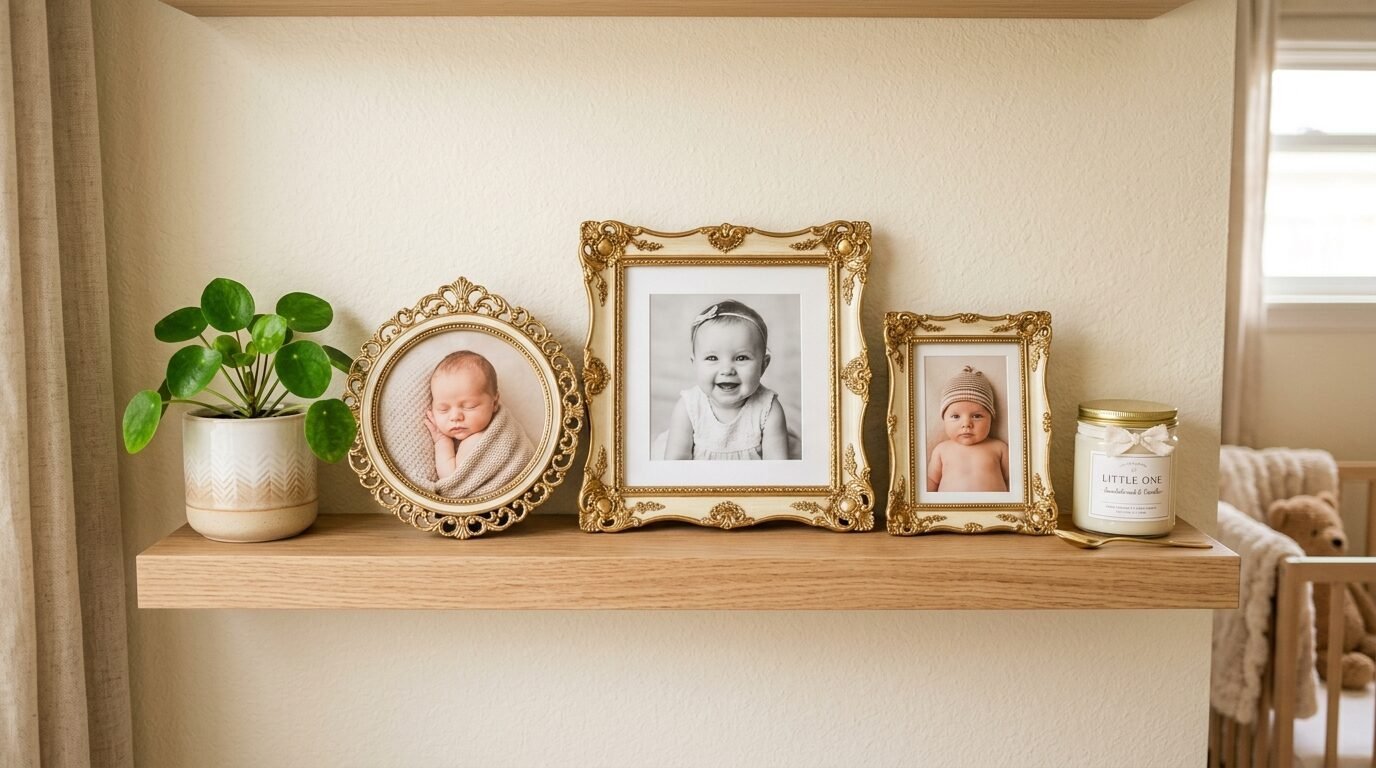
Styling is an art form. The goal is to create a look that feels curated rather than messy. I have found that the Rule of Three is the most effective way to organize photo displays. Group items in odd numbers. Mix different sizes of baby photo frames to create visual interest.
Layering and depth
Start with your largest piece. Place it slightly off center. Layer smaller frames in front of it. Use items with different textures to add depth. A small succulent or a wooden candle holder breaks up the straight lines of the frames. For a nursery, mixing baby photo frames with a small wooden toy or a framed birth announcement creates a sentimental focal point. Keep the color palette consistent. If you use black frames, stick to black or natural wood for the rest of the display.
Choosing a color theme
I noticed that sticking to one or two colors for your frames makes the wall look more expensive. If you have colorful photos, use white or light wood frames to let the pictures stand out. If your photos are black and white, you can use bold black frames for a dramatic look. I once tried to mix gold, silver, and wood frames on one ledge. It looked cluttered and confusing. Now I pick one metal or one wood tone and stick to it. This creates a calm and professional appearance.
Which tools are actually worth buying?
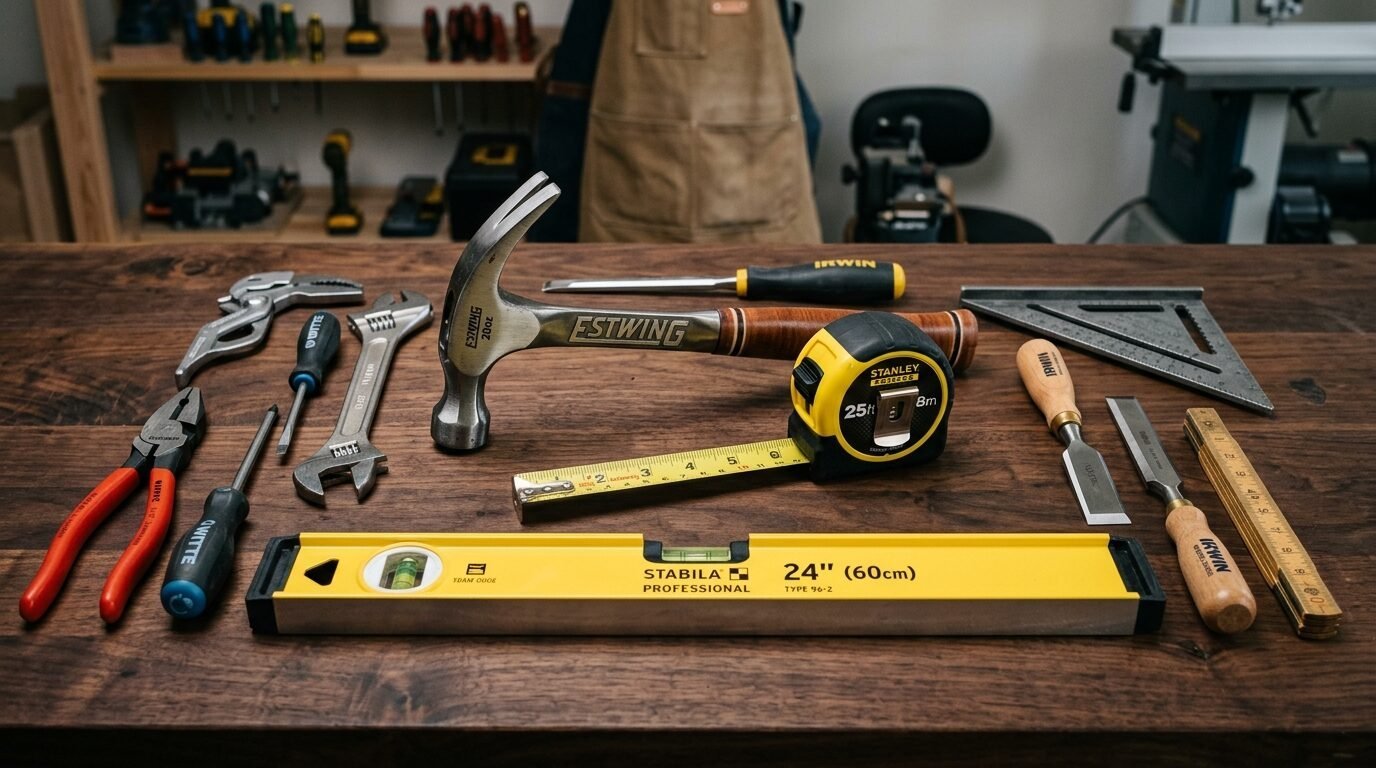
You do not need a garage full of power tools to build a picture ledge. However, a few specific items will make your life much easier. I have wasted money on cheap tools that broke after one use. Here is what I actually recommend for a beginner.
The essential beginner kit
A standard 16 ounce hammer is perfect for this. I use a Stanley FatMax because the grip is comfortable. For the level, a 24 inch aluminum level is best. It is long enough to be accurate but small enough to store easily. I also recommend a high quality tape measure. Cheap ones tend to bend and give inaccurate readings. I have used the same 25 foot Milwuaukee tape for five years.
Investing in a small drill
If you plan to do more DIY home decor projects, a 12 volt cordless drill is a great investment. It is lightweight and powerful enough for almost anything around the house. I use mine for mounting the ledges and pre drilling the holes. You can find a good one for under sixty dollars. I noticed that having a cordless drill made me much more likely to start new projects because it was not a hassle to set up.
How much does a DIY picture ledge really cost?
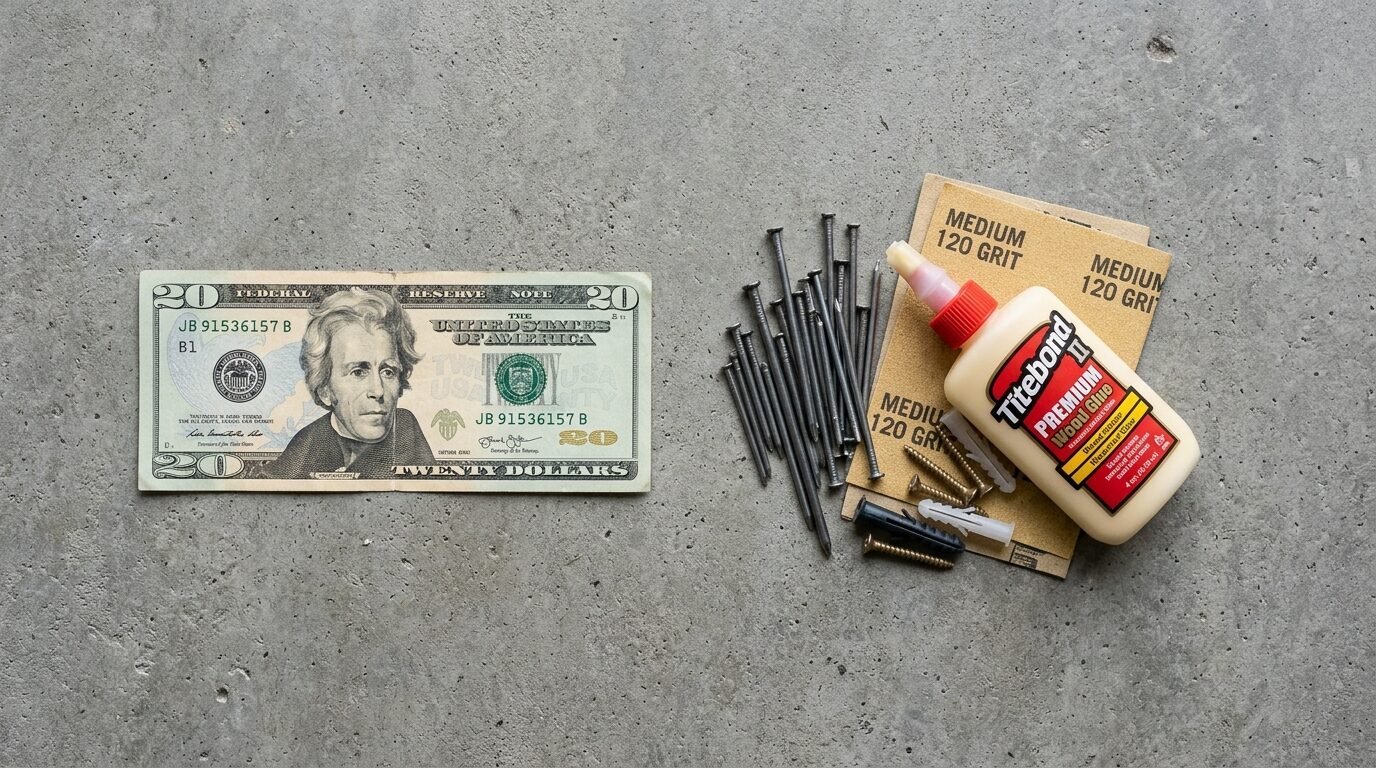
Budgeting is a big part of why we DIY. You can buy a pre made ledge, but the quality is often lower. Most store bought ledges are made of MDF or plastic. When you build your own, you get solid wood for a fraction of the price.
| Item | Estimated Cost | Notes |
| 1×3 Pine Board | $6.00 | 8 foot length |
| 1×2 Pine Board | $8.00 | Two 8 foot lengths |
| Wood Glue | $4.00 | Small bottle lasts for 10 projects |
| Finish Nails | $3.00 | Small box |
| Sandpaper | $2.00 | Two sheets |
| Total | $23.00 | Builds two 4 foot ledges |
This breakdown shows that you can build two high quality ledges for about eleven dollars each. A similar solid wood ledge from a high end store could cost fifty dollars for just one. I saved over eighty dollars on my hallway project by building them myself. That extra money went toward buying nicer baby photo frames.
How do you fix common picture ledge mistakes?
Even experienced builders run into issues. I have made plenty of mistakes over the years. The good news is that most of them are easy to fix with a little patience.
Dealing with warped wood
If your ledge looks curved after you glue it, you might have used too much pressure with your nails. You can sometimes fix this by wetting the back of the wood slightly and clamping it to a flat surface overnight. I learned to be very careful when selecting wood at the store to avoid this. If a board is badly warped, it is usually better to just buy a new one for three dollars than to spend hours trying to flatten it.
Hiding nail holes and gaps
If your joints are not perfectly tight, do not panic. Wood filler is your best friend. Choose a filler that matches the color of your wood. Press it into the holes and gaps with your finger. Once it dries, sand it flat. I noticed that after staining, the filler becomes almost invisible. I always keep a small tub of wood filler in my junk drawer for quick touch ups.
Frequently Asked Questions about DIY Picture Ledges
How much weight can a picture ledge hold?
If you mount your ledge into at least two wall studs, it can easily hold twenty pounds. Most baby photo frames and art prints weigh less than two pounds each. I have never had a ledge sag or pull away from the wall when it was properly secured to the studs. Just avoid putting heavy stacks of books on a 1×3 base.
Can I build this without a saw?
Yes. Most big hardware stores have a cutting station. You can bring your measurements and they will cut the pine boards for you. This is a great option if you live in an apartment or do not want to buy a saw yet. I used the store saw for my first three projects until I felt ready to buy my own miter saw.
What is the best picture ledge layout for a bedroom?
I love the look of two long ledges stacked on top of each other on the wall opposite the bed. It gives you a place to put art and even a small alarm clock or phone. Make sure to leave about 12 inches of vertical space between them so your taller frames fit comfortably. This layout feels very cozy and intentional.
How do I stop the wood from soaking up too much stain?
Pine is very porous. If you apply stain directly, it can look splotchy. I recommend using a wood conditioner first. It seals the pores so the stain goes on evenly. I noticed a huge improvement in the finish of my ledges once I started using a pre stain conditioner. It only takes five minutes to apply.
Is it hard to keep the ledge level?
It is not hard if you have a second pair of hands. Have someone hold the ledge against the wall while you check the level. Once the bubble is centered, make a small pencil mark through the screw holes. This ensures the ledge stays perfectly flat while you are drilling. I have tried to do it alone and it always ends up slightly crooked.
Can I use these for kitchen spice jars?
Absolutely. A picture ledge is the perfect depth for spice jars. I built a three foot ledge for my kitchen and it cleared up so much counter space. The front lip keeps the jars from falling off when you are reaching for something. I suggest painting it with a semi gloss finish so it is easy to wipe down in the kitchen.
What size screws should I use for mounting?
I recommend using 2.5 inch wood screws. This length allows the screw to pass through the back board and deep into the wall stud. If you use screws that are too short, they will only grab the drywall, which is not strong enough. I always keep a box of 2.5 inch gold construction screws in my toolkit.
How do I remove a ledge if I move out?
Since you only used two or three screws, removal is easy. Just unscrew the ledge and fill the holes with a tiny bit of spackle. Once the spackle dries, sand it and dab on a little bit of wall paint. It takes about ten minutes to make the wall look like new. This is why ledges are so much better for renters than gallery walls.
Can I make the base wider than 3 inches?
You can, but the ledge will become much heavier. A 1×4 base provides more room for decor, but it also increases the leverage on the wall screws. If you go wider than 3 inches, you must ensure every screw hits a wall stud. I find that 1×3 is the perfect balance of function and safety for most homes.
Do I need to use wood glue?
Yes. Do not skip the glue. Nails hold the boards in place, but the glue provides the actual strength. Over time, nails can pull loose as the wood expands and contracts with the weather. Glue creates a permanent bond that will not fail. I have never had a glued joint break in all my years of building.
Summary of your weekend project
Building a DIY picture ledge is a fast way to change the feel of your home. It takes less than an hour and costs less than a pizza. You get to control the length, the color, and the placement. In my experience, these small projects provide the most satisfaction because you see the results immediately. You can finally take those baby photo frames out of the box and put them on display. Your home will feel more personal and organized. Start with one ledge in a small room and see how you like it. I bet you will be back at the hardware store for more wood by next weekend.

Anya Castellan is the Founder and Editor-in-Chief of Home Wall Trends. An art history graduate of the Rhode Island School of Design with twelve years of experience writing for leading American design publications, she specializes in composition, gallery wall theory, and the quiet architecture of domestic space. A former contributing editor at Architectural Digest and guest lecturer at Parsons School of Design, Anya personally reads and signs off on every piece before it is published.
